<?xml version="1.0" encoding="utf-8"?>
<feed xmlns="http://www.w3.org/2005/Atom">
    <id>https://www.wavemaker.com/learn/blog</id>
    <title>WaveMaker Docs Blog</title>
    <updated>2024-07-29T00:00:00.000Z</updated>
    <generator>https://github.com/jpmonette/feed</generator>
    <link rel="alternate" href="https://www.wavemaker.com/learn/blog"/>
    <subtitle>WaveMaker Docs Blog</subtitle>
    <icon>https://www.wavemaker.com/learn/img/WM_blue_logo.png</icon>
    <entry>
        <title type="html"><![CDATA[Say Hello to Angular 17]]></title>
        <id>https://www.wavemaker.com/learn/blog/2024/07/29/angular-17-update</id>
        <link href="https://www.wavemaker.com/learn/blog/2024/07/29/angular-17-update"/>
        <updated>2024-07-29T00:00:00.000Z</updated>
        <summary type="html"><![CDATA[---]]></summary>
        <content type="html"><![CDATA[<hr><p>WaveMaker released version <a href="/learn/wavemaker-release-notes/v11-8-0">11.8.0</a> on July 29, 2024. This update includes a significant upgrade to Angular 17. This upgrade is expected to enhance your application's performance and development experience.</p><h2 class="anchor anchorWithStickyNavbar_LWe7" id="angular-17">Angular 17<a href="#angular-17" class="hash-link" aria-label="Direct link to Angular 17" title="Direct link to Angular 17">​</a></h2><table><thead><tr><th>Current version</th><th>Updating to</th></tr></thead><tbody><tr><td>Angular 16.2.12</td><td>17.3.11</td></tr></tbody></table><p>The move from Angular 16 to 17 brings noticeable performance improvements, including faster load times and smoother visuals. This translates to a better user experience overall. Additionally, the upgrade enhances the stability and reliability of applications.</p><p>To learn more, see <a href="https://blog.angular.dev/introducing-angular-v17-4d7033312e4b" target="_blank" rel="noopener noreferrer">Angular Version 17 - what's in the release</a>.</p>]]></content>
        <author>
            <name>Naresh Ravulapalli</name>
        </author>
    </entry>
    <entry>
        <title type="html"><![CDATA[Expo 50 for React Native Released with 11.8.0]]></title>
        <id>https://www.wavemaker.com/learn/blog/2024/07/25/expo-50</id>
        <link href="https://www.wavemaker.com/learn/blog/2024/07/25/expo-50"/>
        <updated>2024-07-25T00:00:00.000Z</updated>
        <summary type="html"><![CDATA[---]]></summary>
        <content type="html"><![CDATA[<hr><p>WaveMaker family, we are excited to announce the latest iteration of our platform, <a href="/learn/wavemaker-release-notes/v11-8-0/">WaveMaker 11.8.0</a>, and it’s packed with significant enhancements - most notably, the upgrade to Expo SDK 50.</p><h2 class="anchor anchorWithStickyNavbar_LWe7" id="why-this-upgrade-matters">Why this Upgrade Matters<a href="#why-this-upgrade-matters" class="hash-link" aria-label="Direct link to Why this Upgrade Matters" title="Direct link to Why this Upgrade Matters">​</a></h2><p>We know developers are always on the lookout for tools that simplify workflows and enhance efficiency. With this new version, we’ve not only improved performance but also brought in new features that could help developers save time and effort in areas where frequent testing is needed. Here's a sneak peek at what you can expect.</p><h2 class="anchor anchorWithStickyNavbar_LWe7" id="react-native-073">React Native 0.73<a href="#react-native-073" class="hash-link" aria-label="Direct link to React Native 0.73" title="Direct link to React Native 0.73">​</a></h2><p>We’ve upgraded to React Native 0.73, bringing you the latest features, enhanced performance, and improved developer tools. Dive into the <a href="https://github.com/facebook/react-native/releases" target="_blank" rel="noopener noreferrer">React Native CHANGELOG</a> to see all the detailed enhancements.</p><h2 class="anchor anchorWithStickyNavbar_LWe7" id="improved-debugger-for-react-native-apps">Improved Debugger for React Native apps<a href="#improved-debugger-for-react-native-apps" class="hash-link" aria-label="Direct link to Improved Debugger for React Native apps" title="Direct link to Improved Debugger for React Native apps">​</a></h2><p>Take a closer look into the future with a new JavaScript debugger UI, which helps developers debug at the same time in preview. This debugger is still in development, but you can try it out now!</p><h3 class="anchor anchorWithStickyNavbar_LWe7" id="whats-new-here">What's new here<a href="#whats-new-here" class="hash-link" aria-label="Direct link to What's new here" title="Direct link to What's new here">​</a></h3><ul><li>A fresh, user-friendly interface for finding and fixing bugs.</li><li>Built on the same technology as the debugger you already know (from Expo CLI).</li></ul><h3 class="anchor anchorWithStickyNavbar_LWe7" id="try-it-out">Try it out<a href="#try-it-out" class="hash-link" aria-label="Direct link to Try it out" title="Direct link to Try it out">​</a></h3><p>To give it a spin, simply add this line to your terminal before starting your Expo project:</p><div class="language-bash codeBlockContainer_Ckt0 theme-code-block" style="--prism-color:#bfc7d5;--prism-background-color:#292d3e"><div class="codeBlockContent_biex"><pre tabindex="0" class="prism-code language-bash codeBlock_bY9V thin-scrollbar"><code class="codeBlockLines_e6Vv"><span class="token-line" style="color:#bfc7d5"><span class="token assign-left variable" style="color:rgb(191, 199, 213)">EXPO_USE_UNSTABLE_DEBUGGER</span><span class="token operator" style="color:rgb(137, 221, 255)">=</span><span class="token number" style="color:rgb(247, 140, 108)">1</span><span class="token plain"> npx expo start</span><br></span></code></pre><div class="buttonGroup__atx"><button type="button" aria-label="Copy code to clipboard" title="Copy" class="clean-btn"><span class="copyButtonIcons_eSgA" aria-hidden="true"><svg viewBox="0 0 24 24" class="copyButtonIcon_y97N"><path fill="currentColor" d="M19,21H8V7H19M19,5H8A2,2 0 0,0 6,7V21A2,2 0 0,0 8,23H19A2,2 0 0,0 21,21V7A2,2 0 0,0 19,5M16,1H4A2,2 0 0,0 2,3V17H4V3H16V1Z"></path></svg><svg viewBox="0 0 24 24" class="copyButtonSuccessIcon_LjdS"><path fill="currentColor" d="M21,7L9,19L3.5,13.5L4.91,12.09L9,16.17L19.59,5.59L21,7Z"></path></svg></span></button></div></div></div><p>This will activate the new debugger interface, giving you a smoother debugging experience.</p><h2 class="anchor anchorWithStickyNavbar_LWe7" id="improvement-in-npx-expo-run-command">Improvement in npx expo run Command<a href="#improvement-in-npx-expo-run-command" class="hash-link" aria-label="Direct link to Improvement in npx expo run Command" title="Direct link to Improvement in npx expo run Command">​</a></h2><p>Expo CLI will now prompt you to select a target platform if it's not explicitly named in the command. This is a small quality-of-life improvement that aligns the <code>npx expo run</code> UX with that of <code>eas build:run</code>. You can also use <code>npx expo run android</code> or <code>npx expo run ios</code> as alternatives to <code>run:android</code> and <code>run:ios</code>.</p><ol><li><code>npx expo run</code> - Prompts to select a platform.  </li><li><code>npx expo run android</code> - Runs on Android.  </li><li><code>npx expo run ios</code> - Runs on iOS.</li></ol><h2 class="anchor anchorWithStickyNavbar_LWe7" id="improved-error-messages-and-stack-traces">Improved Error Messages and Stack Traces<a href="#improved-error-messages-and-stack-traces" class="hash-link" aria-label="Direct link to Improved Error Messages and Stack Traces" title="Direct link to Improved Error Messages and Stack Traces">​</a></h2><p>Debugging just got a whole lot easier! Having the ability to read error messages quickly and having to put lesser efforts when developer runs into error is something that is most times overlooked at. Expo 50 offers more detailed and useful error messages and stack traces, making it faster to identify and resolve issues.</p><h2 class="anchor anchorWithStickyNavbar_LWe7" id="optimized-npx-expo-prebuild">Optimized npx expo prebuild<a href="#optimized-npx-expo-prebuild" class="hash-link" aria-label="Direct link to Optimized npx expo prebuild" title="Direct link to Optimized npx expo prebuild">​</a></h2><p>Skip the unnecessary dependency installations with the improved npx expo prebuild command. If there are no changes to the dependencies in package.json, the Node module installation step is skipped. This means a faster and cleaner prebuild process!</p><h2 class="anchor anchorWithStickyNavbar_LWe7" id="speedy-build-performance">Speedy Build Performance<a href="#speedy-build-performance" class="hash-link" aria-label="Direct link to Speedy Build Performance" title="Direct link to Speedy Build Performance">​</a></h2><p>WaveMaker 11.8.0 ensures that builds are quicker than ever before. This significant performance boost translates directly into a more efficient development cycle.</p><div class="theme-admonition theme-admonition-note alert alert--secondary admonition_WoCw"><div class="admonitionHeading_TMsN"><span class="admonitionIcon_Ibzs"><svg viewBox="0 0 14 16"><path fill-rule="evenodd" d="M6.3 5.69a.942.942 0 0 1-.28-.7c0-.28.09-.52.28-.7.19-.18.42-.28.7-.28.28 0 .52.09.7.28.18.19.28.42.28.7 0 .28-.09.52-.28.7a1 1 0 0 1-.7.3c-.28 0-.52-.11-.7-.3zM8 7.99c-.02-.25-.11-.48-.31-.69-.2-.19-.42-.3-.69-.31H6c-.27.02-.48.13-.69.31-.2.2-.3.44-.31.69h1v3c.02.27.11.5.31.69.2.2.42.31.69.31h1c.27 0 .48-.11.69-.31.2-.19.3-.42.31-.69H8V7.98v.01zM7 2.3c-3.14 0-5.7 2.54-5.7 5.68 0 3.14 2.56 5.7 5.7 5.7s5.7-2.55 5.7-5.7c0-3.15-2.56-5.69-5.7-5.69v.01zM7 .98c3.86 0 7 3.14 7 7s-3.14 7-7 7-7-3.12-7-7 3.14-7 7-7z"></path></svg></span>note</div><div class="admonitionContent_vXIg"><p>While we’re on Expo SDK 50, please note that Expo Go supports only the latest SDK version. Therefore, Expo Go for version 50 won’t be available on the Play Store or App Store.</p><h3 class="anchor anchorWithStickyNavbar_LWe7" id="compatibility-details">Compatibility Details<a href="#compatibility-details" class="hash-link" aria-label="Direct link to Compatibility Details" title="Direct link to Compatibility Details">​</a></h3><p><strong>Android</strong>: Download Expo 50 from Expo Go<br>
<strong>iOS</strong>: Not supported<br>
<strong>Android Emulator</strong>: Supported<br>
<strong>iOS Simulator</strong>: Supported  </p></div></div><h2 class="anchor anchorWithStickyNavbar_LWe7" id="how-to-get-started">How to Get Started<a href="#how-to-get-started" class="hash-link" aria-label="Direct link to How to Get Started" title="Direct link to How to Get Started">​</a></h2><p>Before diving in, ensure you have the following prerequisites installed:</p><ul><li>JDK 17</li><li>Android SDK 34</li><li><code>@wavemaker/wm-reactnative-cli@1.8.x</code></li></ul><p>And there you have it! WaveMaker 11.8.0 is here to supercharge your development process. Get ready to build, debug, and deploy faster and more efficiently.
Feel the power of WaveMaker with Expo SDK 50. 🚀</p>]]></content>
        <author>
            <name>Swetha Kundaram</name>
        </author>
    </entry>
    <entry>
        <title type="html"><![CDATA[Product Updates: June, July 2024]]></title>
        <id>https://www.wavemaker.com/learn/blog/2024/07/11/product-updates-june-july-2024</id>
        <link href="https://www.wavemaker.com/learn/blog/2024/07/11/product-updates-june-july-2024"/>
        <updated>2024-07-11T00:00:00.000Z</updated>
        <summary type="html"><![CDATA[---]]></summary>
        <content type="html"><![CDATA[<hr><p>We are happy to announce new updates in WaveMaker that will enhance your development experience and application quality. This is a product update for the months of June and July 2024.</p><h2 class="anchor anchorWithStickyNavbar_LWe7" id="support-for-java-17-and-21-deployment">Support for Java 17 and 21 Deployment<a href="#support-for-java-17-and-21-deployment" class="hash-link" aria-label="Direct link to Support for Java 17 and 21 Deployment" title="Direct link to Support for Java 17 and 21 Deployment">​</a></h2><p>WaveMaker now supports deployment on web servers using Java 17 and Java 21 alongside Java 11. This update prepares for future Java versions and enhances compatibility with modern libraries.</p><p><a href="/learn/blog/2024/06/24/java-update-17-and-21/">Read More</a></p><h2 class="anchor anchorWithStickyNavbar_LWe7" id="performance-improvements">Performance Improvements<a href="#performance-improvements" class="hash-link" aria-label="Direct link to Performance Improvements" title="Direct link to Performance Improvements">​</a></h2><ul><li>Dialogs now load their content only when you click them to open. This helps web pages with many complex dialogs load faster</li><li>Bind Dialog and Tab Loading: Tabs in the bind dialog now load only when needed, improving navigation speed and overall performance</li><li>Web pages with many dialogs, containing a lot of Widgets and Prefabs will now load and perform better with lazy loading; dialog content only loads when the dialog is clicked</li><li>Prefabs load faster; reducing the number of calls needed to access properties and configuration files</li><li>Optimized Angular builds to reduce the size of the generated application files (like <code>vendor.js</code> and <code>main.js</code>); the studio loads noticeably faster</li></ul><h2 class="anchor anchorWithStickyNavbar_LWe7" id="accessibility-enhancement-with-label-widgets">Accessibility Enhancement with Label Widgets<a href="#accessibility-enhancement-with-label-widgets" class="hash-link" aria-label="Direct link to Accessibility Enhancement with Label Widgets" title="Direct link to Accessibility Enhancement with Label Widgets">​</a></h2><p>WaveMaker improves accessibility by using semantic tags like <code>&lt;p&gt;</code> and <code>&lt;h1&gt;–&lt;h6&gt;</code> instead of <code>&lt;label&gt;</code> tags outside of forms. This change ensures compliance with accessibility standards.</p><p><a href="/learn/blog/2024/05/27/label-accessibility/">Read More</a></p><h2 class="anchor anchorWithStickyNavbar_LWe7" id="pull-request-flow-for-custom-vcs">Pull Request Flow for Custom VCS<a href="#pull-request-flow-for-custom-vcs" class="hash-link" aria-label="Direct link to Pull Request Flow for Custom VCS" title="Direct link to Pull Request Flow for Custom VCS">​</a></h2><p>Introducing a Pull Request (PR) flow for Version Control Systems like Bitbucket, GitHub, and GitLab, enhancing collaboration and code management for teams.</p><p><a href="/learn/app-development/deployment/pull-request-flow/">Read More</a></p><h2 class="anchor anchorWithStickyNavbar_LWe7" id="see-also">See Also<a href="#see-also" class="hash-link" aria-label="Direct link to See Also" title="Direct link to See Also">​</a></h2><p><a href="/learn/wavemaker-release-notes/v11-7-5">v11.7.5</a> - Release date: 08 July 2024<br>
<a href="/learn/wavemaker-release-notes/v11-7-4/">v11.7.4</a> - Release date: 01 July 2024<br>
<a href="/learn/wavemaker-release-notes/v11-7-3">v11.7.3</a> - Release date: 17 June 2024</p>]]></content>
        <author>
            <name>Swetha Kundaram</name>
        </author>
    </entry>
    <entry>
        <title type="html"><![CDATA[Support for Application Deployment with Java 17 and 21]]></title>
        <id>https://www.wavemaker.com/learn/blog/2024/06/24/java-update-17-and-21</id>
        <link href="https://www.wavemaker.com/learn/blog/2024/06/24/java-update-17-and-21"/>
        <updated>2024-06-24T00:00:00.000Z</updated>
        <summary type="html"><![CDATA[---]]></summary>
        <content type="html"><![CDATA[<hr><p>This blog post provides an important update for developers regarding the support for application deployments with Java 17 and 21. Starting with release 11.7.4, WaveMaker applications will now support deployment on web servers running Java 17 and Java 21, along with continued support for Java 11.</p><h2 class="anchor anchorWithStickyNavbar_LWe7" id="java-17-and-21-deployment-support">Java 17 and 21 Deployment Support<a href="#java-17-and-21-deployment-support" class="hash-link" aria-label="Direct link to Java 17 and 21 Deployment Support" title="Direct link to Java 17 and 21 Deployment Support">​</a></h2><p>While WaveMaker applications can now be deployed on web servers using Java 17 and Java 21, the features and syntax of these Java versions cannot be used as compilation still requires Java 11.</p><h2 class="anchor anchorWithStickyNavbar_LWe7" id="what-you-need-to-do-upgrade-your-deployment-container">What You Need to Do: Upgrade Your Deployment Container<a href="#what-you-need-to-do-upgrade-your-deployment-container" class="hash-link" aria-label="Direct link to What You Need to Do: Upgrade Your Deployment Container" title="Direct link to What You Need to Do: Upgrade Your Deployment Container">​</a></h2><p>To deploy applications with Java 17 or Java 21, you need to update the Java version within your deployment container.</p><h2 class="anchor anchorWithStickyNavbar_LWe7" id="wavemaker-online-users">WaveMaker Online Users<a href="#wavemaker-online-users" class="hash-link" aria-label="Direct link to WaveMaker Online Users" title="Direct link to WaveMaker Online Users">​</a></h2><p>If you're using Wavemaker Online (WMO), you don't need to worry about immediate impacts. By default, WMO uses Java 11, so there will be no immediate disruptions for current users. However, the applications can be deployed externally using Java 17 or Java 21.</p><h2 class="anchor anchorWithStickyNavbar_LWe7" id="frequently-asked-questions">Frequently Asked Questions<a href="#frequently-asked-questions" class="hash-link" aria-label="Direct link to Frequently Asked Questions" title="Direct link to Frequently Asked Questions">​</a></h2><h4 class="anchor anchorWithStickyNavbar_LWe7" id="is-upgrading-to-java-17-or-21-mandatory">Is upgrading to Java 17 or 21 mandatory?<a href="#is-upgrading-to-java-17-or-21-mandatory" class="hash-link" aria-label="Direct link to Is upgrading to Java 17 or 21 mandatory?" title="Direct link to Is upgrading to Java 17 or 21 mandatory?">​</a></h4><p>No, upgrading is not mandatory.</p><h4 class="anchor anchorWithStickyNavbar_LWe7" id="why-the-push-for-java-17-and-21">Why the push for Java 17 and 21?<a href="#why-the-push-for-java-17-and-21" class="hash-link" aria-label="Direct link to Why the push for Java 17 and 21?" title="Direct link to Why the push for Java 17 and 21?">​</a></h4><p>Java 11 currently only has extended support. Libraries like Spring and other third-party libraries are actively being developed on Java 17 and above. From WaveMaker 12, we plan to move to Java 21 along with Spring and Hibernate upgrades.</p><h4 class="anchor anchorWithStickyNavbar_LWe7" id="do-i-need-to-update-my-cicd-pipeline">Do I need to update my CI/CD pipeline?<a href="#do-i-need-to-update-my-cicd-pipeline" class="hash-link" aria-label="Direct link to Do I need to update my CI/CD pipeline?" title="Direct link to Do I need to update my CI/CD pipeline?">​</a></h4><p>Yes, only if you want to deploy the application in Java 17 or Java 21.</p><h4 class="anchor anchorWithStickyNavbar_LWe7" id="can-i-use-java-17-and-21-language-features">Can I use Java 17 and 21 language features?<a href="#can-i-use-java-17-and-21-language-features" class="hash-link" aria-label="Direct link to Can I use Java 17 and 21 language features?" title="Direct link to Can I use Java 17 and 21 language features?">​</a></h4><p>No, only Java 11 language features and syntax can be used as code compilation requires Java 11.</p><h4 class="anchor anchorWithStickyNavbar_LWe7" id="can-i-run-maven-build-using-java-17-and-java-21">Can I run Maven build using Java 17 and Java 21?<a href="#can-i-run-maven-build-using-java-17-and-java-21" class="hash-link" aria-label="Direct link to Can I run Maven build using Java 17 and Java 21?" title="Direct link to Can I run Maven build using Java 17 and Java 21?">​</a></h4><p>Yes, Maven builds can be done using Java 17 and Java 21, but code compilation is done in Java 11.</p><h4 class="anchor anchorWithStickyNavbar_LWe7" id="which-web-servers-can-the-application-be-deployed">Which web servers can the application be deployed?<a href="#which-web-servers-can-the-application-be-deployed" class="hash-link" aria-label="Direct link to Which web servers can the application be deployed?" title="Direct link to Which web servers can the application be deployed?">​</a></h4><p>Any web servers that support Java 11/17/21 and Servlet 4.0, such as Apache Tomcat 9.x.</p>]]></content>
        <author>
            <name>Swetha Kundaram</name>
        </author>
    </entry>
    <entry>
        <title type="html"><![CDATA[Label widget Compliance for Accessibility]]></title>
        <id>https://www.wavemaker.com/learn/blog/2024/05/27/label-accessibility</id>
        <link href="https://www.wavemaker.com/learn/blog/2024/05/27/label-accessibility"/>
        <updated>2024-05-27T00:00:00.000Z</updated>
        <summary type="html"><![CDATA[---]]></summary>
        <content type="html"><![CDATA[<hr><p>In accordance with web accessibility standards, the <code>&lt;label&gt;</code> tag is specifically intended for use within Forms. To ensure proper accessibility, WaveMaker is implementing changes to how label widgets are handled. Therefore, the <code>&lt;label&gt;</code> tag used out of the forms will replace with <code>&lt;p&gt;</code>, <code>&lt;h1&gt;</code> to <code>&lt;h6&gt;</code> tags based on the class or type attribute of that element.</p><h3 class="anchor anchorWithStickyNavbar_LWe7" id="current-behavior">Current Behavior<a href="#current-behavior" class="hash-link" aria-label="Direct link to Current Behavior" title="Direct link to Current Behavior">​</a></h3><p>Previously, when dragging and dropping a Label widget onto the canvas and previewing it, the element would utilize the <code>&lt;label&gt;</code> tag with a class defined in the element. Additionally, changing the template layout to headings (H1, H2, etc.) would only modify the class, leaving the tag itself as <code>&lt;label&gt;</code>. This approach conflicts with accessibility guidelines.</p><h2 class="anchor anchorWithStickyNavbar_LWe7" id="improved-accessibility">Improved Accessibility<a href="#improved-accessibility" class="hash-link" aria-label="Direct link to Improved Accessibility" title="Direct link to Improved Accessibility">​</a></h2><p>To address this issue, WaveMaker is replacing the <code>&lt;label&gt;</code> tag with more appropriate semantic tags like <code>&lt;p&gt;</code> (paragraph) or <code>&lt;h1&gt;</code> to <code>&lt;h6&gt;</code> (headings) based on the class or type attribute of the element.</p><div class="theme-admonition theme-admonition-warning alert alert--danger admonition_WoCw"><div class="admonitionHeading_TMsN"><span class="admonitionIcon_Ibzs"><svg viewBox="0 0 12 16"><path fill-rule="evenodd" d="M5.05.31c.81 2.17.41 3.38-.52 4.31C3.55 5.67 1.98 6.45.9 7.98c-1.45 2.05-1.7 6.53 3.53 7.7-2.2-1.16-2.67-4.52-.3-6.61-.61 2.03.53 3.33 1.94 2.86 1.39-.47 2.3.53 2.27 1.67-.02.78-.31 1.44-1.13 1.81 3.42-.59 4.78-3.42 4.78-5.56 0-2.84-2.53-3.22-1.25-5.61-1.52.13-2.03 1.13-1.89 2.75.09 1.08-1.02 1.8-1.86 1.33-.67-.41-.66-1.19-.06-1.78C8.18 5.31 8.68 2.45 5.05.32L5.03.3l.02.01z"></path></svg></span>danger</div><div class="admonitionContent_vXIg"><p>If the styles are written by using the <code>&lt;label&gt;</code> tag then there may be a breakage in UI as <code>&lt;label&gt;</code> tag is replaced by <code>&lt;p&gt;</code> (paragraph) or <code>&lt;h1&gt;</code> to <code>&lt;h6&gt;</code> (headings), so please make changes to your styles accordingly.</p></div></div><h2 class="anchor anchorWithStickyNavbar_LWe7" id="how-it-works">How it Works<a href="#how-it-works" class="hash-link" aria-label="Direct link to How it Works" title="Direct link to How it Works">​</a></h2><p>Here's a breakdown of the changes:</p><p><strong>Default Behavior</strong>: When you drag and drop a label widget, the markup will now include class="p" and type="p" appended to the "wm-label" element by default. This translates to a <code>&lt;p&gt;</code> tag in the preview, ensuring proper accessibility.</p><p><strong>Template Layouts</strong>: Changing the template layout (e.g., H1, H2) will update both the class and type attributes accordingly. The preview will then reflect the corresponding heading tag (e.g., <code>&lt;h1&gt;</code>). Layouts like "Primary Text" and "Secondary Text" will continue to use the <code>&lt;p&gt;</code> tag.</p><p><strong>Implicit Conversion</strong>: Labels within widgets like cards, accordions, and panels will be automatically converted to the appropriate semantic tag (<code>&lt;p&gt;</code> or <code>&lt;h1&gt;</code> to <code>&lt;h6&gt;</code>) based on their existing class values.</p><h3 class="anchor anchorWithStickyNavbar_LWe7" id="addressing-potential-issues">Addressing Potential Issues<a href="#addressing-potential-issues" class="hash-link" aria-label="Direct link to Addressing Potential Issues" title="Direct link to Addressing Potential Issues">​</a></h3><div class="theme-admonition theme-admonition-note alert alert--secondary admonition_WoCw"><div class="admonitionHeading_TMsN"><span class="admonitionIcon_Ibzs"><svg viewBox="0 0 14 16"><path fill-rule="evenodd" d="M6.3 5.69a.942.942 0 0 1-.28-.7c0-.28.09-.52.28-.7.19-.18.42-.28.7-.28.28 0 .52.09.7.28.18.19.28.42.28.7 0 .28-.09.52-.28.7a1 1 0 0 1-.7.3c-.28 0-.52-.11-.7-.3zM8 7.99c-.02-.25-.11-.48-.31-.69-.2-.19-.42-.3-.69-.31H6c-.27.02-.48.13-.69.31-.2.2-.3.44-.31.69h1v3c.02.27.11.5.31.69.2.2.42.31.69.31h1c.27 0 .48-.11.69-.31.2-.19.3-.42.31-.69H8V7.98v.01zM7 2.3c-3.14 0-5.7 2.54-5.7 5.68 0 3.14 2.56 5.7 5.7 5.7s5.7-2.55 5.7-5.7c0-3.15-2.56-5.69-5.7-5.69v.01zM7 .98c3.86 0 7 3.14 7 7s-3.14 7-7 7-7-3.12-7-7 3.14-7 7-7z"></path></svg></span>note</div><div class="admonitionContent_vXIg"><p>As default class "p" is getting added when we drag and drop a label widget on to canvas now it will be a block element. But for previous projects we don't have class "p" as default so it will be a inline-block element.</p></div></div><h2 class="anchor anchorWithStickyNavbar_LWe7" id="differences-before-and-after-change">Differences Before and After change<a href="#differences-before-and-after-change" class="hash-link" aria-label="Direct link to Differences Before and After change" title="Direct link to Differences Before and After change">​</a></h2><p>This section showcases the visual differences between the previous and updated behavior.</p><h3 class="anchor anchorWithStickyNavbar_LWe7" id="label-in-markup">Label in Markup<a href="#label-in-markup" class="hash-link" aria-label="Direct link to Label in Markup" title="Direct link to Label in Markup">​</a></h3><ul><li>In the studio when we drag and drop a <strong>Label</strong> onto canvas and go to markup tab to see the differences as given below.</li></ul><p><strong>Before</strong></p><p><img loading="lazy" alt="Label Markup before" src="/learn/assets/images/label_before_markup-071f8d57f9dd0c9be229f843ef1477aa.png" width="976" height="118" class="img_ev3q"></p><p><strong>After</strong></p><p><img loading="lazy" alt="Label Markup after" src="/learn/assets/images/label_after_markup-9bae1db7ff3f46d27685ad165363b7a8.png" width="1198" height="114" class="img_ev3q"></p><ul><li>Click the label on canvas and then select the template layout option to "H1" then the class and type both gets updated to "h1".</li></ul><p><strong>Before</strong></p><p><img loading="lazy" alt="Label Markup before" src="/learn/assets/images/label_option_before-0be9c3af2345a90bfe3537445cae8a9c.png" width="1226" height="120" class="img_ev3q"></p><p><strong>After</strong></p><p><img loading="lazy" alt="Label Markup after" src="/learn/assets/images/label_option_after-1fac66387d831da5289eccef7bc08569.png" width="1272" height="116" class="img_ev3q"></p><h3 class="anchor anchorWithStickyNavbar_LWe7" id="label-in-preview">Label in Preview<a href="#label-in-preview" class="hash-link" aria-label="Direct link to Label in Preview" title="Direct link to Label in Preview">​</a></h3><ul><li>Click on preview and see the difference that <code>&lt;label&gt;</code> tag is getting replaced by <code>&lt;p&gt;</code> tag by default.</li></ul><p><strong>Before</strong></p><p><img loading="lazy" alt="Label Preview before" src="/learn/assets/images/label_preview_before-7ee744509e74fbde9a64c26fdeedde95.png" width="1364" height="44" class="img_ev3q"></p><p><strong>After</strong></p><p><img loading="lazy" alt="Label Preview after" src="/learn/assets/images/label_preview_after-d4df72ad457b81359d7eb4cead853829.png" width="1382" height="50" class="img_ev3q"> </p><div class="theme-admonition theme-admonition-note alert alert--secondary admonition_WoCw"><div class="admonitionHeading_TMsN"><span class="admonitionIcon_Ibzs"><svg viewBox="0 0 14 16"><path fill-rule="evenodd" d="M6.3 5.69a.942.942 0 0 1-.28-.7c0-.28.09-.52.28-.7.19-.18.42-.28.7-.28.28 0 .52.09.7.28.18.19.28.42.28.7 0 .28-.09.52-.28.7a1 1 0 0 1-.7.3c-.28 0-.52-.11-.7-.3zM8 7.99c-.02-.25-.11-.48-.31-.69-.2-.19-.42-.3-.69-.31H6c-.27.02-.48.13-.69.31-.2.2-.3.44-.31.69h1v3c.02.27.11.5.31.69.2.2.42.31.69.31h1c.27 0 .48-.11.69-.31.2-.19.3-.42.31-.69H8V7.98v.01zM7 2.3c-3.14 0-5.7 2.54-5.7 5.68 0 3.14 2.56 5.7 5.7 5.7s5.7-2.55 5.7-5.7c0-3.15-2.56-5.69-5.7-5.69v.01zM7 .98c3.86 0 7 3.14 7 7s-3.14 7-7 7-7-3.12-7-7 3.14-7 7-7z"></path></svg></span>note</div><div class="admonitionContent_vXIg"><p>Since the <code>&lt;p&gt;</code> tag is now added by default in the preview, it displays as a block-level element. However, existing labels use the <code>&lt;label&gt;</code> tag, which displays inline-block. To prevent UI breakage, the following styles have been added:</p></div></div><div class="language-css codeBlockContainer_Ckt0 theme-code-block" style="--prism-color:#bfc7d5;--prism-background-color:#292d3e"><div class="codeBlockContent_biex"><pre tabindex="0" class="prism-code language-css codeBlock_bY9V thin-scrollbar"><code class="codeBlockLines_e6Vv"><span class="token-line" style="color:#bfc7d5"><span class="token selector" style="color:rgb(199, 146, 234)">p</span><span class="token selector class" style="color:rgb(199, 146, 234)">.app-label</span><span class="token punctuation" style="color:rgb(199, 146, 234)">{</span><span class="token plain"></span><br></span><span class="token-line" style="color:#bfc7d5"><span class="token plain">   </span><span class="token property">display</span><span class="token punctuation" style="color:rgb(199, 146, 234)">:</span><span class="token plain">inline-block </span><br></span><span class="token-line" style="color:#bfc7d5"><span class="token plain"></span><span class="token punctuation" style="color:rgb(199, 146, 234)">}</span><span class="token plain"></span><br></span><span class="token-line" style="color:#bfc7d5"><span class="token plain"></span><span class="token selector" style="color:rgb(199, 146, 234)">p</span><span class="token selector class" style="color:rgb(199, 146, 234)">.p</span><span class="token selector class" style="color:rgb(199, 146, 234)">.app-label</span><span class="token punctuation" style="color:rgb(199, 146, 234)">{</span><span class="token plain"></span><br></span><span class="token-line" style="color:#bfc7d5"><span class="token plain">    </span><span class="token property">display</span><span class="token punctuation" style="color:rgb(199, 146, 234)">:</span><span class="token plain">block</span><span class="token punctuation" style="color:rgb(199, 146, 234)">;</span><span class="token plain"></span><br></span><span class="token-line" style="color:#bfc7d5"><span class="token plain"></span><span class="token punctuation" style="color:rgb(199, 146, 234)">}</span><br></span></code></pre><div class="buttonGroup__atx"><button type="button" aria-label="Copy code to clipboard" title="Copy" class="clean-btn"><span class="copyButtonIcons_eSgA" aria-hidden="true"><svg viewBox="0 0 24 24" class="copyButtonIcon_y97N"><path fill="currentColor" d="M19,21H8V7H19M19,5H8A2,2 0 0,0 6,7V21A2,2 0 0,0 8,23H19A2,2 0 0,0 21,21V7A2,2 0 0,0 19,5M16,1H4A2,2 0 0,0 2,3V17H4V3H16V1Z"></path></svg><svg viewBox="0 0 24 24" class="copyButtonSuccessIcon_LjdS"><path fill="currentColor" d="M21,7L9,19L3.5,13.5L4.91,12.09L9,16.17L19.59,5.59L21,7Z"></path></svg></span></button></div></div></div><h3 class="anchor anchorWithStickyNavbar_LWe7" id="cards-as-example">Cards as Example<a href="#cards-as-example" class="hash-link" aria-label="Direct link to Cards as Example" title="Direct link to Cards as Example">​</a></h3><ul><li>Drag and drop the <strong>Card</strong> widget and click Preview.</li></ul><p><strong>Before</strong></p><p><img loading="lazy" alt="Label Preview before" src="/learn/assets/images/cards_before-ecba9010b4c175362ca05fe6cdad182e.png" width="1600" height="1045" class="img_ev3q"></p><p><strong>After</strong></p><p><img loading="lazy" alt="Label Preview after" src="/learn/assets/images/cards_after-13e5c3a41af700aeab9fbdaf9b38a538.png" width="1600" height="1181" class="img_ev3q"> </p><p>Overall, these changes enhance the accessibility of WaveMaker applications by ensuring proper use of semantic tags for labels. This benefits users with disabilities by providing a more predictable and navigable interface.</p>]]></content>
        <author>
            <name>Bhargavi Gunda</name>
        </author>
    </entry>
    <entry>
        <title type="html"><![CDATA[Angular 16 Upgrade]]></title>
        <id>https://www.wavemaker.com/learn/blog/2024/04/29/angular-16-update</id>
        <link href="https://www.wavemaker.com/learn/blog/2024/04/29/angular-16-update"/>
        <updated>2024-04-29T00:00:00.000Z</updated>
        <summary type="html"><![CDATA[---]]></summary>
        <content type="html"><![CDATA[<hr><p>WaveMaker Release 11.7 is scheduled for the 29th of April 2024 and the release will include an update to Angular 16. This upgrade will enhance your application development experience and performance.</p><h2 class="anchor anchorWithStickyNavbar_LWe7" id="angular-15-new-features-and-enhancements">Angular 15 New Features and Enhancements<a href="#angular-15-new-features-and-enhancements" class="hash-link" aria-label="Direct link to Angular 15 New Features and Enhancements" title="Direct link to Angular 15 New Features and Enhancements">​</a></h2><table><thead><tr><th>Current version</th><th>Updating to</th></tr></thead><tbody><tr><td>Angular 15.2.x</td><td>16.2.x</td></tr></tbody></table><p>Angular 15 to 16 includes many performance improvements, such as faster startup times and improved rendering performance, allowing the apps to be more responsive and provide a better user experience. Also, it improves the stability and reliability of Angular applications.</p><h2 class="anchor anchorWithStickyNavbar_LWe7" id="recommendation">Recommendation<a href="#recommendation" class="hash-link" aria-label="Direct link to Recommendation" title="Direct link to Recommendation">​</a></h2><p>With the Angular 16 upgrade, it is suggested to use the latest compatible browser versions. </p><p>To understand more about the compatible browser versions, see <a href="https://angular.io/guide/browser-support" target="_blank" rel="noopener noreferrer">Angular Browser Support</a>.</p><div class="theme-admonition theme-admonition-note alert alert--secondary admonition_WoCw"><div class="admonitionHeading_TMsN"><span class="admonitionIcon_Ibzs"><svg viewBox="0 0 14 16"><path fill-rule="evenodd" d="M6.3 5.69a.942.942 0 0 1-.28-.7c0-.28.09-.52.28-.7.19-.18.42-.28.7-.28.28 0 .52.09.7.28.18.19.28.42.28.7 0 .28-.09.52-.28.7a1 1 0 0 1-.7.3c-.28 0-.52-.11-.7-.3zM8 7.99c-.02-.25-.11-.48-.31-.69-.2-.19-.42-.3-.69-.31H6c-.27.02-.48.13-.69.31-.2.2-.3.44-.31.69h1v3c.02.27.11.5.31.69.2.2.42.31.69.31h1c.27 0 .48-.11.69-.31.2-.19.3-.42.31-.69H8V7.98v.01zM7 2.3c-3.14 0-5.7 2.54-5.7 5.68 0 3.14 2.56 5.7 5.7 5.7s5.7-2.55 5.7-5.7c0-3.15-2.56-5.69-5.7-5.69v.01zM7 .98c3.86 0 7 3.14 7 7s-3.14 7-7 7-7-3.12-7-7 3.14-7 7-7z"></path></svg></span>note</div><div class="admonitionContent_vXIg"><p>With this upgrade, the support for Cordova iOS apps version 14 and 15 is ending and the minimum version support is now version 16.</p></div></div>]]></content>
        <author>
            <name>Ritupurna Lenka</name>
        </author>
    </entry>
    <entry>
        <title type="html"><![CDATA[Announcing WaveMaker 11.6 release - What's new]]></title>
        <id>https://www.wavemaker.com/learn/blog/2024/03/04/wavemaker-11-6-release</id>
        <link href="https://www.wavemaker.com/learn/blog/2024/03/04/wavemaker-11-6-release"/>
        <updated>2024-03-04T00:00:00.000Z</updated>
        <summary type="html"><![CDATA[As part of our endeavor to get better and use the best of the tech stack available, we have upgraded the underlying framework of WaveMaker Studio from AngularJS to latest version of Angular. During this rewrite we also improved the overall user experience of the studio user.]]></summary>
        <content type="html"><![CDATA[<p>As part of our endeavor to get better and use the best of the tech stack available, we have upgraded the underlying framework of WaveMaker Studio from AngularJS to latest version of Angular. During this rewrite we also improved the overall user experience of the studio user.</p><div class="theme-admonition theme-admonition-note alert alert--secondary admonition_WoCw"><div class="admonitionHeading_TMsN"><span class="admonitionIcon_Ibzs"><svg viewBox="0 0 14 16"><path fill-rule="evenodd" d="M6.3 5.69a.942.942 0 0 1-.28-.7c0-.28.09-.52.28-.7.19-.18.42-.28.7-.28.28 0 .52.09.7.28.18.19.28.42.28.7 0 .28-.09.52-.28.7a1 1 0 0 1-.7.3c-.28 0-.52-.11-.7-.3zM8 7.99c-.02-.25-.11-.48-.31-.69-.2-.19-.42-.3-.69-.31H6c-.27.02-.48.13-.69.31-.2.2-.3.44-.31.69h1v3c.02.27.11.5.31.69.2.2.42.31.69.31h1c.27 0 .48-.11.69-.31.2-.19.3-.42.31-.69H8V7.98v.01zM7 2.3c-3.14 0-5.7 2.54-5.7 5.68 0 3.14 2.56 5.7 5.7 5.7s5.7-2.55 5.7-5.7c0-3.15-2.56-5.69-5.7-5.69v.01zM7 .98c3.86 0 7 3.14 7 7s-3.14 7-7 7-7-3.12-7-7 3.14-7 7-7z"></path></svg></span>note</div><div class="admonitionContent_vXIg"><p>The new studio will be rolled out in a phased manner, see the <a href="#rollout-plan">bottom</a> of this page to know more.</p></div></div><h2 class="anchor anchorWithStickyNavbar_LWe7" id="performance-improvements">Performance improvements<a href="#performance-improvements" class="hash-link" aria-label="Direct link to Performance improvements" title="Direct link to Performance improvements">​</a></h2><p>With the underlying framework upgrade, we have used some of the best features available to keep the studio code footprint lighter at all times. With these implementations, you will see the project loading faster when opened in the new studio.</p><p>Some of the actions taken in this direction are:</p><h3 class="anchor anchorWithStickyNavbar_LWe7" id="lazy-loading-modules">Lazy loading modules<a href="#lazy-loading-modules" class="hash-link" aria-label="Direct link to Lazy loading modules" title="Direct link to Lazy loading modules">​</a></h3><p>By modularising all the major workspaces and using the lazy loading concept in angular, we have decreased the bundle size and kept it to the minimum that is required to initially load the studio.</p><h3 class="anchor anchorWithStickyNavbar_LWe7" id="project-updates">Project updates<a href="#project-updates" class="hash-link" aria-label="Direct link to Project updates" title="Direct link to Project updates">​</a></h3><p>The project updates are now pushed in the background and do not come in the way of the project load. This decreases the time taken for a developer to resume work in their branch. No more will you be asked to update all the prefabs used in the project every time you load your project. You can simply resume the work you left previously without any distractions.</p><h2 class="anchor anchorWithStickyNavbar_LWe7" id="whats-new">What's new?<a href="#whats-new" class="hash-link" aria-label="Direct link to What's new?" title="Direct link to What's new?">​</a></h2><p>Along with the tech upgrade and the performance improvements, there are a few visible changes to the studio as well. Some of these are:</p><h3 class="anchor anchorWithStickyNavbar_LWe7" id="introducing-projectshub">Introducing ProjectsHub<a href="#introducing-projectshub" class="hash-link" aria-label="Direct link to Introducing ProjectsHub" title="Direct link to Introducing ProjectsHub">​</a></h3><p>The projects listing page is completely redesigned and is now called ProjectsHub. Dogfooding our own software, the new ProjectsHub is built using WaveMaker platform itself.</p><h3 class="anchor anchorWithStickyNavbar_LWe7" id="refreshing-overall-studio-look">Refreshing overall studio look<a href="#refreshing-overall-studio-look" class="hash-link" aria-label="Direct link to Refreshing overall studio look" title="Direct link to Refreshing overall studio look">​</a></h3><p>The overall look and feel of the studio has changed. We have reduced clutter in the toolbars and improved the way icons, text look.</p><h3 class="anchor anchorWithStickyNavbar_LWe7" id="a-better-version-controlling">A better version controlling<a href="#a-better-version-controlling" class="hash-link" aria-label="Direct link to A better version controlling" title="Direct link to A better version controlling">​</a></h3><p>When you work in a team, It's important to stay updated with the latest work being done by other team members. A powerful code diff viewer becomes crucial for such an environment. Based on the developer feedback, we've revamped the code diff editor in the studio.</p><ul><li>the code diff editor now shows only the changes made in a file, so you can focus on the same and not scroll through a big file to view what changes are. The unchanged lines of code are by default collapsed, which can still be expanded and viewed.</li><li>the line diff now clearly highlights the diff literal by literal, so it's easier to view the actual change.</li><li>you can navigate through the changes with the next and previous diff buttons</li></ul><p><img loading="lazy" alt="diff_editor" src="/learn/assets/images/diff_editor-4327112ef7a2f12150615e17dbaf53dc.png" width="2882" height="1356" class="img_ev3q"></p><h3 class="anchor anchorWithStickyNavbar_LWe7" id="powerful-3-way-merge-screen">Powerful 3-way merge screen<a href="#powerful-3-way-merge-screen" class="hash-link" aria-label="Direct link to Powerful 3-way merge screen" title="Direct link to Powerful 3-way merge screen">​</a></h3><p>Power packed with all the diff features mentioned above, the 3-way merge screen used in case of merge conflicts boosts the developer productivity as developers can focus on just the conflict areas and resolve them quicker.</p><h3 class="anchor anchorWithStickyNavbar_LWe7" id="new-settings-workspace">New settings workspace<a href="#new-settings-workspace" class="hash-link" aria-label="Direct link to New settings workspace" title="Direct link to New settings workspace">​</a></h3><p>  Multiple project level configuration options in the studio have been collated into one place simply called as Settings. All project level settings that you would generally configure in a project and visit not too frequently are placed here. These configuration options will vary based on the project type. For example:</p><ul><li>General settings</li><li>Profile configuration</li><li>Security</li><li>Artifacts</li><li>Prefab configuration (Prefab project)</li></ul><p>With this change, the studio header becomes lighter and less complicated. The features that are more frequently used in the day to day developer activities are all still placed in the studio header.</p><p><img loading="lazy" alt="settings" src="/learn/assets/images/settings_security-42309d977d6e49ba77e824dbd502d169.png" width="3024" height="1652" class="img_ev3q"></p><h3 class="anchor anchorWithStickyNavbar_LWe7" id="new-project-updates-section">New project updates section<a href="#new-project-updates-section" class="hash-link" aria-label="Direct link to New project updates section" title="Direct link to New project updates section">​</a></h3><p>All the updates to a project are now pushed in the background and collated in the project updates section present in the studio header. Few examples of updates to a project are:</p><ul><li>Changes pushed to the project by other developers.</li><li>Availability of new version of artifacts used in the project (prefab, theme, etc)</li></ul><p><img loading="lazy" alt="project_updates" src="/learn/assets/images/project_updates-0357d0649a3b20049fe2170280df66ef.png" width="724" height="434" class="img_ev3q"></p><h3 class="anchor anchorWithStickyNavbar_LWe7" id="updated-apis-workspace">Updated APIs workspace<a href="#updated-apis-workspace" class="hash-link" aria-label="Direct link to Updated APIs workspace" title="Direct link to Updated APIs workspace">​</a></h3><p>All the APIs imported in a project are now placed at a single place, the APIs workspace. These include the individual REST API endpoints as well as the OpenAPI (swagger) bundle imported in the project.</p><h3 class="anchor anchorWithStickyNavbar_LWe7" id="a-new-yet-familiar-playground-for-apis">A new (yet familiar) playground for APIs<a href="#a-new-yet-familiar-playground-for-apis" class="hash-link" aria-label="Direct link to A new (yet familiar) playground for APIs" title="Direct link to A new (yet familiar) playground for APIs">​</a></h3><p>The APIs workspace now uses the standard OpenAPI UI plugin as the playground to view and test all the APIs in your project in WaveMaker studio. Since this plugin provides exactly the same UI and experience as you would see on the official swagger editor portal, it would feel much more familiar while testing the APIs in WaveMaker studio as well.</p><p><img loading="lazy" alt="project_updates" src="/learn/assets/images/api_ws-f213b7f8cf68a6b62a22e93f6a5e0246.png" width="3024" height="1646" class="img_ev3q"></p><h3 class="anchor anchorWithStickyNavbar_LWe7" id="new-code-editor">New code editor<a href="#new-code-editor" class="hash-link" aria-label="Direct link to New code editor" title="Direct link to New code editor">​</a></h3><p>We are now using monaco as the code editor in the studio, the editor that powers VS Code. The new code editor comes with a new set of rich functionalities provided by monaco, such as better intellisense, code lens feature that makes it easier to navigate through a large file, etc</p><h2 class="anchor anchorWithStickyNavbar_LWe7" id="rollout-plan">Rollout plan<a href="#rollout-plan" class="hash-link" aria-label="Direct link to Rollout plan" title="Direct link to Rollout plan">​</a></h2><p>To facilitate a smooth transition, we will be rolling out access to the new version of Studio in a phased manner. This approach allows us to closely monitor performance, address any unforeseen issues, and provide necessary support to users as they familiarize themselves with the updated interface and features.</p><p>Here is an overview of the phased rollout plan:</p><h4 class="anchor anchorWithStickyNavbar_LWe7" id="phase-1-internal-rollout">Phase 1: Internal rollout<a href="#phase-1-internal-rollout" class="hash-link" aria-label="Direct link to Phase 1: Internal rollout" title="Direct link to Phase 1: Internal rollout">​</a></h4><p>All WaveMaker email accounts will get access to the new ProjectsHub and Studio.
This phase will help us identify any potential issues and gather valuable insights for optimization.</p><h4 class="anchor anchorWithStickyNavbar_LWe7" id="phase-2-selected-wmonline-customers">Phase 2: Selected WMOnline customers<a href="#phase-2-selected-wmonline-customers" class="hash-link" aria-label="Direct link to Phase 2: Selected WMOnline customers" title="Direct link to Phase 2: Selected WMOnline customers">​</a></h4><p>Access to the new version will be extended to selected WMOnline customers.
These are the customers who provide valuable feedback on the platform stability on a regular basis.</p><h4 class="anchor anchorWithStickyNavbar_LWe7" id="phase-3-all-teams-on-wmo--wme">Phase 3: All teams on WMO + WME<a href="#phase-3-all-teams-on-wmo--wme" class="hash-link" aria-label="Direct link to Phase 3: All teams on WMO + WME" title="Direct link to Phase 3: All teams on WMO + WME">​</a></h4><p>All of the online and Enterprise customers will be moved to the new version of the platform.</p>]]></content>
        <author>
            <name>Vibhu Singhal</name>
        </author>
    </entry>
    <entry>
        <title type="html"><![CDATA[Deprecation notice for Cordova project type]]></title>
        <id>https://www.wavemaker.com/learn/blog/2024/02/29/Deprecation-notice-for-cordova-project-type</id>
        <link href="https://www.wavemaker.com/learn/blog/2024/02/29/Deprecation-notice-for-cordova-project-type"/>
        <updated>2024-02-29T00:00:00.000Z</updated>
        <summary type="html"><![CDATA[---]]></summary>
        <content type="html"><![CDATA[<hr><h2 class="anchor anchorWithStickyNavbar_LWe7" id="deprecation-notice-for-cordova-project-type">Deprecation notice for Cordova project type<a href="#deprecation-notice-for-cordova-project-type" class="hash-link" aria-label="Direct link to Deprecation notice for Cordova project type" title="Direct link to Deprecation notice for Cordova project type">​</a></h2><p>With the release of 11.6.0, we will start providing minimal support to Cordova projects. However, by June 2024 we will end our complete support for Cordova projects and users will not be provided with any new patches/updates in further releases.</p><h3 class="anchor anchorWithStickyNavbar_LWe7" id="background">Background<a href="#background" class="hash-link" aria-label="Direct link to Background" title="Direct link to Background">​</a></h3><p>WaveMaker’s support for developing mobile applications was launched in 2015 with Cordova as the underlying framework. But with multiple advancements, in 2022, we released support for creating React Native mobile applications.</p><h4 class="anchor anchorWithStickyNavbar_LWe7" id="why-react-native">Why React Native<a href="#why-react-native" class="hash-link" aria-label="Direct link to Why React Native" title="Direct link to Why React Native">​</a></h4><p>With better performance and the latest technology, React Native stands as the first choice for application development. To understand more about how React Native is better than Cordova, see <a href="/learn/app-development/wavemaker-overview/react-native-and-cordova">React Native or Cordova</a>.</p><h2 class="anchor anchorWithStickyNavbar_LWe7" id="whats-next">What's Next<a href="#whats-next" class="hash-link" aria-label="Direct link to What's Next" title="Direct link to What's Next">​</a></h2><table><thead><tr><th>Timeline</th><th>Description</th></tr></thead><tbody><tr><td>Immediate effect</td><td>Users will not be able to create new Cordova projects but will be able to work on the existing projects.</td></tr><tr><td>Till 30 June 2024</td><td>We will provide fixes if it resolves one of the following: <br> - A newly identified security vulnerability, <br> - A regression caused by a 3rd party change, such as a new mobile OS version.</td></tr><tr><td>Post June 2024</td><td>Complete end of support. Users will not be able to open Cordova projects however, they will be provided an option to export projects.</td></tr></tbody></table><h3 class="anchor anchorWithStickyNavbar_LWe7" id="what-happens-to-the-existing-applications">What happens to the existing applications<a href="#what-happens-to-the-existing-applications" class="hash-link" aria-label="Direct link to What happens to the existing applications" title="Direct link to What happens to the existing applications">​</a></h3><p>Mobile applications that are already installed on devices will continue to run. This notice concerns WaveMaker’s usage to develop the application to add new features or change already built pages. There is no runtime impact.</p><h3 class="anchor anchorWithStickyNavbar_LWe7" id="migration-strategies">Migration Strategies<a href="#migration-strategies" class="hash-link" aria-label="Direct link to Migration Strategies" title="Direct link to Migration Strategies">​</a></h3><ol><li>Recreate mobile application functionality in WaveMaker’s React Native project type.</li><li><a href="https://www.wavemaker.com/creating-progressive-web-applications-with-wavemaker/" target="_blank" rel="noopener noreferrer">Setup the WaveMaker built web application to be a Progressive Web application</a>.</li></ol><p>Please reach out to your customer success partner to talk about your migration approaches. We will be happy to help with this. </p><p>We thank all the WaveMaker developers who have built mobile applications and are looking forward to serving you in the future.</p>]]></content>
        <author>
            <name>Venugopal Jidigam</name>
        </author>
    </entry>
    <entry>
        <title type="html"><![CDATA[Charting Libraries D3 and NVD3 Update - Action Required]]></title>
        <id>https://www.wavemaker.com/learn/blog/2024/01/22/charting-libraries-d3-nvd3-upgrade</id>
        <link href="https://www.wavemaker.com/learn/blog/2024/01/22/charting-libraries-d3-nvd3-upgrade"/>
        <updated>2024-01-22T00:00:00.000Z</updated>
        <summary type="html"><![CDATA[---]]></summary>
        <content type="html"><![CDATA[<hr><p>Exciting news for WaveMaker developers! The upcoming upgrade of the WaveMaker Web Apps Charting libraries, scheduled for Release 11.5.3 in the fourth week of January 2024, introduces significant improvements derived from both D3.js and NVD3.</p><p>This update ensures compatibility with modern web standards and offers a more streamlined experience for developers.</p><table><thead><tr><th>Current version</th><th>Updating to</th></tr></thead><tbody><tr><td>D3 3.5.7</td><td>7.8.5</td></tr><tr><td>NVD3 1.0.0</td><td>1.8.6</td></tr></tbody></table><h2 class="anchor anchorWithStickyNavbar_LWe7" id="who-should-read-this">Who should read this<a href="#who-should-read-this" class="hash-link" aria-label="Direct link to Who should read this" title="Direct link to Who should read this">​</a></h2><p>WaveMaker developers using chart widgets without D3 methods in the ChartOnBeforeRender callback won't be affected by the D3 library upgrade. Their applications will work smoothly without any changes.
However, if developers use D3 methods in the callback, the upgrade might impact functionality, requiring adjustments as outlined below to ensure continued operation.</p><h2 class="anchor anchorWithStickyNavbar_LWe7" id="d3js-version-7">D3.js Version 7<a href="#d3js-version-7" class="hash-link" aria-label="Direct link to D3.js Version 7" title="Direct link to D3.js Version 7">​</a></h2><p>D3.js, a powerful JavaScript library for creating interactive data visualizations, undergoes a major version upgrade from 3.5.7 to 7.8.5, bringing new features and improvements and allowing developers to adapt to the latest changes.</p><h2 class="anchor anchorWithStickyNavbar_LWe7" id="key-changes-in-d3js-version-7">Key Changes in D3.js Version 7<a href="#key-changes-in-d3js-version-7" class="hash-link" aria-label="Direct link to Key Changes in D3.js Version 7" title="Direct link to Key Changes in D3.js Version 7">​</a></h2><ol><li><a href="#syntax-and-selections">Syntax and Selections</a></li><li><a href="#promises">Promises</a></li><li><a href="#immutability">Immutability</a></li><li><a href="#chaining">Chaining</a></li><li><a href="#modularity">Modularity</a></li><li><a href="#axes-and-scales">Axes and Scales</a></li><li><a href="#data-join">Data Join</a></li><li><a href="#compatibility">Compatibility</a></li><li><a href="#documentation">Documentation</a></li></ol><h2 class="anchor anchorWithStickyNavbar_LWe7" id="syntax-and-selections">Syntax and Selections<a href="#syntax-and-selections" class="hash-link" aria-label="Direct link to Syntax and Selections" title="Direct link to Syntax and Selections">​</a></h2><ul><li>The syntax has evolved to be more concise and adherent to ES6 standards.</li><li>Method chaining and selections exhibit a more logical and consistent structure.</li></ul><div class="codeBlockContainer_Ckt0 theme-code-block" style="--prism-color:#bfc7d5;--prism-background-color:#292d3e"><div class="codeBlockContent_biex"><pre tabindex="0" class="prism-code language-text codeBlock_bY9V thin-scrollbar"><code class="codeBlockLines_e6Vv"><span class="token-line" style="color:#bfc7d5"><span class="token plain">// D3 v3</span><br></span><span class="token-line" style="color:#bfc7d5"><span class="token plain">d3.selectAll('circle').attr('r', function(d) { return d.radius; });</span><br></span><span class="token-line" style="color:#bfc7d5"><span class="token plain" style="display:inline-block"></span><br></span><span class="token-line" style="color:#bfc7d5"><span class="token plain">// D3 v7</span><br></span><span class="token-line" style="color:#bfc7d5"><span class="token plain">d3.selectAll('circle').attr('r', d =&gt; d.radius);</span><br></span></code></pre><div class="buttonGroup__atx"><button type="button" aria-label="Copy code to clipboard" title="Copy" class="clean-btn"><span class="copyButtonIcons_eSgA" aria-hidden="true"><svg viewBox="0 0 24 24" class="copyButtonIcon_y97N"><path fill="currentColor" d="M19,21H8V7H19M19,5H8A2,2 0 0,0 6,7V21A2,2 0 0,0 8,23H19A2,2 0 0,0 21,21V7A2,2 0 0,0 19,5M16,1H4A2,2 0 0,0 2,3V17H4V3H16V1Z"></path></svg><svg viewBox="0 0 24 24" class="copyButtonSuccessIcon_LjdS"><path fill="currentColor" d="M21,7L9,19L3.5,13.5L4.91,12.09L9,16.17L19.59,5.59L21,7Z"></path></svg></span></button></div></div></div><h2 class="anchor anchorWithStickyNavbar_LWe7" id="promises">Promises<a href="#promises" class="hash-link" aria-label="Direct link to Promises" title="Direct link to Promises">​</a></h2><p>D3 v7 embraces Promises for asynchronous operations, simplifying the handling of asynchronous tasks.</p><div class="codeBlockContainer_Ckt0 theme-code-block" style="--prism-color:#bfc7d5;--prism-background-color:#292d3e"><div class="codeBlockContent_biex"><pre tabindex="0" class="prism-code language-text codeBlock_bY9V thin-scrollbar"><code class="codeBlockLines_e6Vv"><span class="token-line" style="color:#bfc7d5"><span class="token plain">// D3 v3</span><br></span><span class="token-line" style="color:#bfc7d5"><span class="token plain">d3.json('data.json', function(error, data) {</span><br></span><span class="token-line" style="color:#bfc7d5"><span class="token plain">// Callback-based approach</span><br></span><span class="token-line" style="color:#bfc7d5"><span class="token plain">});</span><br></span><span class="token-line" style="color:#bfc7d5"><span class="token plain" style="display:inline-block"></span><br></span><span class="token-line" style="color:#bfc7d5"><span class="token plain">// D3 v7</span><br></span><span class="token-line" style="color:#bfc7d5"><span class="token plain">d3.json('data.json')</span><br></span><span class="token-line" style="color:#bfc7d5"><span class="token plain">.then(data =&gt; {</span><br></span><span class="token-line" style="color:#bfc7d5"><span class="token plain">// Promise-based approach</span><br></span><span class="token-line" style="color:#bfc7d5"><span class="token plain">})</span><br></span><span class="token-line" style="color:#bfc7d5"><span class="token plain">.catch(error =&gt; {</span><br></span><span class="token-line" style="color:#bfc7d5"><span class="token plain">console.error('Error loading data:', error);</span><br></span><span class="token-line" style="color:#bfc7d5"><span class="token plain">});</span><br></span></code></pre><div class="buttonGroup__atx"><button type="button" aria-label="Copy code to clipboard" title="Copy" class="clean-btn"><span class="copyButtonIcons_eSgA" aria-hidden="true"><svg viewBox="0 0 24 24" class="copyButtonIcon_y97N"><path fill="currentColor" d="M19,21H8V7H19M19,5H8A2,2 0 0,0 6,7V21A2,2 0 0,0 8,23H19A2,2 0 0,0 21,21V7A2,2 0 0,0 19,5M16,1H4A2,2 0 0,0 2,3V17H4V3H16V1Z"></path></svg><svg viewBox="0 0 24 24" class="copyButtonSuccessIcon_LjdS"><path fill="currentColor" d="M21,7L9,19L3.5,13.5L4.91,12.09L9,16.17L19.59,5.59L21,7Z"></path></svg></span></button></div></div></div><h2 class="anchor anchorWithStickyNavbar_LWe7" id="immutability">Immutability<a href="#immutability" class="hash-link" aria-label="Direct link to Immutability" title="Direct link to Immutability">​</a></h2><p>D3 v7 introduces immutability to selections, enhancing code predictability and avoiding unexpected side effects.</p><div class="codeBlockContainer_Ckt0 theme-code-block" style="--prism-color:#bfc7d5;--prism-background-color:#292d3e"><div class="codeBlockContent_biex"><pre tabindex="0" class="prism-code language-text codeBlock_bY9V thin-scrollbar"><code class="codeBlockLines_e6Vv"><span class="token-line" style="color:#bfc7d5"><span class="token plain">// D3 v3</span><br></span><span class="token-line" style="color:#bfc7d5"><span class="token plain">var circles = d3.selectAll("circle");</span><br></span><span class="token-line" style="color:#bfc7d5"><span class="token plain">circles.attr("r", 10);</span><br></span><span class="token-line" style="color:#bfc7d5"><span class="token plain">circles.style("fill", "blue");</span><br></span><span class="token-line" style="color:#bfc7d5"><span class="token plain" style="display:inline-block"></span><br></span><span class="token-line" style="color:#bfc7d5"><span class="token plain">// D3 v7</span><br></span><span class="token-line" style="color:#bfc7d5"><span class="token plain">const circles = d3.selectAll("circle")</span><br></span><span class="token-line" style="color:#bfc7d5"><span class="token plain">.attr("r", 10)</span><br></span><span class="token-line" style="color:#bfc7d5"><span class="token plain">.style("fill", "blue");</span><br></span></code></pre><div class="buttonGroup__atx"><button type="button" aria-label="Copy code to clipboard" title="Copy" class="clean-btn"><span class="copyButtonIcons_eSgA" aria-hidden="true"><svg viewBox="0 0 24 24" class="copyButtonIcon_y97N"><path fill="currentColor" d="M19,21H8V7H19M19,5H8A2,2 0 0,0 6,7V21A2,2 0 0,0 8,23H19A2,2 0 0,0 21,21V7A2,2 0 0,0 19,5M16,1H4A2,2 0 0,0 2,3V17H4V3H16V1Z"></path></svg><svg viewBox="0 0 24 24" class="copyButtonSuccessIcon_LjdS"><path fill="currentColor" d="M21,7L9,19L3.5,13.5L4.91,12.09L9,16.17L19.59,5.59L21,7Z"></path></svg></span></button></div></div></div><h2 class="anchor anchorWithStickyNavbar_LWe7" id="implications-of-immutability">Implications of Immutability<a href="#implications-of-immutability" class="hash-link" aria-label="Direct link to Implications of Immutability" title="Direct link to Implications of Immutability">​</a></h2><h3 class="anchor anchorWithStickyNavbar_LWe7" id="consistency-and-predictability">Consistency and Predictability:<a href="#consistency-and-predictability" class="hash-link" aria-label="Direct link to Consistency and Predictability:" title="Direct link to Consistency and Predictability:">​</a></h3><p>The immutability of selections in D3 v7 leads to more consistent and predictable behavior.</p><h3 class="anchor anchorWithStickyNavbar_LWe7" id="transitioning-and-animation">Transitioning and Animation:<a href="#transitioning-and-animation" class="hash-link" aria-label="Direct link to Transitioning and Animation:" title="Direct link to Transitioning and Animation:">​</a></h3><p>Transitions and animations are built on the same immutable foundation, providing clarity and control.</p><div class="codeBlockContainer_Ckt0 theme-code-block" style="--prism-color:#bfc7d5;--prism-background-color:#292d3e"><div class="codeBlockContent_biex"><pre tabindex="0" class="prism-code language-text codeBlock_bY9V thin-scrollbar"><code class="codeBlockLines_e6Vv"><span class="token-line" style="color:#bfc7d5"><span class="token plain">// D3 v3</span><br></span><span class="token-line" style="color:#bfc7d5"><span class="token plain">var circles = d3.selectAll("circle");</span><br></span><span class="token-line" style="color:#bfc7d5"><span class="token plain">circles.transition().duration(1000).attr("r", 20).style("fill", "red");</span><br></span><span class="token-line" style="color:#bfc7d5"><span class="token plain" style="display:inline-block"></span><br></span><span class="token-line" style="color:#bfc7d5"><span class="token plain">// D3 v7</span><br></span><span class="token-line" style="color:#bfc7d5"><span class="token plain">const circles = d3.selectAll("circle")</span><br></span><span class="token-line" style="color:#bfc7d5"><span class="token plain">.transition()</span><br></span><span class="token-line" style="color:#bfc7d5"><span class="token plain">.duration(1000)</span><br></span><span class="token-line" style="color:#bfc7d5"><span class="token plain">.attr("r", 20)</span><br></span><span class="token-line" style="color:#bfc7d5"><span class="token plain">.style("fill", "red");</span><br></span></code></pre><div class="buttonGroup__atx"><button type="button" aria-label="Copy code to clipboard" title="Copy" class="clean-btn"><span class="copyButtonIcons_eSgA" aria-hidden="true"><svg viewBox="0 0 24 24" class="copyButtonIcon_y97N"><path fill="currentColor" d="M19,21H8V7H19M19,5H8A2,2 0 0,0 6,7V21A2,2 0 0,0 8,23H19A2,2 0 0,0 21,21V7A2,2 0 0,0 19,5M16,1H4A2,2 0 0,0 2,3V17H4V3H16V1Z"></path></svg><svg viewBox="0 0 24 24" class="copyButtonSuccessIcon_LjdS"><path fill="currentColor" d="M21,7L9,19L3.5,13.5L4.91,12.09L9,16.17L19.59,5.59L21,7Z"></path></svg></span></button></div></div></div><h2 class="anchor anchorWithStickyNavbar_LWe7" id="chaining">Chaining<a href="#chaining" class="hash-link" aria-label="Direct link to Chaining" title="Direct link to Chaining">​</a></h2><p>Immutability is closely linked to method chaining, allowing concise and readable code.</p><div class="codeBlockContainer_Ckt0 theme-code-block" style="--prism-color:#bfc7d5;--prism-background-color:#292d3e"><div class="codeBlockContent_biex"><pre tabindex="0" class="prism-code language-text codeBlock_bY9V thin-scrollbar"><code class="codeBlockLines_e6Vv"><span class="token-line" style="color:#bfc7d5"><span class="token plain">// D3 v3</span><br></span><span class="token-line" style="color:#bfc7d5"><span class="token plain">var circles = d3.selectAll("circle");</span><br></span><span class="token-line" style="color:#bfc7d5"><span class="token plain">circles.attr("r", 10).style("fill", "blue");</span><br></span><span class="token-line" style="color:#bfc7d5"><span class="token plain" style="display:inline-block"></span><br></span><span class="token-line" style="color:#bfc7d5"><span class="token plain">// D3 v7</span><br></span><span class="token-line" style="color:#bfc7d5"><span class="token plain">const circles = d3.selectAll("circle")</span><br></span><span class="token-line" style="color:#bfc7d5"><span class="token plain">.attr("r", 10)</span><br></span><span class="token-line" style="color:#bfc7d5"><span class="token plain">.style("fill", "blue");</span><br></span></code></pre><div class="buttonGroup__atx"><button type="button" aria-label="Copy code to clipboard" title="Copy" class="clean-btn"><span class="copyButtonIcons_eSgA" aria-hidden="true"><svg viewBox="0 0 24 24" class="copyButtonIcon_y97N"><path fill="currentColor" d="M19,21H8V7H19M19,5H8A2,2 0 0,0 6,7V21A2,2 0 0,0 8,23H19A2,2 0 0,0 21,21V7A2,2 0 0,0 19,5M16,1H4A2,2 0 0,0 2,3V17H4V3H16V1Z"></path></svg><svg viewBox="0 0 24 24" class="copyButtonSuccessIcon_LjdS"><path fill="currentColor" d="M21,7L9,19L3.5,13.5L4.91,12.09L9,16.17L19.59,5.59L21,7Z"></path></svg></span></button></div></div></div><h2 class="anchor anchorWithStickyNavbar_LWe7" id="modularity">Modularity<a href="#modularity" class="hash-link" aria-label="Direct link to Modularity" title="Direct link to Modularity">​</a></h2><p>D3 v7 embraces modularity, allowing developers to use specific modules without including the entire library.</p><div class="codeBlockContainer_Ckt0 theme-code-block" style="--prism-color:#bfc7d5;--prism-background-color:#292d3e"><div class="codeBlockContent_biex"><pre tabindex="0" class="prism-code language-text codeBlock_bY9V thin-scrollbar"><code class="codeBlockLines_e6Vv"><span class="token-line" style="color:#bfc7d5"><span class="token plain">// D3 v3</span><br></span><span class="token-line" style="color:#bfc7d5"><span class="token plain">// Include the entire library</span><br></span><span class="token-line" style="color:#bfc7d5"><span class="token plain" style="display:inline-block"></span><br></span><span class="token-line" style="color:#bfc7d5"><span class="token plain">// D3 v7</span><br></span><span class="token-line" style="color:#bfc7d5"><span class="token plain">import { scaleLinear, axisBottom } from 'd3';</span><br></span></code></pre><div class="buttonGroup__atx"><button type="button" aria-label="Copy code to clipboard" title="Copy" class="clean-btn"><span class="copyButtonIcons_eSgA" aria-hidden="true"><svg viewBox="0 0 24 24" class="copyButtonIcon_y97N"><path fill="currentColor" d="M19,21H8V7H19M19,5H8A2,2 0 0,0 6,7V21A2,2 0 0,0 8,23H19A2,2 0 0,0 21,21V7A2,2 0 0,0 19,5M16,1H4A2,2 0 0,0 2,3V17H4V3H16V1Z"></path></svg><svg viewBox="0 0 24 24" class="copyButtonSuccessIcon_LjdS"><path fill="currentColor" d="M21,7L9,19L3.5,13.5L4.91,12.09L9,16.17L19.59,5.59L21,7Z"></path></svg></span></button></div></div></div><h2 class="anchor anchorWithStickyNavbar_LWe7" id="axes-and-scales">Axes and Scales<a href="#axes-and-scales" class="hash-link" aria-label="Direct link to Axes and Scales" title="Direct link to Axes and Scales">​</a></h2><p>While core concepts remain, v7 brings refinements for creating scales and axes, offering more control and customization options.</p><div class="codeBlockContainer_Ckt0 theme-code-block" style="--prism-color:#bfc7d5;--prism-background-color:#292d3e"><div class="codeBlockContent_biex"><pre tabindex="0" class="prism-code language-text codeBlock_bY9V thin-scrollbar"><code class="codeBlockLines_e6Vv"><span class="token-line" style="color:#bfc7d5"><span class="token plain">1.d3.scale.linear() = d3.scaleLinear()</span><br></span><span class="token-line" style="color:#bfc7d5"><span class="token plain">2.d3.scale.ordinal() = d3.scaleOrdinal()</span><br></span><span class="token-line" style="color:#bfc7d5"><span class="token plain">3.d3.svg.arc()= d3.arc()</span><br></span><span class="token-line" style="color:#bfc7d5"><span class="token plain">4.d3.svg.axis.orient('bottom') = d3.axisBottom()</span><br></span><span class="token-line" style="color:#bfc7d5"><span class="token plain">5.d3.event.pageX() = d3.pageX()</span><br></span><span class="token-line" style="color:#bfc7d5"><span class="token plain">6.d3.time.format() = d3.timeFormat()</span><br></span><span class="token-line" style="color:#bfc7d5"><span class="token plain">7.d3.time.Scale() = d3.scaleTime()</span><br></span><span class="token-line" style="color:#bfc7d5"><span class="token plain">8.chartinstance.dispatch.on('render_end')=chartinstance.dispatch.on('renderEnd')</span><br></span><span class="token-line" style="color:#bfc7d5"><span class="token plain">9.Changes in Mouse Event Callbacks:</span><br></span><span class="token-line" style="color:#bfc7d5"><span class="token plain">   The arguments passed in mouse events callback functions changed </span><br></span><span class="token-line" style="color:#bfc7d5"><span class="token plain">   from data, index =&gt; event, data, index.</span><br></span><span class="token-line" style="color:#bfc7d5"><span class="token plain">    a.In D3 v3, the mouse event callback functions received </span><br></span><span class="token-line" style="color:#bfc7d5"><span class="token plain">      data and index as the first and second arguments.</span><br></span><span class="token-line" style="color:#bfc7d5"><span class="token plain">    b.In D3 v7, the order is changed, and the callback functions </span><br></span><span class="token-line" style="color:#bfc7d5"><span class="token plain">      receive events as the first argument, followed by data and index.</span><br></span></code></pre><div class="buttonGroup__atx"><button type="button" aria-label="Copy code to clipboard" title="Copy" class="clean-btn"><span class="copyButtonIcons_eSgA" aria-hidden="true"><svg viewBox="0 0 24 24" class="copyButtonIcon_y97N"><path fill="currentColor" d="M19,21H8V7H19M19,5H8A2,2 0 0,0 6,7V21A2,2 0 0,0 8,23H19A2,2 0 0,0 21,21V7A2,2 0 0,0 19,5M16,1H4A2,2 0 0,0 2,3V17H4V3H16V1Z"></path></svg><svg viewBox="0 0 24 24" class="copyButtonSuccessIcon_LjdS"><path fill="currentColor" d="M21,7L9,19L3.5,13.5L4.91,12.09L9,16.17L19.59,5.59L21,7Z"></path></svg></span></button></div></div></div><h2 class="anchor anchorWithStickyNavbar_LWe7" id="data-join">Data Join<a href="#data-join" class="hash-link" aria-label="Direct link to Data Join" title="Direct link to Data Join">​</a></h2><p>D3 v7 enhances the data join pattern for better performance and optimizations.</p><div class="codeBlockContainer_Ckt0 theme-code-block" style="--prism-color:#bfc7d5;--prism-background-color:#292d3e"><div class="codeBlockContent_biex"><pre tabindex="0" class="prism-code language-text codeBlock_bY9V thin-scrollbar"><code class="codeBlockLines_e6Vv"><span class="token-line" style="color:#bfc7d5"><span class="token plain">// D3 v3</span><br></span><span class="token-line" style="color:#bfc7d5"><span class="token plain">var circles = svg.selectAll('circle').data(data);</span><br></span><span class="token-line" style="color:#bfc7d5"><span class="token plain">circles.enter().append('circle');</span><br></span><span class="token-line" style="color:#bfc7d5"><span class="token plain" style="display:inline-block"></span><br></span><span class="token-line" style="color:#bfc7d5"><span class="token plain">// D3 v7</span><br></span><span class="token-line" style="color:#bfc7d5"><span class="token plain">var circles = svg.selectAll('circle').data(data)</span><br></span><span class="token-line" style="color:#bfc7d5"><span class="token plain">.join('circle');</span><br></span></code></pre><div class="buttonGroup__atx"><button type="button" aria-label="Copy code to clipboard" title="Copy" class="clean-btn"><span class="copyButtonIcons_eSgA" aria-hidden="true"><svg viewBox="0 0 24 24" class="copyButtonIcon_y97N"><path fill="currentColor" d="M19,21H8V7H19M19,5H8A2,2 0 0,0 6,7V21A2,2 0 0,0 8,23H19A2,2 0 0,0 21,21V7A2,2 0 0,0 19,5M16,1H4A2,2 0 0,0 2,3V17H4V3H16V1Z"></path></svg><svg viewBox="0 0 24 24" class="copyButtonSuccessIcon_LjdS"><path fill="currentColor" d="M21,7L9,19L3.5,13.5L4.91,12.09L9,16.17L19.59,5.59L21,7Z"></path></svg></span></button></div></div></div><h2 class="anchor anchorWithStickyNavbar_LWe7" id="compatibility">Compatibility<a href="#compatibility" class="hash-link" aria-label="Direct link to Compatibility" title="Direct link to Compatibility">​</a></h2><p>D3 v7 aligns with modern web standards, integrating seamlessly with other JavaScript tools and frameworks.</p><div class="codeBlockContainer_Ckt0 theme-code-block" style="--prism-color:#bfc7d5;--prism-background-color:#292d3e"><div class="codeBlockContent_biex"><pre tabindex="0" class="prism-code language-text codeBlock_bY9V thin-scrollbar"><code class="codeBlockLines_e6Vv"><span class="token-line" style="color:#bfc7d5"><span class="token plain">// D3 v3</span><br></span><span class="token-line" style="color:#bfc7d5"><span class="token plain">// No native module support</span><br></span><span class="token-line" style="color:#bfc7d5"><span class="token plain" style="display:inline-block"></span><br></span><span class="token-line" style="color:#bfc7d5"><span class="token plain">// D3 v7</span><br></span><span class="token-line" style="color:#bfc7d5"><span class="token plain">import { select, scaleLinear } from 'd3';</span><br></span></code></pre><div class="buttonGroup__atx"><button type="button" aria-label="Copy code to clipboard" title="Copy" class="clean-btn"><span class="copyButtonIcons_eSgA" aria-hidden="true"><svg viewBox="0 0 24 24" class="copyButtonIcon_y97N"><path fill="currentColor" d="M19,21H8V7H19M19,5H8A2,2 0 0,0 6,7V21A2,2 0 0,0 8,23H19A2,2 0 0,0 21,21V7A2,2 0 0,0 19,5M16,1H4A2,2 0 0,0 2,3V17H4V3H16V1Z"></path></svg><svg viewBox="0 0 24 24" class="copyButtonSuccessIcon_LjdS"><path fill="currentColor" d="M21,7L9,19L3.5,13.5L4.91,12.09L9,16.17L19.59,5.59L21,7Z"></path></svg></span></button></div></div></div><h2 class="anchor anchorWithStickyNavbar_LWe7" id="documentation">Documentation<a href="#documentation" class="hash-link" aria-label="Direct link to Documentation" title="Direct link to Documentation">​</a></h2><p>The documentation for D3 v7 is updated, offering more comprehensive explanations and examples.</p><div class="codeBlockContainer_Ckt0 theme-code-block" style="--prism-color:#bfc7d5;--prism-background-color:#292d3e"><div class="codeBlockContent_biex"><pre tabindex="0" class="prism-code language-text codeBlock_bY9V thin-scrollbar"><code class="codeBlockLines_e6Vv"><span class="token-line" style="color:#bfc7d5"><span class="token plain">// D3 v3</span><br></span><span class="token-line" style="color:#bfc7d5"><span class="token plain">// Limited documentation</span><br></span><span class="token-line" style="color:#bfc7d5"><span class="token plain" style="display:inline-block"></span><br></span><span class="token-line" style="color:#bfc7d5"><span class="token plain">// D3 v7</span><br></span><span class="token-line" style="color:#bfc7d5"><span class="token plain">// Well-documented features with examples</span><br></span></code></pre><div class="buttonGroup__atx"><button type="button" aria-label="Copy code to clipboard" title="Copy" class="clean-btn"><span class="copyButtonIcons_eSgA" aria-hidden="true"><svg viewBox="0 0 24 24" class="copyButtonIcon_y97N"><path fill="currentColor" d="M19,21H8V7H19M19,5H8A2,2 0 0,0 6,7V21A2,2 0 0,0 8,23H19A2,2 0 0,0 21,21V7A2,2 0 0,0 19,5M16,1H4A2,2 0 0,0 2,3V17H4V3H16V1Z"></path></svg><svg viewBox="0 0 24 24" class="copyButtonSuccessIcon_LjdS"><path fill="currentColor" d="M21,7L9,19L3.5,13.5L4.91,12.09L9,16.17L19.59,5.59L21,7Z"></path></svg></span></button></div></div></div><p>NVD3 is a wrapper library over D3 which is also upgraded to incorporate latest changes in D3.</p><p>To learn more, see <a href="https://observablehq.com/@d3/d3v6-migration-guide" target="_blank" rel="noopener noreferrer">The Comprehensive Migration Guide</a>.</p>]]></content>
        <author>
            <name>Bhargavi Gunda</name>
        </author>
    </entry>
    <entry>
        <title type="html"><![CDATA[Angular 15 is here - Action Needed]]></title>
        <id>https://www.wavemaker.com/learn/blog/2023/11/06/angular-15-update</id>
        <link href="https://www.wavemaker.com/learn/blog/2023/11/06/angular-15-update"/>
        <updated>2023-11-06T00:00:00.000Z</updated>
        <summary type="html"><![CDATA[---]]></summary>
        <content type="html"><![CDATA[<hr><p>WaveMaker Release 11.5 is scheduled for the 4th week of November 2023 and the release will include an update to Angular 15, as well as an upgrade to Node.js 18.16.1.! This is a significant upgrade that will help improve your application development experience and performance.</p><h2 class="anchor anchorWithStickyNavbar_LWe7" id="angular-15-new-features-and-enhancements">Angular 15 New Features and Enhancements<a href="#angular-15-new-features-and-enhancements" class="hash-link" aria-label="Direct link to Angular 15 New Features and Enhancements" title="Direct link to Angular 15 New Features and Enhancements">​</a></h2><table><thead><tr><th>Current version</th><th>Updating to</th></tr></thead><tbody><tr><td>Angular 12.2.x</td><td>15.2.x</td></tr></tbody></table><p>Angular 12 to 15 includes a number of performance improvements, such as faster startup times and improved rendering performance, allowing the apps to be more responsive and provide a better user experience. Also, it improves the stability and reliability of Angular applications.</p><p>To learn more, see <a href="https://blog.angular.io/angular-v15-is-now-available-df7be7f2f4c8" target="_blank" rel="noopener noreferrer">Angular Version 15 - what's in the release</a>.</p><h2 class="anchor anchorWithStickyNavbar_LWe7" id="action-needed">Action Needed<a href="#action-needed" class="hash-link" aria-label="Direct link to Action Needed" title="Direct link to Action Needed">​</a></h2><p>Along with Angular upgrade we have upgraded the Node version to 18.16.x. Therefore, you are required to adjust the CI/CD pipeline accordingly. </p><ul><li>Moving to Node.js 18.16.1</li></ul><p>Node version should be greater than 18.16.1. The current version of the Node.js is 12.x.x </p><div class="theme-admonition theme-admonition-note alert alert--secondary admonition_WoCw"><div class="admonitionHeading_TMsN"><span class="admonitionIcon_Ibzs"><svg viewBox="0 0 14 16"><path fill-rule="evenodd" d="M6.3 5.69a.942.942 0 0 1-.28-.7c0-.28.09-.52.28-.7.19-.18.42-.28.7-.28.28 0 .52.09.7.28.18.19.28.42.28.7 0 .28-.09.52-.28.7a1 1 0 0 1-.7.3c-.28 0-.52-.11-.7-.3zM8 7.99c-.02-.25-.11-.48-.31-.69-.2-.19-.42-.3-.69-.31H6c-.27.02-.48.13-.69.31-.2.2-.3.44-.31.69h1v3c.02.27.11.5.31.69.2.2.42.31.69.31h1c.27 0 .48-.11.69-.31.2-.19.3-.42.31-.69H8V7.98v.01zM7 2.3c-3.14 0-5.7 2.54-5.7 5.68 0 3.14 2.56 5.7 5.7 5.7s5.7-2.55 5.7-5.7c0-3.15-2.56-5.69-5.7-5.69v.01zM7 .98c3.86 0 7 3.14 7 7s-3.14 7-7 7-7-3.12-7-7 3.14-7 7-7z"></path></svg></span>note</div><div class="admonitionContent_vXIg"><p>We recommend adjusting CI/CD to ensure seamless integration with the new Node.js version. </p></div></div>]]></content>
        <author>
            <name>Swetha Kundaram</name>
        </author>
    </entry>
    <entry>
        <title type="html"><![CDATA[Design Tokens]]></title>
        <id>https://www.wavemaker.com/learn/blog/2023/10/18/design-tokens-part-1</id>
        <link href="https://www.wavemaker.com/learn/blog/2023/10/18/design-tokens-part-1"/>
        <updated>2023-10-18T00:00:00.000Z</updated>
        <summary type="html"><![CDATA[---]]></summary>
        <content type="html"><![CDATA[<hr><p>Design tokens are platform-agnostic variables. They are the single source of truth for the design system, and all applications that use the design system refer to them.</p><p>Design tokens allow designers to make sweeping changes to the look and feel of a product by simply changing the value of a single token. They are typically defined in human-readable formats like JSON or YAML, which makes them easy to understand and maintain.</p><p>Design tokens codify design decisions in a way that is easy to enforce, which helps to ensure consistency across all products that use the design system.</p><h2 class="anchor anchorWithStickyNavbar_LWe7" id="what-are-design-tokens">What are Design Tokens?<a href="#what-are-design-tokens" class="hash-link" aria-label="Direct link to What are Design Tokens?" title="Direct link to What are Design Tokens?">​</a></h2><p>Design tokens are the building blocks of a design system. They are platform-agnostic variables that represent the design elements of a product, such as typography, colors, spacing, and more. Design tokens can be shared across iOS, Android, and regular websites, and they provide the foundation for theming and design process automation to automate tasks in the design process, such as generating CSS variables or style guides.</p><h2 class="anchor anchorWithStickyNavbar_LWe7" id="who-uses-design-tokens">Who uses Design Tokens?<a href="#who-uses-design-tokens" class="hash-link" aria-label="Direct link to Who uses Design Tokens?" title="Direct link to Who uses Design Tokens?">​</a></h2><p>One of the fundamental questions when creating a design system is:</p><h3 class="anchor anchorWithStickyNavbar_LWe7" id="who-is-going-to-use-it-and-how">Who is going to use it and how?<a href="#who-is-going-to-use-it-and-how" class="hash-link" aria-label="Direct link to Who is going to use it and how?" title="Direct link to Who is going to use it and how?">​</a></h3><p>A design system is not just a project; it is a living document. Design systems are good for business and even better for people, providing a huge sense of relief for <strong><em>product managers</em></strong>, <strong><em>project managers</em></strong>, and <strong><em>VPs of Design</em></strong>.</p><p>So, what does a design system do for your designers and developers?</p><p>Designers and developers benefit from design systems in a variety of ways. For example, design tokens allow designers to easily update and reproduce design changes throughout a project, eliminating the need to manually update elements individually. This saves time and effort, and ensures flawless visual consistency throughout the design process.</p><h2 class="anchor anchorWithStickyNavbar_LWe7" id="why-should-we-use-design-tokens">Why should we use design tokens?<a href="#why-should-we-use-design-tokens" class="hash-link" aria-label="Direct link to Why should we use design tokens?" title="Direct link to Why should we use design tokens?">​</a></h2><p>It is important for companies with many products to include design tokens in their design system. The complexity of the world we’re living in today where a single organization that is building multiple web apps and native applications needs to feel and look the same while not slowing down the development team.</p><p>As digital transformation accelerates, companies face the challenge of scaling design across an increasing number of screens, tech stacks, and product teams. As the product footprint grows, propagating even simple design decisions (such as a color change) can take weeks to accomplish.</p><p>To address this challenge, the design system team at Salesforce established a new data layer and a practice that helps scale design across multiple platforms and teams. They named it <strong>Design Tokens</strong>. By using design tokens, it can take minutes—instead of weeks—to implement design decisions across platforms</p><p><img loading="lazy" alt="why-tokens.png" src="/learn/assets/images/why-tokens-b4d2370e1b4cf451f86ddfd3a7b51556.png" width="783" height="393" class="img_ev3q"></p><p>The key benefits of using design tokens are</p><ul><li>Consistency</li><li>Efficiency</li><li>Flexibility</li><li>Adaptability</li><li>Documentation</li></ul><p>Let’s try to understand with an example how adopting modular design tokens brings flexibility and scalability to design systems.</p><p>Let’s say we have a theme with a primary color as the dominant color and use it across different components like button, input fields, toggle, checkboxes, etc.</p><p>Now, suppose a designer decides to choose a darker shade for the primary color. We can do that using styles in Figma or other design tools, and CSS variables can handle this challenge and bring scale to some extent. But using just styles or variables alone cannot solve other complex challenges, like changing the primary color only in components where it is used as a background—this is where design tokens come into play.</p><p>Design tokens are not just limited to a color system; they can store everything from type or spatial systems to design assets.</p><h2 class="anchor anchorWithStickyNavbar_LWe7" id="design-tokens--css-variables">Design Tokens ≠ CSS Variables<a href="#design-tokens--css-variables" class="hash-link" aria-label="Direct link to Design Tokens ≠ CSS Variables" title="Direct link to Design Tokens ≠ CSS Variables">​</a></h2><p>Design tokens follow the same concept as design variables, but they do have their differences.</p><table><thead><tr><th>Design Tokens</th><th>CSS Variables</th></tr></thead><tbody><tr><td>Design tokens are a set of values that represent design decisions. They provide centralized control for designers and developers to change the design system</td><td>On the other hand, design variables are used to define reusable CSS values that can be updated throughout an application</td></tr><tr><td>Design tokens allow easy updates to the design language without changing individual files and stylesheets</td><td>Design variables use the var() function to specify the values, which are often scoped to a specific element or component</td></tr><tr><td>Design tokens can be used in a separate file or module</td><td>Design variables can be inherited from design tokens and overridden with a new value when applied to an element</td></tr></tbody></table><h2 class="anchor anchorWithStickyNavbar_LWe7" id="simplifying-the-process">Simplifying the Process<a href="#simplifying-the-process" class="hash-link" aria-label="Direct link to Simplifying the Process" title="Direct link to Simplifying the Process">​</a></h2><p>Tokens includes everything in css properties that goes within “” <em>values</em>, <em>spacing</em>, <em>sizing</em>, <em>rounded corners</em>, <em>fontweights</em>, <em>font sizes</em>, <em>line heights</em>, <em>shadows</em>, <em>font families</em>, <em>border colors</em>, <em>background colors</em>, <em>text colors</em>, <em>animation durations</em>, <em>z-indexes</em>, <em>media queries</em>, etc.</p><p>How can we start our design system using simplified tokens?</p><p>The solution is to use a concept similar to <a href="https://bradfrost.com/blog/post/atomic-web-design/" target="_blank" rel="noopener noreferrer">atomic design</a>, where we will have a base token and a semantic token.</p><h3 class="anchor anchorWithStickyNavbar_LWe7" id="base-token">Base Token<a href="#base-token" class="hash-link" aria-label="Direct link to Base Token" title="Direct link to Base Token">​</a></h3><p>The base token will represent the literal value of the property. It will be the base, and you don’t need to have many rules for creation, for example:</p><div class="language-css codeBlockContainer_Ckt0 theme-code-block" style="--prism-color:#bfc7d5;--prism-background-color:#292d3e"><div class="codeBlockContent_biex"><pre tabindex="0" class="prism-code language-css codeBlock_bY9V thin-scrollbar"><code class="codeBlockLines_e6Vv"><span class="token-line" style="color:#bfc7d5"><span class="token selector" style="color:rgb(199, 146, 234)">colorBase</span><span class="token plain"> </span><span class="token punctuation" style="color:rgb(199, 146, 234)">{</span><span class="token plain"></span><br></span><span class="token-line" style="color:#bfc7d5"><span class="token plain">color.</span><span class="token color">blue</span><span class="token number" style="color:rgb(247, 140, 108)">.50</span><span class="token plain"> = </span><span class="token hexcode color">#000022</span><span class="token plain"></span><br></span><span class="token-line" style="color:#bfc7d5"><span class="token plain">color.</span><span class="token color">blue</span><span class="token number" style="color:rgb(247, 140, 108)">.100</span><span class="token plain"> = </span><span class="token hexcode color">#000033</span><span class="token plain"></span><br></span><span class="token-line" style="color:#bfc7d5"><span class="token plain"></span><span class="token punctuation" style="color:rgb(199, 146, 234)">}</span><br></span></code></pre><div class="buttonGroup__atx"><button type="button" aria-label="Copy code to clipboard" title="Copy" class="clean-btn"><span class="copyButtonIcons_eSgA" aria-hidden="true"><svg viewBox="0 0 24 24" class="copyButtonIcon_y97N"><path fill="currentColor" d="M19,21H8V7H19M19,5H8A2,2 0 0,0 6,7V21A2,2 0 0,0 8,23H19A2,2 0 0,0 21,21V7A2,2 0 0,0 19,5M16,1H4A2,2 0 0,0 2,3V17H4V3H16V1Z"></path></svg><svg viewBox="0 0 24 24" class="copyButtonSuccessIcon_LjdS"><path fill="currentColor" d="M21,7L9,19L3.5,13.5L4.91,12.09L9,16.17L19.59,5.59L21,7Z"></path></svg></span></button></div></div></div><h3 class="anchor anchorWithStickyNavbar_LWe7" id="semantic-token">Semantic Token<a href="#semantic-token" class="hash-link" aria-label="Direct link to Semantic Token" title="Direct link to Semantic Token">​</a></h3><p>Tokens that represent the character of the base design tokens If the designer decides the border color should be the brand primary, the border color will change accordingly.</p><div class="language-css codeBlockContainer_Ckt0 theme-code-block" style="--prism-color:#bfc7d5;--prism-background-color:#292d3e"><div class="codeBlockContent_biex"><pre tabindex="0" class="prism-code language-css codeBlock_bY9V thin-scrollbar"><code class="codeBlockLines_e6Vv"><span class="token-line" style="color:#bfc7d5"><span class="token selector" style="color:rgb(199, 146, 234)">color</span><span class="token selector class" style="color:rgb(199, 146, 234)">.blue</span><span class="token selector class" style="color:rgb(199, 146, 234)">.50</span><span class="token selector" style="color:rgb(199, 146, 234)"> = </span><span class="token selector id" style="color:rgb(199, 146, 234)">#000022</span><span class="token selector" style="color:rgb(199, 146, 234)"></span><br></span><span class="token-line" style="color:#bfc7d5"><span class="token selector" style="color:rgb(199, 146, 234)">color</span><span class="token selector class" style="color:rgb(199, 146, 234)">.blue</span><span class="token selector class" style="color:rgb(199, 146, 234)">.100</span><span class="token selector" style="color:rgb(199, 146, 234)"> = </span><span class="token selector id" style="color:rgb(199, 146, 234)">#000033</span><span class="token selector" style="color:rgb(199, 146, 234)"></span><br></span><span class="token-line" style="color:#bfc7d5"><span class="token selector" style="display:inline-block;color:rgb(199, 146, 234)"></span><br></span><span class="token-line" style="color:#bfc7d5"><span class="token selector" style="color:rgb(199, 146, 234)">colorSemantic</span><span class="token plain"> </span><span class="token punctuation" style="color:rgb(199, 146, 234)">{</span><span class="token plain"></span><br></span><span class="token-line" style="color:#bfc7d5"><span class="token plain">color.brand.primary = color.</span><span class="token color">blue</span><span class="token number" style="color:rgb(247, 140, 108)">.100</span><span class="token plain"></span><br></span><span class="token-line" style="color:#bfc7d5"><span class="token plain">button.border.color = color.brand.primary</span><br></span><span class="token-line" style="color:#bfc7d5"><span class="token plain"></span><span class="token punctuation" style="color:rgb(199, 146, 234)">}</span><br></span></code></pre><div class="buttonGroup__atx"><button type="button" aria-label="Copy code to clipboard" title="Copy" class="clean-btn"><span class="copyButtonIcons_eSgA" aria-hidden="true"><svg viewBox="0 0 24 24" class="copyButtonIcon_y97N"><path fill="currentColor" d="M19,21H8V7H19M19,5H8A2,2 0 0,0 6,7V21A2,2 0 0,0 8,23H19A2,2 0 0,0 21,21V7A2,2 0 0,0 19,5M16,1H4A2,2 0 0,0 2,3V17H4V3H16V1Z"></path></svg><svg viewBox="0 0 24 24" class="copyButtonSuccessIcon_LjdS"><path fill="currentColor" d="M21,7L9,19L3.5,13.5L4.91,12.09L9,16.17L19.59,5.59L21,7Z"></path></svg></span></button></div></div></div><h3 class="anchor anchorWithStickyNavbar_LWe7" id="types-of-tokens">Types of Tokens<a href="#types-of-tokens" class="hash-link" aria-label="Direct link to Types of Tokens" title="Direct link to Types of Tokens">​</a></h3><p>There are three types of design tokens:</p><h4 class="anchor anchorWithStickyNavbar_LWe7" id="global-tokens">Global Tokens<a href="#global-tokens" class="hash-link" aria-label="Direct link to Global Tokens" title="Direct link to Global Tokens">​</a></h4><p>Global tokens control all instances of a particular design decision, and can be defined by their context or theme. You can refer to <a href="https://javisperez.github.io/tailwindcolorshades/" target="_blank" rel="noopener noreferrer">Shades Generator</a> to create tonal colors.</p><p><img loading="lazy" alt="global-token.png" src="/learn/assets/images/global-token-49949b9f3bd635b34ae6e6576e4f8c51.png" width="632" height="361" class="img_ev3q"> </p><h4 class="anchor anchorWithStickyNavbar_LWe7" id="alias-tokens">Alias Tokens<a href="#alias-tokens" class="hash-link" aria-label="Direct link to Alias Tokens" title="Direct link to Alias Tokens">​</a></h4><p>Alias tokens are context-specific and reference global tokens. They are also known as semantic tokens.</p><p><img loading="lazy" alt="alias-token.png" src="/learn/assets/images/alias-token-f27b499e4e29a9ae0a70d41b9702a9f5.png" width="695" height="339" class="img_ev3q"></p><h4 class="anchor anchorWithStickyNavbar_LWe7" id="component-specific-tokens">Component specific Tokens<a href="#component-specific-tokens" class="hash-link" aria-label="Direct link to Component specific Tokens" title="Direct link to Component specific Tokens">​</a></h4><p>Component-specific tokens are related to the individual parts of a component. Component-specific tokens are self-explanatory and aim to provide enough context about the use of token
<img loading="lazy" alt="component-token.png" src="/learn/assets/images/component-token-959103d22a599aa78dc85d453b36d498.png" width="682" height="313" class="img_ev3q"></p><h3 class="anchor anchorWithStickyNavbar_LWe7" id="naming-design-tokens">Naming Design Tokens<a href="#naming-design-tokens" class="hash-link" aria-label="Direct link to Naming Design Tokens" title="Direct link to Naming Design Tokens">​</a></h3><p>As tokens become more sophisticated, naming patterns matter. For ease of use, it is recommended to use Category/Type/Item/Subitem/State (CTI) naming conventions to define tokens in a hierarchical tree structure of options and decisions.</p><p>Each token combines four levels -</p><ol><li><strong>Namespace</strong> levels combining any of <em>System</em> (wm), <em>Theme</em> (material, branding theme) or <em>Domain</em></li><li><strong>Object</strong> levels refer to a <em>component</em> (button), <em>Element</em> (left-icon) or <em>Component group</em> (forms)</li><li><strong>Base</strong> levels as a backbone combining <em>Category</em> (color), <em>Concept</em> (action) and <em>Property</em> (size)</li><li><strong>Modifier</strong> levels refer to one or more of <em>Variant</em> (primary), <em>State</em> (on-hover), <em>Scale</em> (100), <em>Mode</em> (on-dark)</li></ol><p>Let's see an example token:</p><p><img loading="lazy" alt="example-token.png" src="/learn/assets/images/example-token-f0ff6908b4f7f2af5fd231f43863f99b.png" width="480" height="218" class="img_ev3q"></p><h2 class="anchor anchorWithStickyNavbar_LWe7" id="how-does-it-work">How does it work?<a href="#how-does-it-work" class="hash-link" aria-label="Direct link to How does it work?" title="Direct link to How does it work?">​</a></h2><p>The design tokens can be broken down into a few main steps:</p><h3 class="anchor anchorWithStickyNavbar_LWe7" id="centralize">Centralize<a href="#centralize" class="hash-link" aria-label="Direct link to Centralize" title="Direct link to Centralize">​</a></h3><p>Manage design tokens in a single place in a platform-agnostic format (e.g., JSON or YAML).</p><div class="language-json codeBlockContainer_Ckt0 theme-code-block" style="--prism-color:#bfc7d5;--prism-background-color:#292d3e"><div class="codeBlockContent_biex"><pre tabindex="0" class="prism-code language-json codeBlock_bY9V thin-scrollbar"><code class="codeBlockLines_e6Vv"><span class="token-line" style="color:#bfc7d5"><span class="token plain">  json </span><span class="token punctuation" style="color:rgb(199, 146, 234)">{</span><span class="token plain"></span><br></span><span class="token-line" style="color:#bfc7d5"><span class="token plain">    “color”</span><span class="token operator" style="color:rgb(137, 221, 255)">:</span><span class="token plain"> </span><span class="token punctuation" style="color:rgb(199, 146, 234)">{</span><span class="token plain"></span><br></span><span class="token-line" style="color:#bfc7d5"><span class="token plain">      “primary”</span><span class="token operator" style="color:rgb(137, 221, 255)">:</span><span class="token plain"> </span><span class="token punctuation" style="color:rgb(199, 146, 234)">{</span><span class="token plain"> “value” </span><span class="token operator" style="color:rgb(137, 221, 255)">:</span><span class="token plain"> “#3366FF”</span><span class="token punctuation" style="color:rgb(199, 146, 234)">}</span><span class="token punctuation" style="color:rgb(199, 146, 234)">,</span><span class="token plain"></span><br></span><span class="token-line" style="color:#bfc7d5"><span class="token plain">      “text” </span><span class="token operator" style="color:rgb(137, 221, 255)">:</span><span class="token plain"> </span><span class="token punctuation" style="color:rgb(199, 146, 234)">{</span><span class="token plain"> “value” </span><span class="token operator" style="color:rgb(137, 221, 255)">:</span><span class="token plain"> “</span><span class="token punctuation" style="color:rgb(199, 146, 234)">{</span><span class="token plain">color.primary.value</span><span class="token punctuation" style="color:rgb(199, 146, 234)">}</span><span class="token plain">” </span><span class="token punctuation" style="color:rgb(199, 146, 234)">}</span><span class="token punctuation" style="color:rgb(199, 146, 234)">,</span><span class="token plain"></span><br></span><span class="token-line" style="color:#bfc7d5"><span class="token plain">    </span><span class="token punctuation" style="color:rgb(199, 146, 234)">}</span><span class="token punctuation" style="color:rgb(199, 146, 234)">,</span><span class="token plain"></span><br></span><span class="token-line" style="color:#bfc7d5"><span class="token plain">    “button”</span><span class="token operator" style="color:rgb(137, 221, 255)">:</span><span class="token plain"> </span><span class="token punctuation" style="color:rgb(199, 146, 234)">{</span><span class="token plain"></span><br></span><span class="token-line" style="color:#bfc7d5"><span class="token plain">      “background”</span><span class="token operator" style="color:rgb(137, 221, 255)">:</span><span class="token plain"> </span><span class="token punctuation" style="color:rgb(199, 146, 234)">{</span><span class="token plain"> “value”</span><span class="token operator" style="color:rgb(137, 221, 255)">:</span><span class="token plain"> “</span><span class="token punctuation" style="color:rgb(199, 146, 234)">{</span><span class="token plain">color.primary.value</span><span class="token punctuation" style="color:rgb(199, 146, 234)">}</span><span class="token plain">” </span><span class="token punctuation" style="color:rgb(199, 146, 234)">}</span><span class="token punctuation" style="color:rgb(199, 146, 234)">,</span><span class="token plain"></span><br></span><span class="token-line" style="color:#bfc7d5"><span class="token plain">      “text”</span><span class="token operator" style="color:rgb(137, 221, 255)">:</span><span class="token plain">  </span><span class="token punctuation" style="color:rgb(199, 146, 234)">{</span><span class="token plain"> “value”</span><span class="token operator" style="color:rgb(137, 221, 255)">:</span><span class="token plain"> “</span><span class="token punctuation" style="color:rgb(199, 146, 234)">{</span><span class="token plain">color.text.value</span><span class="token punctuation" style="color:rgb(199, 146, 234)">}</span><span class="token plain">” </span><span class="token punctuation" style="color:rgb(199, 146, 234)">}</span><span class="token plain"></span><br></span><span class="token-line" style="color:#bfc7d5"><span class="token plain">    </span><span class="token punctuation" style="color:rgb(199, 146, 234)">}</span><span class="token plain"></span><br></span><span class="token-line" style="color:#bfc7d5"><span class="token plain">  </span><span class="token punctuation" style="color:rgb(199, 146, 234)">}</span><br></span></code></pre><div class="buttonGroup__atx"><button type="button" aria-label="Copy code to clipboard" title="Copy" class="clean-btn"><span class="copyButtonIcons_eSgA" aria-hidden="true"><svg viewBox="0 0 24 24" class="copyButtonIcon_y97N"><path fill="currentColor" d="M19,21H8V7H19M19,5H8A2,2 0 0,0 6,7V21A2,2 0 0,0 8,23H19A2,2 0 0,0 21,21V7A2,2 0 0,0 19,5M16,1H4A2,2 0 0,0 2,3V17H4V3H16V1Z"></path></svg><svg viewBox="0 0 24 24" class="copyButtonSuccessIcon_LjdS"><path fill="currentColor" d="M21,7L9,19L3.5,13.5L4.91,12.09L9,16.17L19.59,5.59L21,7Z"></path></svg></span></button></div></div></div><h3 class="anchor anchorWithStickyNavbar_LWe7" id="transform">Transform<a href="#transform" class="hash-link" aria-label="Direct link to Transform" title="Direct link to Transform">​</a></h3><p>Use a build engine that takes design tokens as input and transforms them into platform-specific or framework-specific style files (e.g., CSS, Sass, iOS, Android, React, etc.). You can develop your own engine, or you can use existing ones like <a href="https://amzn.github.io/style-dictionary/#/" target="_blank" rel="noopener noreferrer">Style Dictionary</a> and <a href="https://github.com/salesforce-ux/theo" target="_blank" rel="noopener noreferrer">Theo</a>.</p><div class="language-css codeBlockContainer_Ckt0 theme-code-block" style="--prism-color:#bfc7d5;--prism-background-color:#292d3e"><div class="codeBlockContent_biex"><pre tabindex="0" class="prism-code language-css codeBlock_bY9V thin-scrollbar"><code class="codeBlockLines_e6Vv"><span class="token-line" style="color:#bfc7d5"><span class="token plain">  </span><span class="token selector" style="color:rgb(199, 146, 234)">css</span><br></span><span class="token-line" style="color:#bfc7d5"><span class="token selector" style="color:rgb(199, 146, 234)">  </span><span class="token selector pseudo-class" style="color:rgb(199, 146, 234)">:root</span><span class="token plain"> </span><span class="token punctuation" style="color:rgb(199, 146, 234)">{</span><span class="token plain"></span><br></span><span class="token-line" style="color:#bfc7d5"><span class="token plain">  </span><span class="token variable" style="color:rgb(191, 199, 213)">--color-primary</span><span class="token punctuation" style="color:rgb(199, 146, 234)">:</span><span class="token plain"> </span><span class="token hexcode color">#3366FF</span><span class="token punctuation" style="color:rgb(199, 146, 234)">;</span><span class="token plain"></span><br></span><span class="token-line" style="color:#bfc7d5"><span class="token plain">  </span><span class="token variable" style="color:rgb(191, 199, 213)">--color-text</span><span class="token punctuation" style="color:rgb(199, 146, 234)">:</span><span class="token plain"> </span><span class="token function" style="color:rgb(130, 170, 255)">var</span><span class="token punctuation" style="color:rgb(199, 146, 234)">(</span><span class="token variable" style="color:rgb(191, 199, 213)">--color-primary</span><span class="token punctuation" style="color:rgb(199, 146, 234)">)</span><span class="token punctuation" style="color:rgb(199, 146, 234)">;</span><span class="token plain"></span><br></span><span class="token-line" style="color:#bfc7d5"><span class="token plain">  </span><span class="token variable" style="color:rgb(191, 199, 213)">--button-background</span><span class="token punctuation" style="color:rgb(199, 146, 234)">:</span><span class="token plain"> </span><span class="token function" style="color:rgb(130, 170, 255)">var</span><span class="token punctuation" style="color:rgb(199, 146, 234)">(</span><span class="token variable" style="color:rgb(191, 199, 213)">--color-primary</span><span class="token punctuation" style="color:rgb(199, 146, 234)">)</span><span class="token punctuation" style="color:rgb(199, 146, 234)">;</span><span class="token plain"></span><br></span><span class="token-line" style="color:#bfc7d5"><span class="token plain">  </span><span class="token variable" style="color:rgb(191, 199, 213)">--button-text</span><span class="token punctuation" style="color:rgb(199, 146, 234)">:</span><span class="token plain"> </span><span class="token function" style="color:rgb(130, 170, 255)">var</span><span class="token punctuation" style="color:rgb(199, 146, 234)">(</span><span class="token variable" style="color:rgb(191, 199, 213)">--color-text</span><span class="token punctuation" style="color:rgb(199, 146, 234)">)</span><span class="token punctuation" style="color:rgb(199, 146, 234)">;</span><span class="token plain"></span><br></span><span class="token-line" style="color:#bfc7d5"><span class="token plain">  </span><span class="token punctuation" style="color:rgb(199, 146, 234)">}</span><br></span></code></pre><div class="buttonGroup__atx"><button type="button" aria-label="Copy code to clipboard" title="Copy" class="clean-btn"><span class="copyButtonIcons_eSgA" aria-hidden="true"><svg viewBox="0 0 24 24" class="copyButtonIcon_y97N"><path fill="currentColor" d="M19,21H8V7H19M19,5H8A2,2 0 0,0 6,7V21A2,2 0 0,0 8,23H19A2,2 0 0,0 21,21V7A2,2 0 0,0 19,5M16,1H4A2,2 0 0,0 2,3V17H4V3H16V1Z"></path></svg><svg viewBox="0 0 24 24" class="copyButtonSuccessIcon_LjdS"><path fill="currentColor" d="M21,7L9,19L3.5,13.5L4.91,12.09L9,16.17L19.59,5.59L21,7Z"></path></svg></span></button></div></div></div><p>We will learn more about using design tokens with or without a design system in the coming blogs.</p><h2 class="anchor anchorWithStickyNavbar_LWe7" id="conclusion">Conclusion<a href="#conclusion" class="hash-link" aria-label="Direct link to Conclusion" title="Direct link to Conclusion">​</a></h2><p>In conclusion, design tokens are not just a novel concept; they are the game changer for digital product design.</p><p>As we simplify the process, we can standardize the creation of design tokens, the naming conventions of design tokens, and the different types of design tokens. Using design tokens instead of hard coded values ensures more flexible design systems that are easy to build, maintain, and scale.</p><p>In the next blog post, see how it works with SaaS application and with WaveMaker.</p>]]></content>
        <author>
            <name>Lovin Ahmed</name>
        </author>
    </entry>
    <entry>
        <title type="html"><![CDATA[Consuming WaveMaker application’s secure APIs]]></title>
        <id>https://www.wavemaker.com/learn/blog/2023/09/15/consuming-wmsecured-apis</id>
        <link href="https://www.wavemaker.com/learn/blog/2023/09/15/consuming-wmsecured-apis"/>
        <updated>2023-09-15T00:00:00.000Z</updated>
        <summary type="html"><![CDATA[A WaveMaker application can have different services like Database, REST, SOAP, and all these services have API endpoints that are automatically generated by WaveMaker when they are created. So the application can act as a resource-serving microservice and these APIs can be used by other microservices/applications.]]></summary>
        <content type="html"><![CDATA[<p>A WaveMaker application can have different services like Database, REST, SOAP, and all these services have API endpoints that are automatically generated by WaveMaker when they are created. So the application can act as a resource-serving microservice and these APIs can be used by other microservices/applications.</p><p>These API endpoints are automatically used by the WaveMaker application UI when they are bound to a variable. If the application is secured with a security provider the existing architecture of the WaveMaker app UI already handles the authentication of the APIs i.e., if the UI and services are in the same application.</p><p>The WaveMaker application APIs can also be invoked from different clients. To know more about <a href="#what-is-client">What is Client</a>.</p><h2 class="anchor anchorWithStickyNavbar_LWe7" id="how-can-wavemaker-application-apis-be-used-in-other-clients">How can WaveMaker application APIs be used in other clients?<a href="#how-can-wavemaker-application-apis-be-used-in-other-clients" class="hash-link" aria-label="Direct link to How can WaveMaker application APIs be used in other clients?" title="Direct link to How can WaveMaker application APIs be used in other clients?">​</a></h2><p>The WaveMaker application APIs that are exposed can be used in many ways and if the client is,</p><ul><li>A WaveMaker application then the APIs can be imported as a REST service or as Swagger.</li><li>A Non-WaveMaker application then the APIs can be invoked by making an HTTP request to the API.</li></ul><h2 class="anchor anchorWithStickyNavbar_LWe7" id="when-wavemaker-apis-are-secured-with-security-providers">When WaveMaker APIs are secured with security providers<a href="#when-wavemaker-apis-are-secured-with-security-providers" class="hash-link" aria-label="Direct link to When WaveMaker APIs are secured with security providers" title="Direct link to When WaveMaker APIs are secured with security providers">​</a></h2><p>APIs exposed by the application are also secured and require authentication to access them when used in other applications.  </p><p>If the application is secured by any form-based security provider like Database/LDAP/DB/Custom Security, then the client can pass the BASIC authorization header in the HTTP request to invoke the application APIs. Basic authentication has to be enabled to access the APIs and in WaveMaker, by default, basic authentication is enabled for form-based authentication providers.</p><p>If the application is secured with an SSO security provider like OpenID, SAML, CAS, then the below approach can be used to invoke the secure APIs.</p><h3 class="anchor anchorWithStickyNavbar_LWe7" id="how-can-clients-invoke-wavemaker-application-apis-secured-with-sso">How can Clients invoke WaveMaker Application APIs Secured with SSO?<a href="#how-can-clients-invoke-wavemaker-application-apis-secured-with-sso" class="hash-link" aria-label="Direct link to How can Clients invoke WaveMaker Application APIs Secured with SSO?" title="Direct link to How can Clients invoke WaveMaker Application APIs Secured with SSO?">​</a></h3><p>If a client that needs to invoke the WaveMaker application APIs has security configured, the same user context cannot be used to access the WaveMaker secured APIs as the security configured can be different, even if it is the same security provider there cannot be common user context between them.</p><p>This can now be achieved in WaveMaker by using JWS or Opaque tokens as the secondary authentication providers. In other words, if the WaveMaker application's APIs are secured and are to be used by other clients then, the user can enable a secondary authentication provider i.e., JWS or Opaque providers. This makes the APIs accept a token and provide user access to the APIs.</p><p>For example, consider a client and one WaveMaker application, the application provides some services and has the primary security SAML configured. If the service APIs are to be accessed from the same application UI then the existing architecture of the WaveMaker applications takes care of the complete flow. In this flow, the user is redirected to the SAML server for authentication and once the user is authenticated, they get redirected to the application.</p><p>If the same APIs are invoked from a different client, then along with SAML a secondary security provider needs to be configured. Now the client can invoke the API with a bearer token header in the request and gain access to the APIs. To know more about <a href="#what-is-authorization-server">Bearer token</a>.</p><p><a target="_blank" href="/learn/assets/files/client_resourceserver_authorizationserver-8861b142a86efc9085b5363b96bd462a.png"><img loading="lazy" src="/learn/assets/images/client_resourceserver_authorizationserver-8861b142a86efc9085b5363b96bd462a.png" width="846" height="508" class="img_ev3q"></a></p><h2 class="anchor anchorWithStickyNavbar_LWe7" id="what-is-client">What is Client<a href="#what-is-client" class="hash-link" aria-label="Direct link to What is Client" title="Direct link to What is Client">​</a></h2><p>The client can be a WaveMaker application/Non-WaveMaker application, microservice, Java client, command line, Postman, and so on. The client should have a token of the current user, making the request that is issued by any provider that follows OpenID specification. According to the OpenID specification, the provider returns two tokens, an ID and an access token. Any one of the tokens can be passed in the request as a header while invoking the API.</p><div class="theme-admonition theme-admonition-note alert alert--secondary admonition_WoCw"><div class="admonitionHeading_TMsN"><span class="admonitionIcon_Ibzs"><svg viewBox="0 0 14 16"><path fill-rule="evenodd" d="M6.3 5.69a.942.942 0 0 1-.28-.7c0-.28.09-.52.28-.7.19-.18.42-.28.7-.28.28 0 .52.09.7.28.18.19.28.42.28.7 0 .28-.09.52-.28.7a1 1 0 0 1-.7.3c-.28 0-.52-.11-.7-.3zM8 7.99c-.02-.25-.11-.48-.31-.69-.2-.19-.42-.3-.69-.31H6c-.27.02-.48.13-.69.31-.2.2-.3.44-.31.69h1v3c.02.27.11.5.31.69.2.2.42.31.69.31h1c.27 0 .48-.11.69-.31.2-.19.3-.42.31-.69H8V7.98v.01zM7 2.3c-3.14 0-5.7 2.54-5.7 5.68 0 3.14 2.56 5.7 5.7 5.7s5.7-2.55 5.7-5.7c0-3.15-2.56-5.69-5.7-5.69v.01zM7 .98c3.86 0 7 3.14 7 7s-3.14 7-7 7-7-3.12-7-7 3.14-7 7-7z"></path></svg></span>note</div><div class="admonitionContent_vXIg"><p>The OpenID provider from which the client obtained the token needs to be configured as the secondary security provider in the resource server i.e., the application which has the APIs.</p></div></div><h2 class="anchor anchorWithStickyNavbar_LWe7" id="what-is-authorization-server">What is Authorization Server<a href="#what-is-authorization-server" class="hash-link" aria-label="Direct link to What is Authorization Server" title="Direct link to What is Authorization Server">​</a></h2><p>An authorization server issues tokens to clients that can be used to access protected resources on the resource server which is known as bearer token. These tokens are usually in the form of OAuth2 ID and access tokens and are issued after the client has been authenticated and authorized by the authorization server. The authorization server is responsible for ensuring that only authorized clients can access protected resources on the resource server.</p><h2 class="anchor anchorWithStickyNavbar_LWe7" id="what-is-resource-server">What is Resource Server<a href="#what-is-resource-server" class="hash-link" aria-label="Direct link to What is Resource Server" title="Direct link to What is Resource Server">​</a></h2><p>The resource server is the WaveMaker application which has the service APIs exposed for use. These APIs are secured by the primary security provider but if we enable a secondary security provider that can be one of JWS or Opaque and thus it can accept ID or access token in the request which is being made by the client and provide access to the client. The resource server handles the validation of the ID/Access token.
To know more about the differences between an ID token and an Access token, see <a href="https://auth0.com/blog/id-token-access-token-what-is-the-difference/" target="_blank" rel="noopener noreferrer">ID/Access token</a> .</p><div class="theme-admonition theme-admonition-note alert alert--secondary admonition_WoCw"><div class="admonitionHeading_TMsN"><span class="admonitionIcon_Ibzs"><svg viewBox="0 0 14 16"><path fill-rule="evenodd" d="M6.3 5.69a.942.942 0 0 1-.28-.7c0-.28.09-.52.28-.7.19-.18.42-.28.7-.28.28 0 .52.09.7.28.18.19.28.42.28.7 0 .28-.09.52-.28.7a1 1 0 0 1-.7.3c-.28 0-.52-.11-.7-.3zM8 7.99c-.02-.25-.11-.48-.31-.69-.2-.19-.42-.3-.69-.31H6c-.27.02-.48.13-.69.31-.2.2-.3.44-.31.69h1v3c.02.27.11.5.31.69.2.2.42.31.69.31h1c.27 0 .48-.11.69-.31.2-.19.3-.42.31-.69H8V7.98v.01zM7 2.3c-3.14 0-5.7 2.54-5.7 5.68 0 3.14 2.56 5.7 5.7 5.7s5.7-2.55 5.7-5.7c0-3.15-2.56-5.69-5.7-5.69v.01zM7 .98c3.86 0 7 3.14 7 7s-3.14 7-7 7-7-3.12-7-7 3.14-7 7-7z"></path></svg></span>note</div><div class="admonitionContent_vXIg"><p>If the token is an ID token, configure the JWS provider, and if it is an access token configure the Opaque provider in the resource server as a secondary provider. This is because the ID token can be validated directly by the resource server but the access token needs to be verified using an introspection endpoint provided by the authorization server.</p></div></div><h2 class="anchor anchorWithStickyNavbar_LWe7" id="configuring-wavemaker-application-as-resource-server">Configuring WaveMaker Application as Resource Server<a href="#configuring-wavemaker-application-as-resource-server" class="hash-link" aria-label="Direct link to Configuring WaveMaker Application as Resource Server" title="Direct link to Configuring WaveMaker Application as Resource Server">​</a></h2><p>WaveMaker application can be configured to accept an ID token or access token as bearer token in the authorization header. It is then validated using the JWS provider if it is an ID token or using Opaque token provider if it is an opaque access token. </p><p>This makes the application a resource server that validates ID and access tokens to share resources. To know how to configure JWS or opaque as secondary authentication providers, see <a href="/learn/how-tos/configuring-jws-and-opaque-security-providers">Configure JWS and Opaque providers</a>.</p><h2 class="anchor anchorWithStickyNavbar_LWe7" id="configuring-wavemaker-application-as-client">Configuring WaveMaker Application as Client<a href="#configuring-wavemaker-application-as-client" class="hash-link" aria-label="Direct link to Configuring WaveMaker Application as Client" title="Direct link to Configuring WaveMaker Application as Client">​</a></h2><p>WaveMaker application can be configured as a client to pass the ID or access token to the resource server. To know more, see <a href="/learn/how-tos/passing-id-access-tokens-as-header">How to Pass Logged-In User ID/Access Tokens as Header</a>.</p>]]></content>
        <author>
            <name>Praveen Chandra</name>
        </author>
    </entry>
    <entry>
        <title type="html"><![CDATA[App Security Migration from XML to Java Configuration]]></title>
        <id>https://www.wavemaker.com/learn/blog/2023/09/05/xml-to-java-configuration-migration</id>
        <link href="https://www.wavemaker.com/learn/blog/2023/09/05/xml-to-java-configuration-migration"/>
        <updated>2023-09-05T00:00:00.000Z</updated>
        <summary type="html"><![CDATA[---]]></summary>
        <content type="html"><![CDATA[<hr><p>WaveMaker app security configuration has now migrated from XML-based configuration to Java-based configuration. In earlier versions, the Java beans generated during any security change, using security dialog, used to get saved in the <strong>project-security.xml</strong> file. With this release, WaveMaker 11.4, <strong>project-security.xml</strong> and <strong>securityService.properties</strong> files will be removed from the project and the Java beans will be generated dynamically in the WaveMaker runtime.</p><div class="theme-admonition theme-admonition-note alert alert--secondary admonition_WoCw"><div class="admonitionHeading_TMsN"><span class="admonitionIcon_Ibzs"><svg viewBox="0 0 14 16"><path fill-rule="evenodd" d="M6.3 5.69a.942.942 0 0 1-.28-.7c0-.28.09-.52.28-.7.19-.18.42-.28.7-.28.28 0 .52.09.7.28.18.19.28.42.28.7 0 .28-.09.52-.28.7a1 1 0 0 1-.7.3c-.28 0-.52-.11-.7-.3zM8 7.99c-.02-.25-.11-.48-.31-.69-.2-.19-.42-.3-.69-.31H6c-.27.02-.48.13-.69.31-.2.2-.3.44-.31.69h1v3c.02.27.11.5.31.69.2.2.42.31.69.31h1c.27 0 .48-.11.69-.31.2-.19.3-.42.31-.69H8V7.98v.01zM7 2.3c-3.14 0-5.7 2.54-5.7 5.68 0 3.14 2.56 5.7 5.7 5.7s5.7-2.55 5.7-5.7c0-3.15-2.56-5.69-5.7-5.69v.01zM7 .98c3.86 0 7 3.14 7 7s-3.14 7-7 7-7-3.12-7-7 3.14-7 7-7z"></path></svg></span>note</div><div class="admonitionContent_vXIg"><p>Any custom beans related to security written in <strong>project-user-spring.xml</strong> will continue to work.</p></div></div><h2 class="anchor anchorWithStickyNavbar_LWe7" id="why-are-we-migrating">Why are we Migrating?<a href="#why-are-we-migrating" class="hash-link" aria-label="Direct link to Why are we Migrating?" title="Direct link to Why are we Migrating?">​</a></h2><p>XML configuration beans are generated in design time when a security-related configuration is saved or updated from the Security dialog. By moving beans to the Java configuration there is no generation of XML files which helps in the following.</p><ul><li><a href="/learn/how-tos/switch-security-provider-based-on-profile/">Switching security providers</a> based on the profile i.e., users can set different security providers for the development profile and testing/production profile. To know more about profiles, see <a href="/learn/app-development/deployment/configuration-profiles/">Configuration Profiles</a>.</li><li>XML changes are no longer visible in VCS as the security configurations are maintained in the WaveMaker app runtime. This avoids confusion as only user changes would be visible in the VCS.</li><li>Any configuration changes/bug fixes in the future will not require any migrations in the user projects.</li><li>In further releases, it would also help in supporting multiple security providers in the same profile in WaveMaker studio.</li></ul><h2 class="anchor anchorWithStickyNavbar_LWe7" id="backward-compatibility">Backward Compatibility<a href="#backward-compatibility" class="hash-link" aria-label="Direct link to Backward Compatibility" title="Direct link to Backward Compatibility">​</a></h2><p>As a part of release 11.4, the following profile property names have been auto-migrated in the user projects. In case, the users have been using the below properties in any of their environments or build scripts, they need to perform the below changes.</p><table><thead><tr><th>Old Property Name</th><th>New Property Name</th></tr></thead><tbody><tr><td>security.providers</td><td>security.activeProviders</td></tr><tr><td>security.general.cors.{pathEntryName}.allowedOrigins</td><td>security.general.cors.pathEntries.{pathEntryName}.allowedOrigins</td></tr><tr><td>security.providers.ad.groupSearchDisabled</td><td>security.providers.ad.roleMappingEnabled</td></tr><tr><td>security.providers.ldap.groupSearchDisabled</td><td>security.providers.ldap.roleMappingEnabled</td></tr></tbody></table>]]></content>
        <author>
            <name>Praveen Chandra</name>
        </author>
    </entry>
    <entry>
        <title type="html"><![CDATA[AA Compliant Website Accessibility through WaveMaker Platform]]></title>
        <id>https://www.wavemaker.com/learn/blog/2023/08/14/aa-compliance-accessibility</id>
        <link href="https://www.wavemaker.com/learn/blog/2023/08/14/aa-compliance-accessibility"/>
        <updated>2023-08-14T00:00:00.000Z</updated>
        <summary type="html"><![CDATA[Enabling AA Compliance for web apps built with WaveMaker requires a concerted effort to implement various accessibility standards across our 100+ widget collection. By following WCAG guidelines, using semantic markup, prioritizing keyboard accessibility, ensuring color contrast, providing alternative text for images, and implementing ARIA attributes, developers can create an inclusive and accessible platform for users of all abilities. Continuous testing, documentation, and training further contribute to the platform's commitment to accessibility and enable a seamless and enriching experience for all users.]]></summary>
        <content type="html"><![CDATA[<p>Enabling AA Compliance for web apps built with WaveMaker requires a concerted effort to implement various accessibility standards across our 100+ widget collection. By following WCAG guidelines, using semantic markup, prioritizing keyboard accessibility, ensuring color contrast, providing alternative text for images, and implementing ARIA attributes, developers can create an inclusive and accessible platform for users of all abilities. Continuous testing, documentation, and training further contribute to the platform's commitment to accessibility and enable a seamless and enriching experience for all users.</p><p>Although Accessibility is designed for people with disabilities, it helps everyone in general. Accessibility promotes usability. Everyone, in general, can benefit from clear instructions, opportunities to correct form errors, simple visual layouts, high color contrast, and the option to read a transcript or captions to a video or audio recording.
Accessibility often describes hardware and software designed to help those who experience disabilities.</p><h2 class="anchor anchorWithStickyNavbar_LWe7" id="standard-practices-to-ensure-aa-compliance">Standard practices to ensure AA compliance<a href="#standard-practices-to-ensure-aa-compliance" class="hash-link" aria-label="Direct link to Standard practices to ensure AA compliance" title="Direct link to Standard practices to ensure AA compliance">​</a></h2><p><strong>WCAG 2.1 Guidelines</strong>: The Web Content Accessibility Guidelines (WCAG) 2.1 provide the most widely recognized and accepted accessibility standards. These guidelines define criteria for making web content more accessible to users with disabilities.</p><p><strong>Keyboard Accessibility</strong>: All components and interactions should be operable and fully functional using only the keyboard. This ensures that users who rely on keyboard navigation or assistive devices can access all functionalities without barriers.
Proper focus management is crucial for keyboard accessibility. </p><p>Ensuring that focus is clearly visible and moves in a logical order through interactive elements improves the overall accessibility web apps built with the platform.
All modals/dialogs with custom HTML or widgets like date, datetime made accessible by trapping the focus inside them i..e, when a user hits <em>Tab</em> or <em>Shift+Tab</em> or clicks around, they can't escape a certain cycle of focusable elements like anchor/button/input inside the dialog.
The only way to escape the focus on dialog is to close it or press <em>Escape</em> key.</p><p><strong>Semantic/native HTML</strong>: Using these HTML elements is essential to create a well-structured and accessible user interface. This includes using proper heading tags, lists, form elements, and semantic roles to convey the meaning and relationships of content to assistive technologies.</p><p><strong>Form Accessibility</strong>: Forms on the platform should be designed with clear labels, error messages, and properly associated input fields. This ensures that users can understand and complete forms using assistive technologies.
ARIA (Accessible Rich Internet Applications): Implementing ARIA attributes can enhance the accessibility of dynamic and interactive components on the website. ARIA roles and properties provide additional context and information to assistive technologies.</p><p><strong>Testing and Validation</strong>: Regular accessibility testing and validation should be conducted during the development process. Automated testing tools, as well as manual testing with users with disabilities, can help identify and address potential accessibility issues.</p><p><strong>Documentation and Training</strong>: Providing comprehensive accessibility documentation and training for web app developers and users helps ensure that accessibility is consistently maintained throughout the development lifecycle.</p><h3 class="anchor anchorWithStickyNavbar_LWe7" id="a-holistic-approach-to-embrace-aa-compliance">A Holistic Approach to Embrace AA Compliance:<a href="#a-holistic-approach-to-embrace-aa-compliance" class="hash-link" aria-label="Direct link to A Holistic Approach to Embrace AA Compliance:" title="Direct link to A Holistic Approach to Embrace AA Compliance:">​</a></h3><p>Accessibility is not an afterthought; it's an integral part of our WaveMaker’s DNA. From the initial planning stages to the final implementation, we adopted a holistic approach to accessibility, ensuring that apps built with WaveMaker cater to everyone.
Aligning with the Web Content Accessibility Guidelines (WCAG) 2.1 AA standards, our team worked tirelessly to address host of issues with AA compliance in our widgets. Clear and consistent navigation, keyboard operability, and color contrast optimization were among the many key aspects we prioritized to create a seamless browsing experience.</p><p><strong>1.The Power of Semantic Markup</strong>: Recognizing that an accessible app goes beyond mere compliance, we fully embraced the potential of semantic markup. By using appropriate HTML elements with meaningful structure, we enable all users, including those with assistive technologies, to comprehend the content's context and organization effortlessly.</p><p><strong>2.Empowering Users with Semantic Elements</strong>: Semantic headings play a crucial role in guiding users through our website’s content. By employing a logical heading hierarchy, we empower screen readers to provide users with a comprehensive outline of the information, ensuring easy navigation and comprehension.
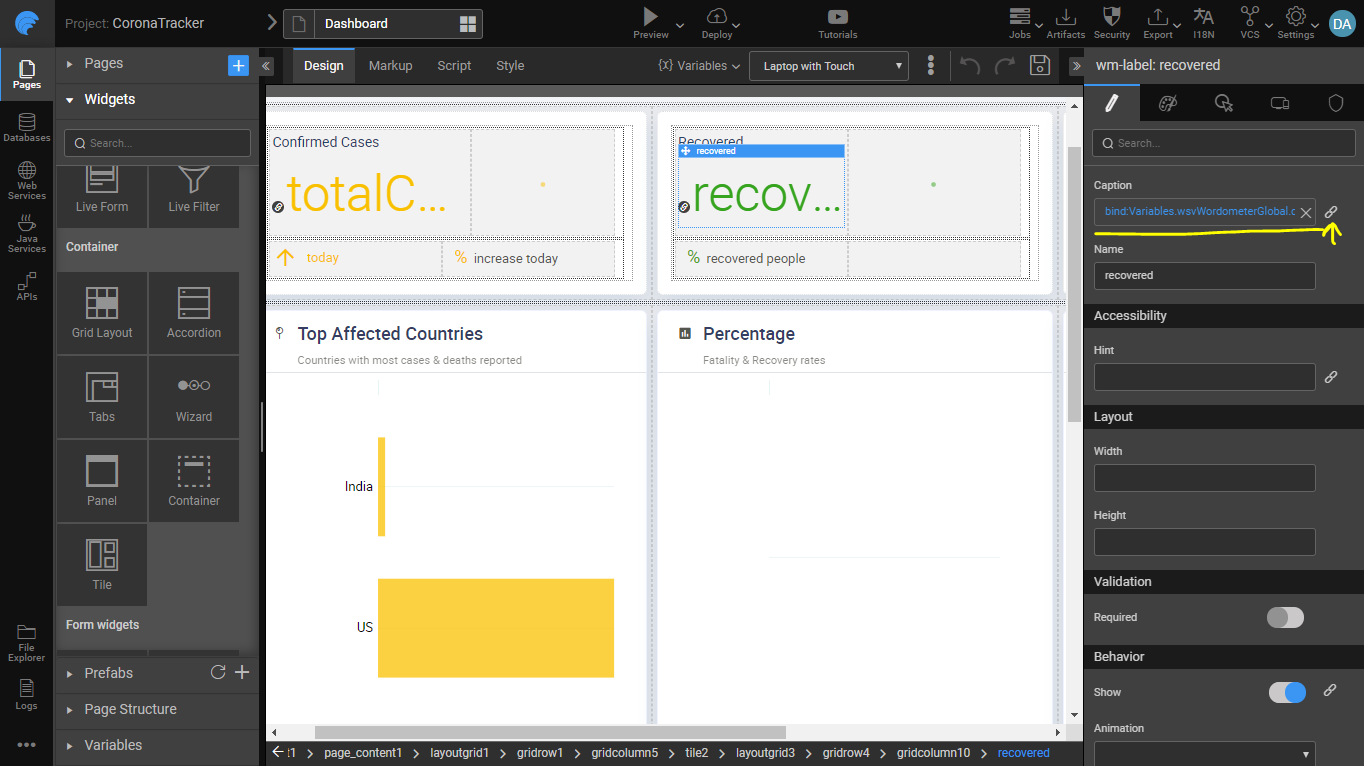
</p><p><strong>3.Enhanced Interactive Elements</strong>: Our commitment to inclusivity extended to interactive elements, which received special attention. Every button, link, and form field is equipped with descriptive labels, ensuring that users, irrespective of their abilities, can fully grasp the purpose and functionality of each element.</p><p><strong>4.The Impact of ARIA Roles</strong>: Incorporating ARIA roles judiciously, we elevated the accessibility of our platform’s dynamic components. Navigation menus, landmark elements, and live regions were thoughtfully annotated, providing users with valuable context through assistive technologies.
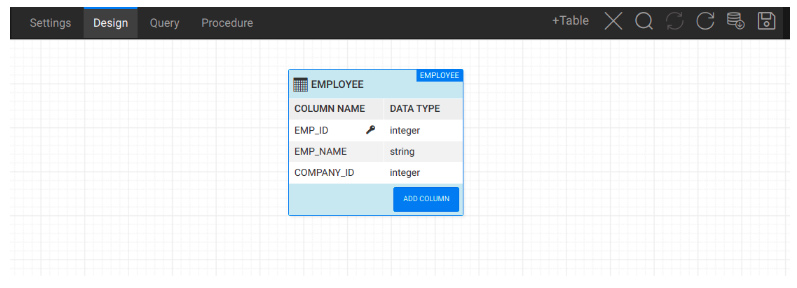
</p><p><strong>5.Unlocking the Power of Data Tables</strong>: When presenting data in tabular format, we embraced best practices for table accessibility. Meaningful table headers and descriptive captions not only aid screen readers in properly interpreting the information but also offer a seamless experience to all users.</p><p><strong>6.Form Filling Made Accessible</strong>: We understood the importance of form accessibility, as it directly affects users' ability to interact with our services. With clear validation messages and error handling, we created a smooth form filling experience for everyone</p><h3 class="anchor anchorWithStickyNavbar_LWe7" id="accessibility-attributes-added-to-different-widgets-in-wavemaker">Accessibility attributes added to different widgets in WaveMaker<a href="#accessibility-attributes-added-to-different-widgets-in-wavemaker" class="hash-link" aria-label="Direct link to Accessibility attributes added to different widgets in WaveMaker" title="Direct link to Accessibility attributes added to different widgets in WaveMaker">​</a></h3><p>By incorporating many of these recommendations with a focus on accessibility and semantic markup, we aim to create a seamless and inclusive browsing experience for all users, regardless of their abilities.
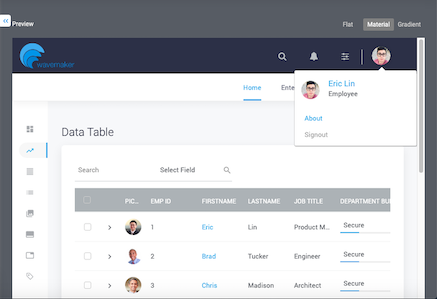
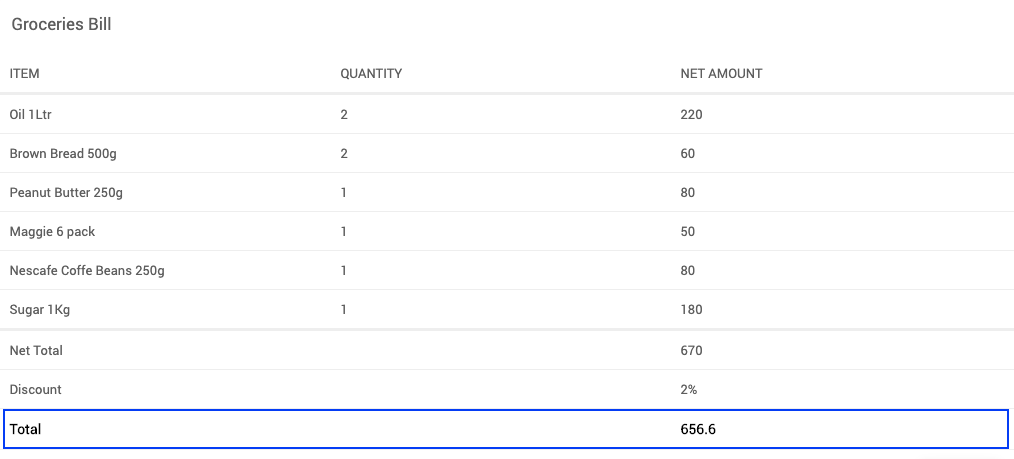
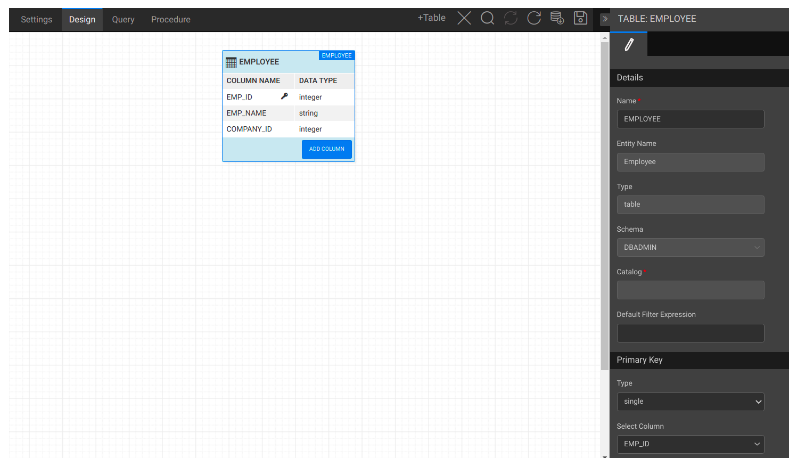
 </p><p><strong>Data Table</strong>:
Implemented proper table headers and captions for screen readers to interpret data correctly.
Ensured that data cells are logically organized, making navigation easier for keyboard users.
Incorporated ARIA attributes to convey additional information about the table structure.
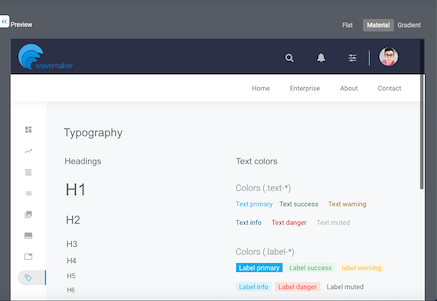
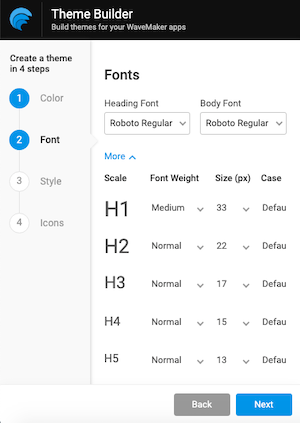
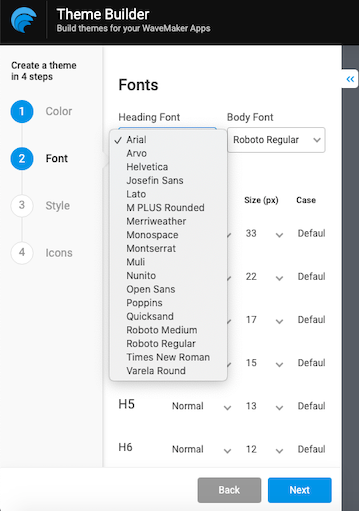
</p><p><strong>Typography</strong>:
Utilized appropriate heading tags (e.g., h1, h2, etc.) to maintain a clear content hierarchy.
Ensured sufficient contrast between text and background for readability.
Made font size adjustable using browser settings to accommodate users with low vision.
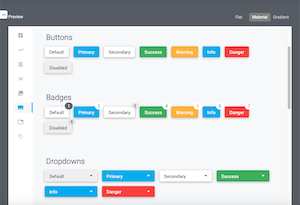
Added descriptive and meaningful text labels for buttons and anchor links.
Provided keyboard focus styling to indicate active elements for keyboard users.
Included ARIA roles and states to communicate button states to screen readers.</p><div class="codeBlockContainer_Ckt0 theme-code-block" style="--prism-color:#bfc7d5;--prism-background-color:#292d3e"><div class="codeBlockContent_biex"><pre tabindex="0" class="prism-code language-text codeBlock_bY9V thin-scrollbar"><code class="codeBlockLines_e6Vv"><span class="token-line" style="color:#bfc7d5"><span class="token plain">&lt;label for="name"&gt;Full Name:&lt;/label&gt;</span><br></span><span class="token-line" style="color:#bfc7d5"><span class="token plain">&lt;input type="text" id="name" name="name" aria-required="true" /
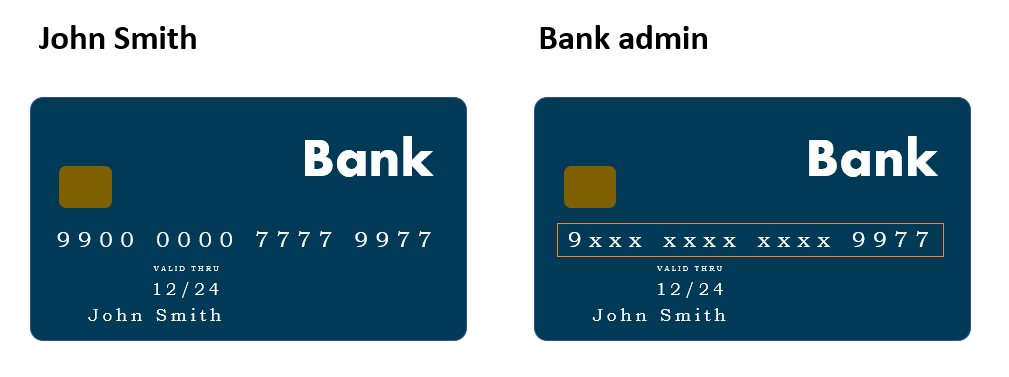
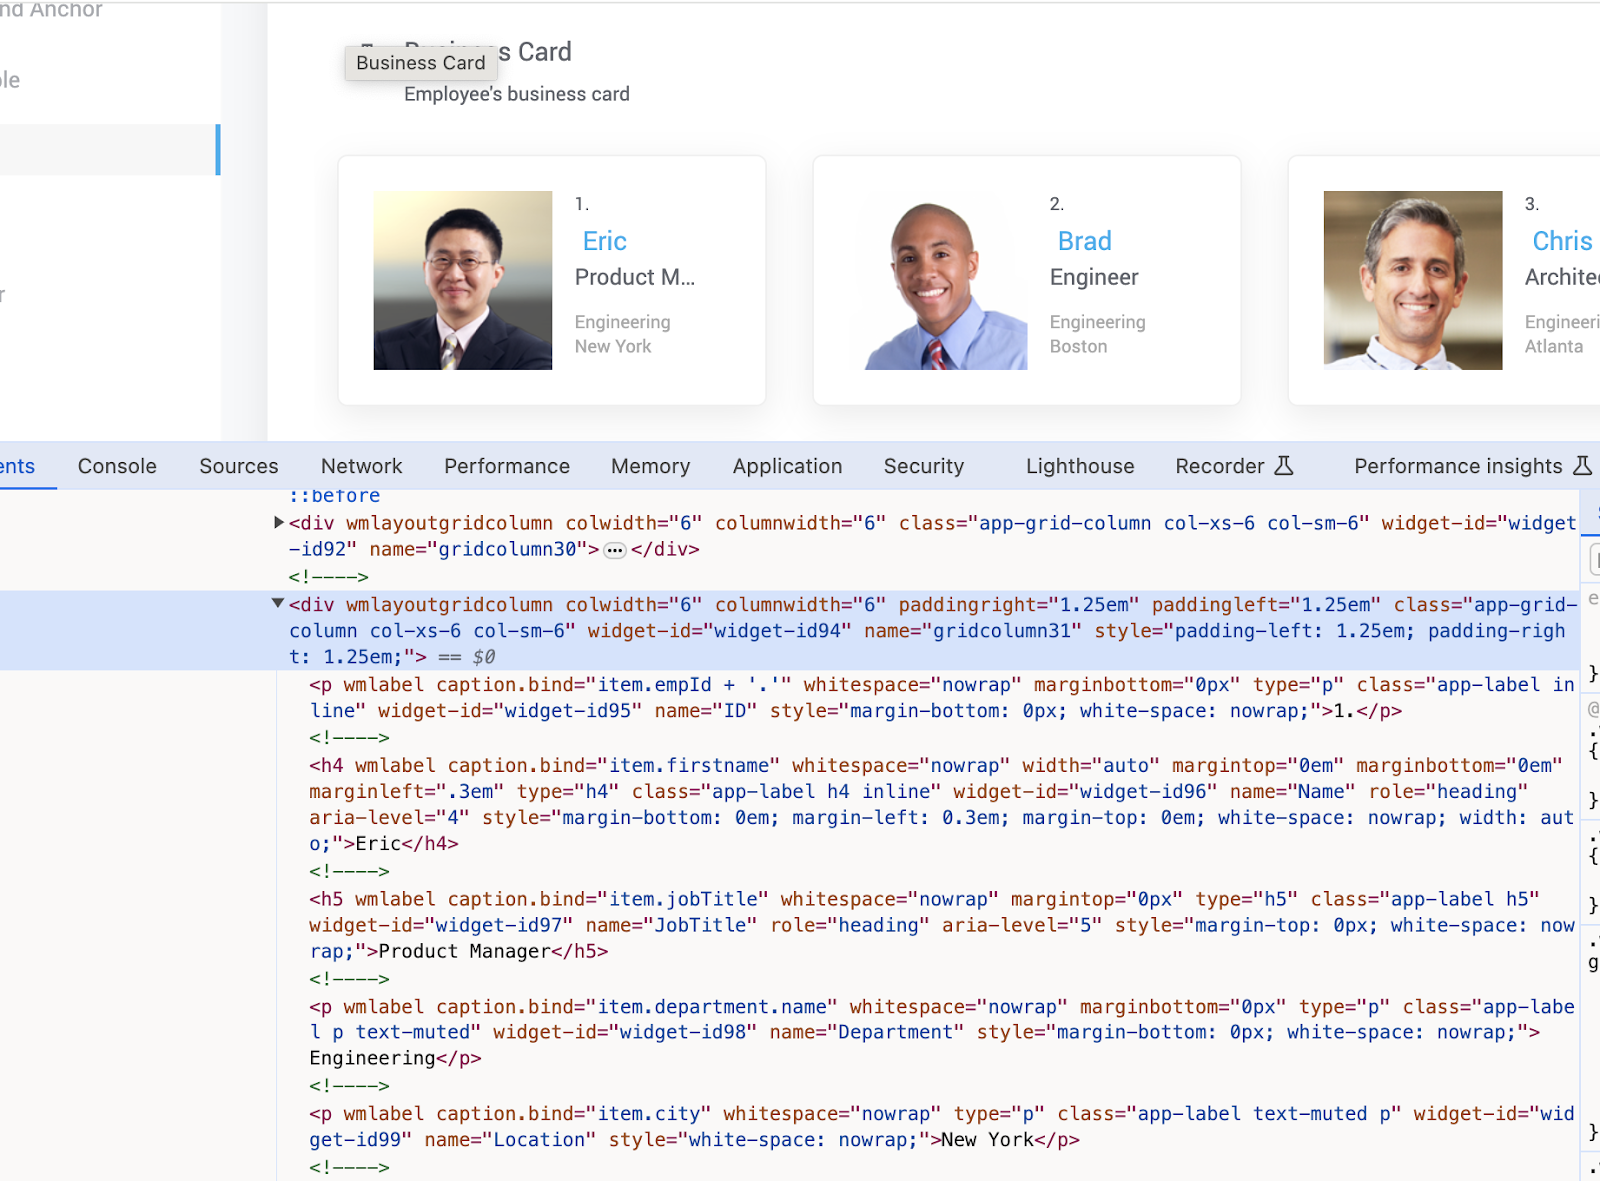
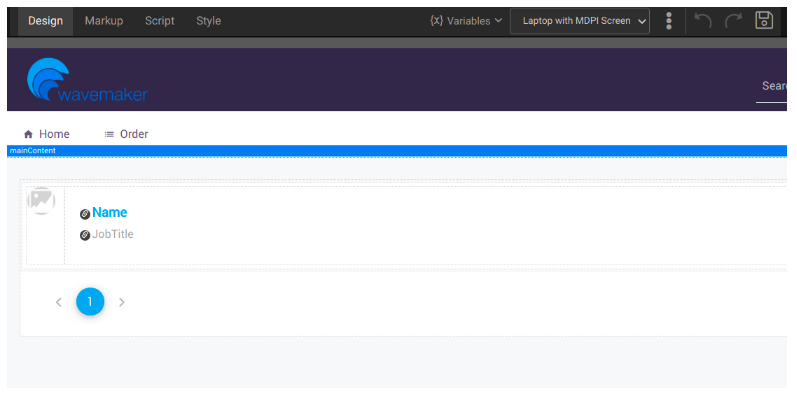
&gt;</span><br></span></code></pre><div class="buttonGroup__atx"><button type="button" aria-label="Copy code to clipboard" title="Copy" class="clean-btn"><span class="copyButtonIcons_eSgA" aria-hidden="true"><svg viewBox="0 0 24 24" class="copyButtonIcon_y97N"><path fill="currentColor" d="M19,21H8V7H19M19,5H8A2,2 0 0,0 6,7V21A2,2 0 0,0 8,23H19A2,2 0 0,0 21,21V7A2,2 0 0,0 19,5M16,1H4A2,2 0 0,0 2,3V17H4V3H16V1Z"></path></svg><svg viewBox="0 0 24 24" class="copyButtonSuccessIcon_LjdS"><path fill="currentColor" d="M21,7L9,19L3.5,13.5L4.91,12.09L9,16.17L19.59,5.59L21,7Z"></path></svg></span></button></div></div></div><p><strong>Cards</strong>:
Made card content accessible to screen readers by using proper semantic elements.
Ensured focus order inside the card for keyboard navigation.
Made card structures consistent and straightforward for easy comprehension.</p><p><strong>Iframe</strong>:
Added descriptive titles to iframes, conveying their purpose to assistive technologies.
Ensured that the iframe content is accessible and adheres to WCAG guidelines.
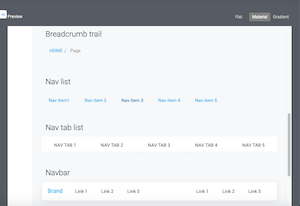
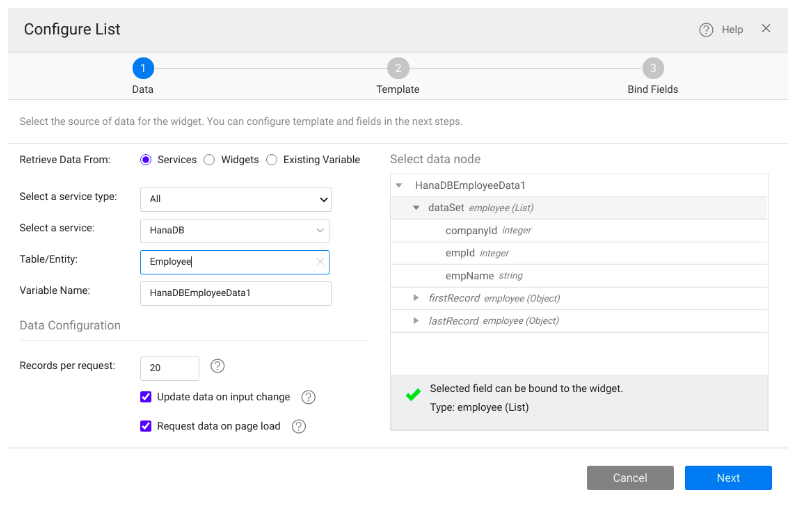
</p><p><strong>Lists and Pagination</strong>:
Utilized semantic list elements (e.g., ul, ol) to provide clear content structure.
Added ARIA attributes to indicate the list role and state to screen readers.</p><p><strong>Live Filter</strong>:
Provided accessible feedback to screen readers when filtering results dynamically.
Ensured that the filter function is keyboard operable and fully functional without a mouse.</p><p><strong>Forms</strong>:
Implemented form labels, legends, and placeholders to describe form elements clearly.
Ensured proper validation messages for screen readers to identify and correct errors.</p><div class="codeBlockContainer_Ckt0 theme-code-block" style="--prism-color:#bfc7d5;--prism-background-color:#292d3e"><div class="codeBlockContent_biex"><pre tabindex="0" class="prism-code language-text codeBlock_bY9V thin-scrollbar"><code class="codeBlockLines_e6Vv"><span class="token-line" style="color:#bfc7d5"><span class="token plain">&lt;button type="submit" aria-label="Submit Form"&gt;Submit&lt;/button&gt;</span><br></span></code></pre><div class="buttonGroup__atx"><button type="button" aria-label="Copy code to clipboard" title="Copy" class="clean-btn"><span class="copyButtonIcons_eSgA" aria-hidden="true"><svg viewBox="0 0 24 24" class="copyButtonIcon_y97N"><path fill="currentColor" d="M19,21H8V7H19M19,5H8A2,2 0 0,0 6,7V21A2,2 0 0,0 8,23H19A2,2 0 0,0 21,21V7A2,2 0 0,0 19,5M16,1H4A2,2 0 0,0 2,3V17H4V3H16V1Z"></path></svg><svg viewBox="0 0 24 24" class="copyButtonSuccessIcon_LjdS"><path fill="currentColor" d="M21,7L9,19L3.5,13.5L4.91,12.09L9,16.17L19.59,5.59L21,7Z"></path></svg></span></button></div></div></div><p><strong>Form Widgets</strong>:
Ensured form widgets (e.g., input fields, dropdowns) are accessible and operable with a keyboard.
Provided appropriate labels and instructions for assistive technologies.</p><p><strong>Carousel</strong>:
Implemented ARIA roles and states to indicate the current slide and navigate the carousel.
Made navigation buttons and indicators accessible with proper labeling.</p><p><strong>Date Widget</strong>:
Provided ARIA live regions to announce dynamic notifications to screen readers.
Ensured that notifications are perceivable by users with visual and hearing impairments.</p><div class="codeBlockContainer_Ckt0 theme-code-block" style="--prism-color:#bfc7d5;--prism-background-color:#292d3e"><div class="codeBlockContent_biex"><pre tabindex="0" class="prism-code language-text codeBlock_bY9V thin-scrollbar"><code class="codeBlockLines_e6Vv"><span class="token-line" style="color:#bfc7d5"><span class="token plain">&lt;label for="eventDate"&gt;Select Event Date:&lt;/label&gt;</span><br></span><span class="token-line" style="color:#bfc7d5"><span class="token plain">&lt;input type="date" id="eventDate" name="eventDate" aria-label="Event Date" /
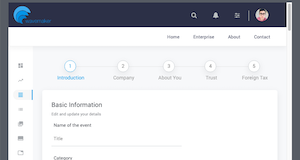
&gt;</span><br></span></code></pre><div class="buttonGroup__atx"><button type="button" aria-label="Copy code to clipboard" title="Copy" class="clean-btn"><span class="copyButtonIcons_eSgA" aria-hidden="true"><svg viewBox="0 0 24 24" class="copyButtonIcon_y97N"><path fill="currentColor" d="M19,21H8V7H19M19,5H8A2,2 0 0,0 6,7V21A2,2 0 0,0 8,23H19A2,2 0 0,0 21,21V7A2,2 0 0,0 19,5M16,1H4A2,2 0 0,0 2,3V17H4V3H16V1Z"></path></svg><svg viewBox="0 0 24 24" class="copyButtonSuccessIcon_LjdS"><path fill="currentColor" d="M21,7L9,19L3.5,13.5L4.91,12.09L9,16.17L19.59,5.59L21,7Z"></path></svg></span></button></div></div></div><p><strong>Progress Bar</strong>:
Implemented ARIA roles and states to communicate the progress status to screen readers.
Made the progress bar keyboard accessible and focusable.</p><p><strong>Messages</strong>:
Ensured that messages, such as alerts and feedback, are accessible with descriptive text.
Used ARIA roles to convey important information to assistive technologies.</p><p><strong>
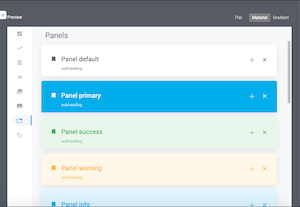
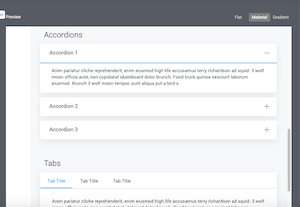
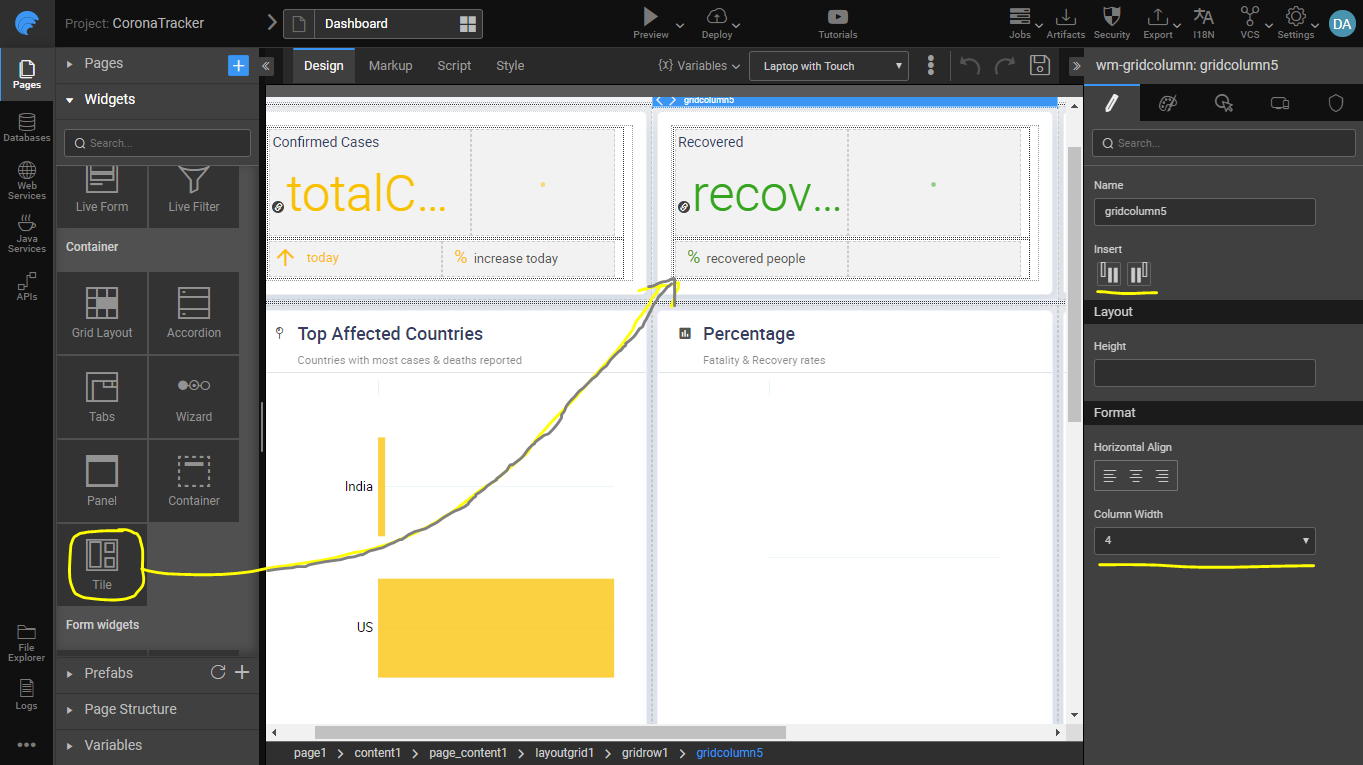
Panel, Tile, Accordion, Tabs, Dialog, Wizard, Media</strong>:
Ensured that all interactive elements within these widgets are keyboard accessible.
Provided proper labeling and ARIA attributes for enhanced screen reader support.</p><h3 class="anchor anchorWithStickyNavbar_LWe7" id="different-tools-used-to-test-accessibility">Different tools used to test Accessibility<a href="#different-tools-used-to-test-accessibility" class="hash-link" aria-label="Direct link to Different tools used to test Accessibility" title="Direct link to Different tools used to test Accessibility">​</a></h3><p>In our quest to ensure accessibility compliance across our WaveMaker’s diverse range of widgets, we employ various tools and techniques to test and validate the accessibility of each element. Below are some of the tools we leverage to ensure that every widget on our platform is accessible to all users:</p><p><strong>Screen Readers (e.g., NVDA/AssistiveLabs and VoiceOver)</strong>: We test all widgets using popular screen readers like NVDA (NonVisual Desktop Access) and VoiceOver to experience the website as users with visual impairments would. This helps us identify issues and optimize our widgets for smooth navigation and comprehension.</p><p><strong>Keyboard Navigation Testing</strong>: We conduct extensive keyboard navigation testing to ensure that users can access and interact with all widgets using only the keyboard, without relying on a mouse.</p><p><strong>ARIA Validation Tools</strong>: We use ARIA (Accessible Rich Internet Applications) validation tools to verify the appropriate use of ARIA attributes and roles in our widgets, enhancing their compatibility with assistive technologies.</p><p><strong>Form Accessibility Testing</strong>: Our forms undergo rigorous accessibility testing to ensure they are easily navigable and usable with screen readers, providing descriptive labels, and handling errors effectively.</p><p><strong>Automated Accessibility Testing Tools (e.g., Axe, Pa11y)</strong>: We utilize automated testing tools like Axe and Pa11y to scan our widgets and identify potential accessibility issues. These tools help us streamline the testing process and catch common problems quickly.</p><p><strong>Browser Developer Tools</strong>: The built-in accessibility inspection tools within modern web browsers assist us in identifying and rectifying accessibility issues for each widget.</p><p><strong>User Testing and Feedback</strong>: Real-world testing by users with disabilities is a crucial aspect of our accessibility evaluation process. We seek feedback from diverse user groups to gain valuable insights and address any usability challenges.</p><p><strong>Continuous Monitoring</strong>: We continuously monitor our WaveMaker’s accessibility to ensure that any new updates or content additions maintain the same high level of accessibility compliance.</p><p>By combining these testing methods and tools, we offer excellent platform to build rich web applications that are accessible, inclusive, and easy to use for all users, regardless of their abilities or assistive technologies. Our commitment to accessibility remains an ongoing journey, and we are dedicated to providing an inclusive experience for users of every app built using WaveMaker.</p>]]></content>
        <author>
            <name>Bhargavi Gunda</name>
        </author>
    </entry>
    <entry>
        <title type="html"><![CDATA[Ending Support to WaveMaker 10 Projects]]></title>
        <id>https://www.wavemaker.com/learn/blog/2023/08/11/wavemaker10x-end-of-support</id>
        <link href="https://www.wavemaker.com/learn/blog/2023/08/11/wavemaker10x-end-of-support"/>
        <updated>2023-08-11T00:00:00.000Z</updated>
        <summary type="html"><![CDATA[---]]></summary>
        <content type="html"><![CDATA[<hr><p>We are excited to announce the upcoming release of WaveMaker Version 11.4, which will introduce various new features and improvements. With this release, we end our support for WaveMaker 10 projects. </p><p>Upon launching WaveMaker 11.0 on June 6th, 2022, our users were provided with the flexibility to work on WaveMaker 10 projects while undertaking the upgrade process to WaveMaker 11, using our <a href="https://docs.wavemaker.com/learn/app-development/wavemaker-overview/faqs-11/#what-is-multi-version-studio" target="_blank" rel="noopener noreferrer">Multi-version Studio</a>. With 11.4 release, we are disabling the support for the above facility and auto-upgrading the projects to WaveMaker 11. </p><h2 class="anchor anchorWithStickyNavbar_LWe7" id="what-will-happen">What will happen?<a href="#what-will-happen" class="hash-link" aria-label="Direct link to What will happen?" title="Direct link to What will happen?">​</a></h2><p>However, with the release of Version 11.4, we will officially discontinue support for WaveMaker Version 10 projects. This decision is aligned with our commitment to delivering the latest technology and ensuring that our users can benefit from the most up-to-date and secure features. As part of this transition, we will be ending support for WaveMaker 10.x projects by September 4, 2023.</p><div class="theme-admonition theme-admonition-note alert alert--secondary admonition_WoCw"><div class="admonitionHeading_TMsN"><span class="admonitionIcon_Ibzs"><svg viewBox="0 0 14 16"><path fill-rule="evenodd" d="M6.3 5.69a.942.942 0 0 1-.28-.7c0-.28.09-.52.28-.7.19-.18.42-.28.7-.28.28 0 .52.09.7.28.18.19.28.42.28.7 0 .28-.09.52-.28.7a1 1 0 0 1-.7.3c-.28 0-.52-.11-.7-.3zM8 7.99c-.02-.25-.11-.48-.31-.69-.2-.19-.42-.3-.69-.31H6c-.27.02-.48.13-.69.31-.2.2-.3.44-.31.69h1v3c.02.27.11.5.31.69.2.2.42.31.69.31h1c.27 0 .48-.11.69-.31.2-.19.3-.42.31-.69H8V7.98v.01zM7 2.3c-3.14 0-5.7 2.54-5.7 5.68 0 3.14 2.56 5.7 5.7 5.7s5.7-2.55 5.7-5.7c0-3.15-2.56-5.69-5.7-5.69v.01zM7 .98c3.86 0 7 3.14 7 7s-3.14 7-7 7-7-3.12-7-7 3.14-7 7-7z"></path></svg></span>note</div><div class="admonitionContent_vXIg"><p>Once the 11.4 release is deployed on <a href="https://www.wavemakeronline.com/studio/#/projects" target="_blank" rel="noopener noreferrer">wavemakeronline.com</a>, WaveMaker 10 projects will undergo an automatic upgrade to 11.4.</p></div></div><h2 class="anchor anchorWithStickyNavbar_LWe7" id="what-should-you-do">What Should You Do?<a href="#what-should-you-do" class="hash-link" aria-label="Direct link to What Should You Do?" title="Direct link to What Should You Do?">​</a></h2><p>After the 11.4 release, our support team will no longer provide assistance or updates for projects running on Version 10. Therefore, we strongly recommend that you plan to migrate your projects to the latest version to continue receiving support and leverage the latest functionalities.</p><h3 class="anchor anchorWithStickyNavbar_LWe7" id="migrating-from-wavemaker-10x-to-11x">Migrating from WaveMaker 10.x to 11.x<a href="#migrating-from-wavemaker-10x-to-11x" class="hash-link" aria-label="Direct link to Migrating from WaveMaker 10.x to 11.x" title="Direct link to Migrating from WaveMaker 10.x to 11.x">​</a></h3><div class="theme-admonition theme-admonition-important alert alert--info admonition_WoCw"><div class="admonitionHeading_TMsN"><span class="admonitionIcon_Ibzs"><svg viewBox="0 0 14 16"><path fill-rule="evenodd" d="M7 2.3c3.14 0 5.7 2.56 5.7 5.7s-2.56 5.7-5.7 5.7A5.71 5.71 0 0 1 1.3 8c0-3.14 2.56-5.7 5.7-5.7zM7 1C3.14 1 0 4.14 0 8s3.14 7 7 7 7-3.14 7-7-3.14-7-7-7zm1 3H6v5h2V4zm0 6H6v2h2v-2z"></path></svg></span>info</div><div class="admonitionContent_vXIg"><p>If you do not migrate your projects to 11.x, your projects will automatically be migrated to the latest released version i.e. 11.4.x. We recommend you initiate the upgrade to take full control of your project migration and plan it accordingly. For more information, see the release information.</p></div></div><p>To aid you in the process of migration, we have prepared detailed documentation on migrating from Version 10 to the latest Version 11.x. To get started with the migration process, see <a href="https://docs.wavemaker.com/learn/how-tos/upgrade-guide-wavemaker-10-to-11" target="_blank" rel="noopener noreferrer">Updating an App from WaveMaker 10 WaveMaker 11</a>.</p><h3 class="anchor anchorWithStickyNavbar_LWe7" id="upgrade-in-progress-archived-apps">Upgrade In-progress: Archived Apps<a href="#upgrade-in-progress-archived-apps" class="hash-link" aria-label="Direct link to Upgrade In-progress: Archived Apps" title="Direct link to Upgrade In-progress: Archived Apps">​</a></h3><p>It is recommended to complete the migration from WaveMaker 10 to WaveMaker 11.x before the 11.4 release. To perform smooth migration, WaveMaker has provided the ability to use the multi-studio projects, this enables you to initiate migration and continue working on WaveMaker 10 projects while you simultaneously implement WaveMaker 11 upgrade. In the process of migration,</p><h4 class="anchor anchorWithStickyNavbar_LWe7" id="wavemaker-10-projects">WaveMaker 10 projects<a href="#wavemaker-10-projects" class="hash-link" aria-label="Direct link to WaveMaker 10 projects" title="Direct link to WaveMaker 10 projects">​</a></h4><p>WaveMaker 10 projects that have not been migrated will be automatically migrated to 11.4. Users might face some issues as it is migrated without their interference. </p><h4 class="anchor anchorWithStickyNavbar_LWe7" id="wavemaker-11-projects">WaveMaker 11 Projects<a href="#wavemaker-11-projects" class="hash-link" aria-label="Direct link to WaveMaker 11 Projects" title="Direct link to WaveMaker 11 Projects">​</a></h4><p>For the WaveMaker 10 projects for which the migration process has been initiated, WaveMaker 11 version will be moved to the Archived apps, and the WaveMaker 10 version of the project will be auto-migrated to WaveMaker 11.4.</p><p>To avoid auto-migration from WaveMaker 10 to WaveMaker 11, complete the process before 4th September 2023. In case of any assistance, reach out to our support team.</p>]]></content>
        <author>
            <name>Ritupurna Lenka</name>
        </author>
    </entry>
    <entry>
        <title type="html"><![CDATA[Mutual TLS Support in REST APIs]]></title>
        <id>https://www.wavemaker.com/learn/blog/2022/08/23/Support-for-mutual-tls-in-rest-apis</id>
        <link href="https://www.wavemaker.com/learn/blog/2022/08/23/Support-for-mutual-tls-in-rest-apis"/>
        <updated>2022-08-23T00:00:00.000Z</updated>
        <summary type="html"><![CDATA[---]]></summary>
        <content type="html"><![CDATA[<hr><p>TLS (Transport Layer Security) is an encryption protocol that encrypts all the information communicated between the client and the server. Mutual TLS is an additional configuration in which the server and client authenticate each other, and only then is the connection established. This blog explains in detail what MTLS (Mutual Transport Layer Security) is and why it is used.</p><div class="theme-admonition theme-admonition-note alert alert--secondary admonition_WoCw"><div class="admonitionHeading_TMsN"><span class="admonitionIcon_Ibzs"><svg viewBox="0 0 14 16"><path fill-rule="evenodd" d="M6.3 5.69a.942.942 0 0 1-.28-.7c0-.28.09-.52.28-.7.19-.18.42-.28.7-.28.28 0 .52.09.7.28.18.19.28.42.28.7 0 .28-.09.52-.28.7a1 1 0 0 1-.7.3c-.28 0-.52-.11-.7-.3zM8 7.99c-.02-.25-.11-.48-.31-.69-.2-.19-.42-.3-.69-.31H6c-.27.02-.48.13-.69.31-.2.2-.3.44-.31.69h1v3c.02.27.11.5.31.69.2.2.42.31.69.31h1c.27 0 .48-.11.69-.31.2-.19.3-.42.31-.69H8V7.98v.01zM7 2.3c-3.14 0-5.7 2.54-5.7 5.68 0 3.14 2.56 5.7 5.7 5.7s5.7-2.55 5.7-5.7c0-3.15-2.56-5.69-5.7-5.69v.01zM7 .98c3.86 0 7 3.14 7 7s-3.14 7-7 7-7-3.12-7-7 3.14-7 7-7z"></path></svg></span>note</div><div class="admonitionContent_vXIg"><p>WaveMaker supports MTLS from WaveMaker 11 GA onwards. For more information, see how to <a href="/learn/how-tos/configure-mtls-in-wmapp">Configure MTLS in WaveMaker application</a>.</p></div></div><h2 class="anchor anchorWithStickyNavbar_LWe7" id="mutual-tls">Mutual TLS<a href="#mutual-tls" class="hash-link" aria-label="Direct link to Mutual TLS" title="Direct link to Mutual TLS">​</a></h2><p>Mutual TLS is a configuration in which the client authenticates the server first, and then the server authenticates the client as well. The SSL connection gets established if both client and server are authenticated successfully. </p><p><img loading="lazy" alt="Mutual-TLS" src="/learn/assets/images/mutual-tls-9809648d8afca44bd7fe85e44a8cc685.png" width="2420" height="1314" class="img_ev3q"></p><ol><li><p>Client connects to the server to initiate an SSL connection.</p></li><li><p>Server presents its certificate to the client.</p></li><li><p>The client authenticates the server's certificate from its truststore and can verify the hostname (Optional).</p></li><li><p>Client presents its certificate to the server.</p></li><li><p>Server authenticates the client certificate.</p></li><li><p>Symmetric session keys are created, and an SSL connection gets established.</p></li><li><p>The client and server exchange information in a secure connection.</p></li></ol><h3 class="anchor anchorWithStickyNavbar_LWe7" id="server-authentication">Server Authentication<a href="#server-authentication" class="hash-link" aria-label="Direct link to Server Authentication" title="Direct link to Server Authentication">​</a></h3><p>The server presents its certificate to the client, and the client authenticates it. The client authenticates the server's certificate using its truststore. TrustStore is used to store certificates from Certified Authorities (CA) that authenticate the certificate presented by the server in an SSL connection. If the server is using a self-signed certificate, then a custom truststore needs to be generated with the server's certificate, and you must configure it in the client. </p><p>The client can then use this custom truststore to authenticate the server's certificate and proceed to further steps in initiating the SSL connection.</p><h3 class="anchor anchorWithStickyNavbar_LWe7" id="client-authentication">Client Authentication<a href="#client-authentication" class="hash-link" aria-label="Direct link to Client Authentication" title="Direct link to Client Authentication">​</a></h3><p>The client presents its certificate to the server, and the server authenticates it. The server authenticates the client using the Keystore configured using the client key and certificate. When the server authenticates the client, then it proceeds to the further steps in initiating the SSL connection. When the client authentication is enabled along with the server authentication, it indicates that the SSL connection is configured with mutual TLS.</p><h2 class="anchor anchorWithStickyNavbar_LWe7" id="why-is-mutual-tls-used">Why is Mutual TLS used?<a href="#why-is-mutual-tls-used" class="hash-link" aria-label="Direct link to Why is Mutual TLS used?" title="Direct link to Why is Mutual TLS used?">​</a></h2><p>Typically, TLS protocol only proves the server's identity to the client, but the server cannot authenticate the client. MTLS provides an additional layer of security in which the server should authenticate the client and prevent unauthorized access. </p><h2 class="anchor anchorWithStickyNavbar_LWe7" id="configure-mutual-tls-in-a-webserver">Configure Mutual TLS in a Webserver<a href="#configure-mutual-tls-in-a-webserver" class="hash-link" aria-label="Direct link to Configure Mutual TLS in a Webserver" title="Direct link to Configure Mutual TLS in a Webserver">​</a></h2><p>MTLS is part of the TLS standard, and any web server that uses TLS to secure its connection should be capable of mutual authentication. In order to implement mutual authentication, the server needs to ask the client for its certificate specifically. Web servers are not configured to do this by default. For more information, see <a href="https://tomcat.apache.org/tomcat-9.0-doc/ssl-howto.html" target="_blank" rel="noopener noreferrer">tomcat documentation</a> to configure MTLS.</p><h2 class="anchor anchorWithStickyNavbar_LWe7" id="wavemaker-mtls-support-in-rest-apis">WaveMaker MTLS Support in REST APIs<a href="#wavemaker-mtls-support-in-rest-apis" class="hash-link" aria-label="Direct link to WaveMaker MTLS Support in REST APIs" title="Direct link to WaveMaker MTLS Support in REST APIs">​</a></h2><p>WaveMaker now supports mutual TLS in REST APIs or imported APIs using Swagger by configuring a few properties in the application. See <a href="/learn/how-tos/configure-mtls-in-wmapp">Configure MTLS in WaveMaker application</a> for more details.</p>]]></content>
        <author>
            <name>Praveen Chandra</name>
        </author>
    </entry>
    <entry>
        <title type="html"><![CDATA[Monitoring performance and health of deployed WaveMaker app]]></title>
        <id>https://www.wavemaker.com/learn/blog/2022/08/02/Monitoring-performance-and-health-of-deployed-WaveMaker-app</id>
        <link href="https://www.wavemaker.com/learn/blog/2022/08/02/Monitoring-performance-and-health-of-deployed-WaveMaker-app"/>
        <updated>2022-08-02T00:00:00.000Z</updated>
        <summary type="html"><![CDATA[---]]></summary>
        <content type="html"><![CDATA[<hr><p>In this blog we talk about how to make any WaveMaker application Observable by applying OpenTelemetry, Zipkin.  While accelerating application development, WaveMaker's generated code allows easy integration with best of the breed tools and applying devops best practices while operating the app in production a cinch. </p><h2 class="anchor anchorWithStickyNavbar_LWe7" id="about-open-telemetry">About Open Telemetry<a href="#about-open-telemetry" class="hash-link" aria-label="Direct link to About Open Telemetry" title="Direct link to About Open Telemetry">​</a></h2><p>Open telemetry is an opensource tool enabling Observability. Observability lets a developer understand an application from the outside without knowing its inner workings and helps in troubleshooting degradations in service quality. To achieve this, a developer should instrument the application. By instrumenting code to emit traces and metrics, and collecting such data developers make the application observable. </p><p>Once instrumented, the end user flows become traceable across different microservices. This data can be sent to Zipkin - a popular open source tool. </p><h2 class="anchor anchorWithStickyNavbar_LWe7" id="benefits-of-implementing-observability">Benefits of implementing observability<a href="#benefits-of-implementing-observability" class="hash-link" aria-label="Direct link to Benefits of implementing observability" title="Direct link to Benefits of implementing observability">​</a></h2><p>Metrics, Logs and Traces make up the <a href="https://devops.com/metrics-logs-and-traces-the-golden-triangle-of-observability-in-monitoring/" target="_blank" rel="noopener noreferrer">golden triangle of Observability</a> of any application. WaveMaker built applications can also easily be set up for tracing.</p><ol><li>Understand why the applications has slowed down.</li><li>Trace 500 error codes to figure out what went wrong among the microservices. </li><li>What if one of the application calls is taking too long than expected.</li></ol><p>OpenTelemetry tool integration with an application can help have detailed visibility of tracing an application to easily spot almost any issue or have an idea of where the problem could be.
Instrumenting WaveMaker applications code lets you get traces for each request, along with their time slices captured in detail.</p><h2 class="anchor anchorWithStickyNavbar_LWe7" id="four-simple-integration-steps-for-opentelemety">Four simple integration steps for Opentelemety<a href="#four-simple-integration-steps-for-opentelemety" class="hash-link" aria-label="Direct link to Four simple integration steps for Opentelemety" title="Direct link to Four simple integration steps for Opentelemety">​</a></h2><ol><li>Install and Setup tools</li><li>Instrument application code</li><li>Build and Deploy application</li><li>Accessing request traces</li></ol><h3 class="anchor anchorWithStickyNavbar_LWe7" id="1-install-and-setup-tools">1. Install and Setup tools<a href="#1-install-and-setup-tools" class="hash-link" aria-label="Direct link to 1. Install and Setup tools" title="Direct link to 1. Install and Setup tools">​</a></h3><p>How to use OpenTelemetry integration to have complete visibility of the application, Here in this first step explains details to Install and Setup tools and integrate OpenTelemetry and Zipkin with the application deployed at Apache Tomcat.</p><ol><li><p>Install Zipkin as default data collector and tracing dashboard. Once the following docker command is run, browse to <strong>http://your_host:9411</strong> to find traces. Dashbord will be empty initially. </p><div class="codeBlockContainer_Ckt0 theme-code-block" style="--prism-color:#bfc7d5;--prism-background-color:#292d3e"><div class="codeBlockContent_biex"><pre tabindex="0" class="prism-code language-text codeBlock_bY9V thin-scrollbar"><code class="codeBlockLines_e6Vv"><span class="token-line" style="color:#bfc7d5"><span class="token plain">          docker run -d -p 9411:9411 openzipkin/zipkin</span><br></span></code></pre><div class="buttonGroup__atx"><button type="button" aria-label="Copy code to clipboard" title="Copy" class="clean-btn"><span class="copyButtonIcons_eSgA" aria-hidden="true"><svg viewBox="0 0 24 24" class="copyButtonIcon_y97N"><path fill="currentColor" d="M19,21H8V7H19M19,5H8A2,2 0 0,0 6,7V21A2,2 0 0,0 8,23H19A2,2 0 0,0 21,21V7A2,2 0 0,0 19,5M16,1H4A2,2 0 0,0 2,3V17H4V3H16V1Z"></path></svg><svg viewBox="0 0 24 24" class="copyButtonSuccessIcon_LjdS"><path fill="currentColor" d="M21,7L9,19L3.5,13.5L4.91,12.09L9,16.17L19.59,5.59L21,7Z"></path></svg></span></button></div></div></div></li><li><p>WaveMaker application can be deployed on specific versions of Apache Tomcat. Install Tomcat by following <a href="https://docs.wavemaker.com/learn/how-tos/wavemaker-application-deployment-tomcat" target="_blank" rel="noopener noreferrer">installation instructions</a> and then copy step 1 downloaded opentelemetry-javaagent.jar to tomcat lib directory(<strong>$TOMCAT_HOME/lib/</strong>)</p></li></ol><h3 class="anchor anchorWithStickyNavbar_LWe7" id="2-instrument-application-code">2. Instrument application code<a href="#2-instrument-application-code" class="hash-link" aria-label="Direct link to 2. Instrument application code" title="Direct link to 2. Instrument application code">​</a></h3><p>OpenTelemetry code instrumentation is supported for Java based applications, here are the steps  to  Instrument application code.</p><ol><li>Download latest open telemetry <a href="https://github.com/open-telemetry/opentelemetry-java-instrumentation/releases/latest/download/opentelemetry-javaagent.jar" target="_blank" rel="noopener noreferrer">opentelemetry-javaagent.jar</a> from the Open Telemetry repo and place the JAR at preferred directory and launch it with tomcat.</li><li>Set environment variables by adding the <code>setenv.sh</code> file above the installed tomcat bin directory.</li></ol><p><code>$TOMCAT_HOME/bin/setenv.sh</code></p><div class="codeBlockContainer_Ckt0 theme-code-block" style="--prism-color:#bfc7d5;--prism-background-color:#292d3e"><div class="codeBlockContent_biex"><pre tabindex="0" class="prism-code language-text codeBlock_bY9V thin-scrollbar"><code class="codeBlockLines_e6Vv"><span class="token-line" style="color:#bfc7d5"><span class="token plain">    export CATALINA_OPTS="$CATALINA_OPTS -javaagent:/usr/local/tomcat/lib/opentelemetry-javaagent.jar”</span><br></span><span class="token-line" style="color:#bfc7d5"><span class="token plain">    export OTEL_TRACES_EXPORTER=“-Dotel.traces.exporter=zipkin”</span><br></span><span class="token-line" style="color:#bfc7d5"><span class="token plain">    export  OTEL_EXPORTER_ZIPKIN_ENDPOINT=“-Dotel.exporter.zipkin.endpoint=http://&lt;zipkin-host-ip&gt;:&lt;zipkin-port&gt;/api/v2/spans”</span><br></span><span class="token-line" style="color:#bfc7d5"><span class="token plain">    export OTEL_SERVICE_NAME=”-Dotel.service.name=&lt;App/service name&gt;”</span><br></span><span class="token-line" style="color:#bfc7d5"><span class="token plain">    export JAVA_OPTS=”$JAVA_OPTS $CATALINA_OPTS $OTEL_TRACES_EXPORTER $OTEL_EXPORTER_ZIPKIN_ENDPOINT $OTEL_SERVICE_NAME”</span><br></span></code></pre><div class="buttonGroup__atx"><button type="button" aria-label="Copy code to clipboard" title="Copy" class="clean-btn"><span class="copyButtonIcons_eSgA" aria-hidden="true"><svg viewBox="0 0 24 24" class="copyButtonIcon_y97N"><path fill="currentColor" d="M19,21H8V7H19M19,5H8A2,2 0 0,0 6,7V21A2,2 0 0,0 8,23H19A2,2 0 0,0 21,21V7A2,2 0 0,0 19,5M16,1H4A2,2 0 0,0 2,3V17H4V3H16V1Z"></path></svg><svg viewBox="0 0 24 24" class="copyButtonSuccessIcon_LjdS"><path fill="currentColor" d="M21,7L9,19L3.5,13.5L4.91,12.09L9,16.17L19.59,5.59L21,7Z"></path></svg></span></button></div></div></div><div class="theme-admonition theme-admonition-note alert alert--secondary admonition_WoCw"><div class="admonitionHeading_TMsN"><span class="admonitionIcon_Ibzs"><svg viewBox="0 0 14 16"><path fill-rule="evenodd" d="M6.3 5.69a.942.942 0 0 1-.28-.7c0-.28.09-.52.28-.7.19-.18.42-.28.7-.28.28 0 .52.09.7.28.18.19.28.42.28.7 0 .28-.09.52-.28.7a1 1 0 0 1-.7.3c-.28 0-.52-.11-.7-.3zM8 7.99c-.02-.25-.11-.48-.31-.69-.2-.19-.42-.3-.69-.31H6c-.27.02-.48.13-.69.31-.2.2-.3.44-.31.69h1v3c.02.27.11.5.31.69.2.2.42.31.69.31h1c.27 0 .48-.11.69-.31.2-.19.3-.42.31-.69H8V7.98v.01zM7 2.3c-3.14 0-5.7 2.54-5.7 5.68 0 3.14 2.56 5.7 5.7 5.7s5.7-2.55 5.7-5.7c0-3.15-2.56-5.69-5.7-5.69v.01zM7 .98c3.86 0 7 3.14 7 7s-3.14 7-7 7-7-3.12-7-7 3.14-7 7-7z"></path></svg></span>note</div><div class="admonitionContent_vXIg"><p>Here Zipkin server should be accessible to the tomcat server.</p></div></div><ol start="3"><li>Introduce tracing code:
To introduce tracing and create correlations Spring AOP(Aspect Oriented Programming) code changes needed, this code can also be introduced by using the <a href="https://docs.wavemaker.com/learn/app-development/dev-integration/extending-application-using-ides/#steps-in-working-with-ides" target="_blank" rel="noopener noreferrer">IDE</a> at WaveMaker application.<br>Download WaveMaker Application Zip from Studio, extract the downloaded zip file to a directory and call it as <code>$WMAPP_HOME</code>
Navigate to the maven <code>pom.xml</code> file to add following dependencies code snippet</li></ol><p><code>$WMAPP_HOME----&gt;pom.xml</code></p><div class="codeBlockContainer_Ckt0 theme-code-block" style="--prism-color:#bfc7d5;--prism-background-color:#292d3e"><div class="codeBlockContent_biex"><pre tabindex="0" class="prism-code language-text codeBlock_bY9V thin-scrollbar"><code class="codeBlockLines_e6Vv"><span class="token-line" style="color:#bfc7d5"><span class="token plain">      &lt;dependencies&gt;</span><br></span><span class="token-line" style="color:#bfc7d5"><span class="token plain">        &lt;dependency&gt;</span><br></span><span class="token-line" style="color:#bfc7d5"><span class="token plain">              &lt;groupId&gt;io.opentelemetry&lt;/groupId&gt;</span><br></span><span class="token-line" style="color:#bfc7d5"><span class="token plain">              &lt;artifactId&gt;opentelemetry-sdk&lt;/artifactId&gt;</span><br></span><span class="token-line" style="color:#bfc7d5"><span class="token plain">              &lt;version&gt;1.11.0&lt;/version&gt;</span><br></span><span class="token-line" style="color:#bfc7d5"><span class="token plain">        &lt;/dependency&gt;</span><br></span><span class="token-line" style="color:#bfc7d5"><span class="token plain">       &lt;dependencies&gt;</span><br></span></code></pre><div class="buttonGroup__atx"><button type="button" aria-label="Copy code to clipboard" title="Copy" class="clean-btn"><span class="copyButtonIcons_eSgA" aria-hidden="true"><svg viewBox="0 0 24 24" class="copyButtonIcon_y97N"><path fill="currentColor" d="M19,21H8V7H19M19,5H8A2,2 0 0,0 6,7V21A2,2 0 0,0 8,23H19A2,2 0 0,0 21,21V7A2,2 0 0,0 19,5M16,1H4A2,2 0 0,0 2,3V17H4V3H16V1Z"></path></svg><svg viewBox="0 0 24 24" class="copyButtonSuccessIcon_LjdS"><path fill="currentColor" d="M21,7L9,19L3.5,13.5L4.91,12.09L9,16.17L19.59,5.59L21,7Z"></path></svg></span></button></div></div></div><p>Navigate to the <code>project-user-spring.xml</code> in the below path and add the given snippet</p><p><code>$WMAPP_HOME -----&gt; src/main/webapp/WEB-INF/project-user-spring.xml</code></p><div class="codeBlockContainer_Ckt0 theme-code-block" style="--prism-color:#bfc7d5;--prism-background-color:#292d3e"><div class="codeBlockContent_biex"><pre tabindex="0" class="prism-code language-text codeBlock_bY9V thin-scrollbar"><code class="codeBlockLines_e6Vv"><span class="token-line" style="color:#bfc7d5"><span class="token plain">          &lt;beans xmlns="http://www.springframework.org/schema/beans"</span><br></span><span class="token-line" style="color:#bfc7d5"><span class="token plain">              xmlns:xsi="http://www.w3.org/2001/XMLSchema-instance"</span><br></span><span class="token-line" style="color:#bfc7d5"><span class="token plain">                  xmlns:aop="http://www.springframework.org/schema/aop"</span><br></span><span class="token-line" style="color:#bfc7d5"><span class="token plain">              xsi:schemaLocation="http://www.springframework.org/schema/beans http://www.springframework.org/schema/beans/spring-beans.xsd </span><br></span><span class="token-line" style="color:#bfc7d5"><span class="token plain">              http://www.springframework.org/schema/aop   </span><br></span><span class="token-line" style="color:#bfc7d5"><span class="token plain">                  http://www.springframework.org/schema/aop/spring-aop-3.0.xsd "&gt;</span><br></span><span class="token-line" style="color:#bfc7d5"><span class="token plain">                  &lt;!--&lt;context:component-scan base-package="com.aop.aspect"/&gt;--&gt;</span><br></span><span class="token-line" style="color:#bfc7d5"><span class="token plain">                  &lt;bean id="LogAspect" class="com.aop.aspect.LogAspect"/&gt;</span><br></span><span class="token-line" style="color:#bfc7d5"><span class="token plain" style="display:inline-block"></span><br></span><span class="token-line" style="color:#bfc7d5"><span class="token plain">              &lt;aop:config&gt;  </span><br></span><span class="token-line" style="color:#bfc7d5"><span class="token plain">                &lt;aop:aspect id="myaspect" ref="LogAspect" &gt;  </span><br></span><span class="token-line" style="color:#bfc7d5"><span class="token plain">                   &lt;!-- @Before --&gt;  </span><br></span><span class="token-line" style="color:#bfc7d5"><span class="token plain">                   &lt;aop:pointcut id="pointCutBefore" expression="within (com.wavemaker.*.*.controller..*) || within (com.wavemaker.runtime.rest.controller..*)|| within (com.*.*.controller..*)"/&gt;  </span><br></span><span class="token-line" style="color:#bfc7d5"><span class="token plain">                   &lt;aop:before method="before" pointcut-ref="pointCutBefore" /&gt;</span><br></span><span class="token-line" style="color:#bfc7d5"><span class="token plain">                &lt;/aop:aspect&gt;  </span><br></span><span class="token-line" style="color:#bfc7d5"><span class="token plain">              &lt;/aop:config&gt;  </span><br></span><span class="token-line" style="color:#bfc7d5"><span class="token plain">          &lt;/beans&gt;</span><br></span></code></pre><div class="buttonGroup__atx"><button type="button" aria-label="Copy code to clipboard" title="Copy" class="clean-btn"><span class="copyButtonIcons_eSgA" aria-hidden="true"><svg viewBox="0 0 24 24" class="copyButtonIcon_y97N"><path fill="currentColor" d="M19,21H8V7H19M19,5H8A2,2 0 0,0 6,7V21A2,2 0 0,0 8,23H19A2,2 0 0,0 21,21V7A2,2 0 0,0 19,5M16,1H4A2,2 0 0,0 2,3V17H4V3H16V1Z"></path></svg><svg viewBox="0 0 24 24" class="copyButtonSuccessIcon_LjdS"><path fill="currentColor" d="M21,7L9,19L3.5,13.5L4.91,12.09L9,16.17L19.59,5.59L21,7Z"></path></svg></span></button></div></div></div><p>Create a new java file with given package structure and copy code to the created Java source file</p><p><code>$WMAPP_HOME -----&gt;src/main/java/com/aop/aspect/LogAspect.java</code></p><div class="codeBlockContainer_Ckt0 theme-code-block" style="--prism-color:#bfc7d5;--prism-background-color:#292d3e"><div class="codeBlockContent_biex"><pre tabindex="0" class="prism-code language-text codeBlock_bY9V thin-scrollbar"><code class="codeBlockLines_e6Vv"><span class="token-line" style="color:#bfc7d5"><span class="token plain">          package com.aop.aspect;</span><br></span><span class="token-line" style="color:#bfc7d5"><span class="token plain" style="display:inline-block"></span><br></span><span class="token-line" style="color:#bfc7d5"><span class="token plain">          import org.aspectj.lang.JoinPoint;</span><br></span><span class="token-line" style="color:#bfc7d5"><span class="token plain">          import org.slf4j.Logger;</span><br></span><span class="token-line" style="color:#bfc7d5"><span class="token plain">          import org.slf4j.LoggerFactory;</span><br></span><span class="token-line" style="color:#bfc7d5"><span class="token plain">          import io.opentelemetry.api.trace.Span;</span><br></span><span class="token-line" style="color:#bfc7d5"><span class="token plain">          import javax.servlet.http.HttpServletResponse;</span><br></span><span class="token-line" style="color:#bfc7d5"><span class="token plain">          import org.springframework.beans.factory.annotation.Autowired;</span><br></span><span class="token-line" style="color:#bfc7d5"><span class="token plain">          public class LogAspect {</span><br></span><span class="token-line" style="color:#bfc7d5"><span class="token plain" style="display:inline-block"></span><br></span><span class="token-line" style="color:#bfc7d5"><span class="token plain">              private static final Logger logger = LoggerFactory.getLogger(LogAspect.class);</span><br></span><span class="token-line" style="color:#bfc7d5"><span class="token plain" style="display:inline-block"></span><br></span><span class="token-line" style="color:#bfc7d5"><span class="token plain">              @Autowired</span><br></span><span class="token-line" style="color:#bfc7d5"><span class="token plain">              private HttpServletResponse response;</span><br></span><span class="token-line" style="color:#bfc7d5"><span class="token plain" style="display:inline-block"></span><br></span><span class="token-line" style="color:#bfc7d5"><span class="token plain">             public void before(JoinPoint jp) {</span><br></span><span class="token-line" style="color:#bfc7d5"><span class="token plain">                  Span currentSpan = Span.current();</span><br></span><span class="token-line" style="color:#bfc7d5"><span class="token plain">                  currentSpan.setAttribute("x-wm-request-track-id", response.getHeader("x-wm-request-track-id"));</span><br></span><span class="token-line" style="color:#bfc7d5"><span class="token plain">              }</span><br></span><span class="token-line" style="color:#bfc7d5"><span class="token plain">          }</span><br></span></code></pre><div class="buttonGroup__atx"><button type="button" aria-label="Copy code to clipboard" title="Copy" class="clean-btn"><span class="copyButtonIcons_eSgA" aria-hidden="true"><svg viewBox="0 0 24 24" class="copyButtonIcon_y97N"><path fill="currentColor" d="M19,21H8V7H19M19,5H8A2,2 0 0,0 6,7V21A2,2 0 0,0 8,23H19A2,2 0 0,0 21,21V7A2,2 0 0,0 19,5M16,1H4A2,2 0 0,0 2,3V17H4V3H16V1Z"></path></svg><svg viewBox="0 0 24 24" class="copyButtonSuccessIcon_LjdS"><path fill="currentColor" d="M21,7L9,19L3.5,13.5L4.91,12.09L9,16.17L19.59,5.59L21,7Z"></path></svg></span></button></div></div></div><h3 class="anchor anchorWithStickyNavbar_LWe7" id="3-build-and-deploy-application">3. Build and Deploy application<a href="#3-build-and-deploy-application" class="hash-link" aria-label="Direct link to 3. Build and Deploy application" title="Direct link to 3. Build and Deploy application">​</a></h3><p>Build and Deploy application to reflect above instrumentation code change</p><ol><li>With above changes build WaveMaker app for WAR and copy built war to tomcat setup at webapps folder <code>($TOMCAT_HOME/webapps)</code></li><li>Restart the tomcat server to reflect above changes at <code>setenv.sh</code> along with the WaeMaker application.</li></ol><h3 class="anchor anchorWithStickyNavbar_LWe7" id="4-accessing-request-traces">4. Accessing request traces<a href="#4-accessing-request-traces" class="hash-link" aria-label="Direct link to 4. Accessing request traces" title="Direct link to 4. Accessing request traces">​</a></h3><p>Accessing request traces with Use Cases
Here is the introduced sample use case at WaveMaker application to imitate calls to other external services, or another microservice and a call to database engine into the application. Following are the Zipkin screenshots where time taken by application request is spent in each function, to pin where the problem is with the call to the microservice and focus on reducing the latency in a service considering the time details exposed. Or, These traces can be used to understand what the workflow of a request is.
Another advantage that works is by introducing trace ID in the response payload of the WaveMaker application and using that ID to correlate with other dependency calls.</p><p>Every time when a hit to service endpoint of an application is made a trace is captured at Zipkin, to see something like this at Zipkin dashboard by accessing url <strong>http://your_host:9411</strong>,  here are few WaveMaker application request traces.</p><br><br><br><p><img loading="lazy" alt="Zipkin-APIComposer" src="/learn/assets/images/Zipkin-APIComposer-d00919534e8df77062918443447ad6d5.png" width="1920" height="1080" class="img_ev3q">
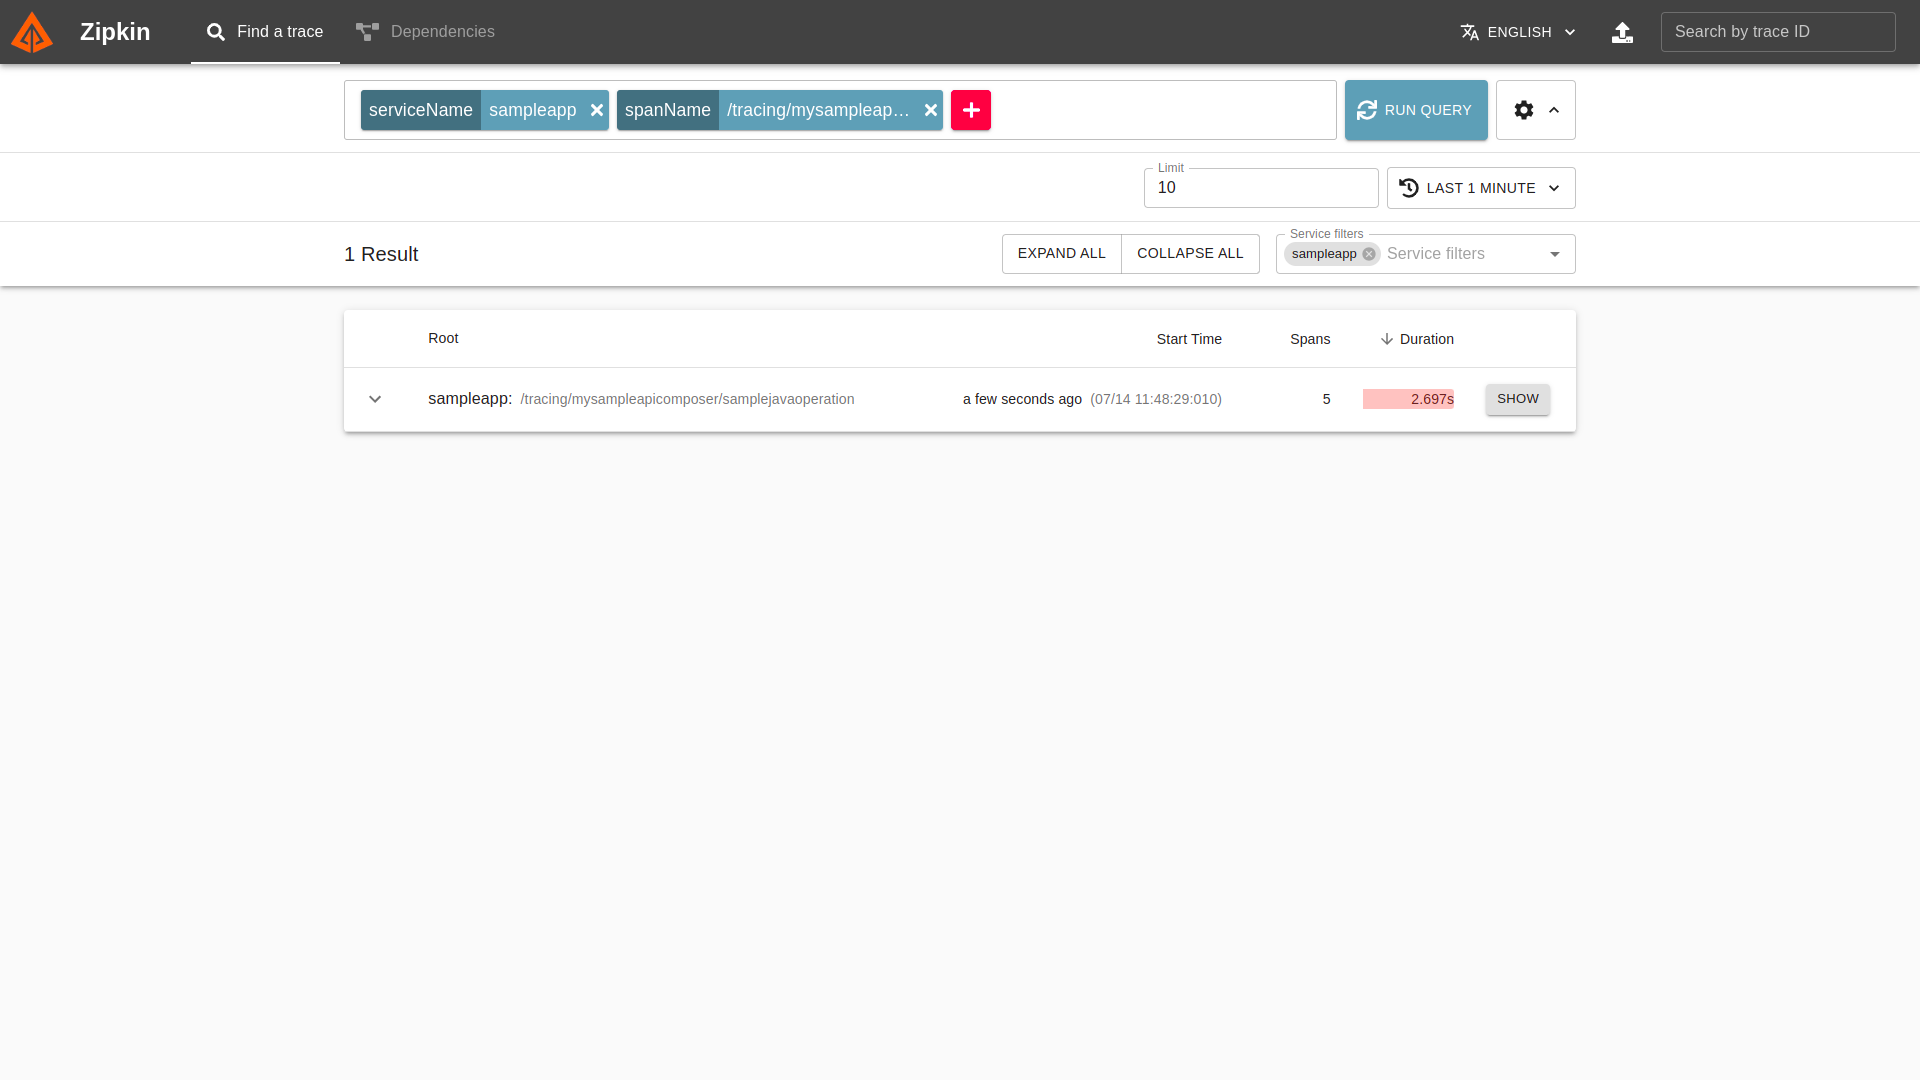
Click on the show button to see WaveMaker API Composer call details</p><br><br><br><p><img loading="lazy" alt="Zipkin-APIComposerList" src="/learn/assets/images/Zipkin-APIComposerList-6cf67ea2bdd2f89d0700ef26bd3b453f.png" width="1920" height="1080" class="img_ev3q">
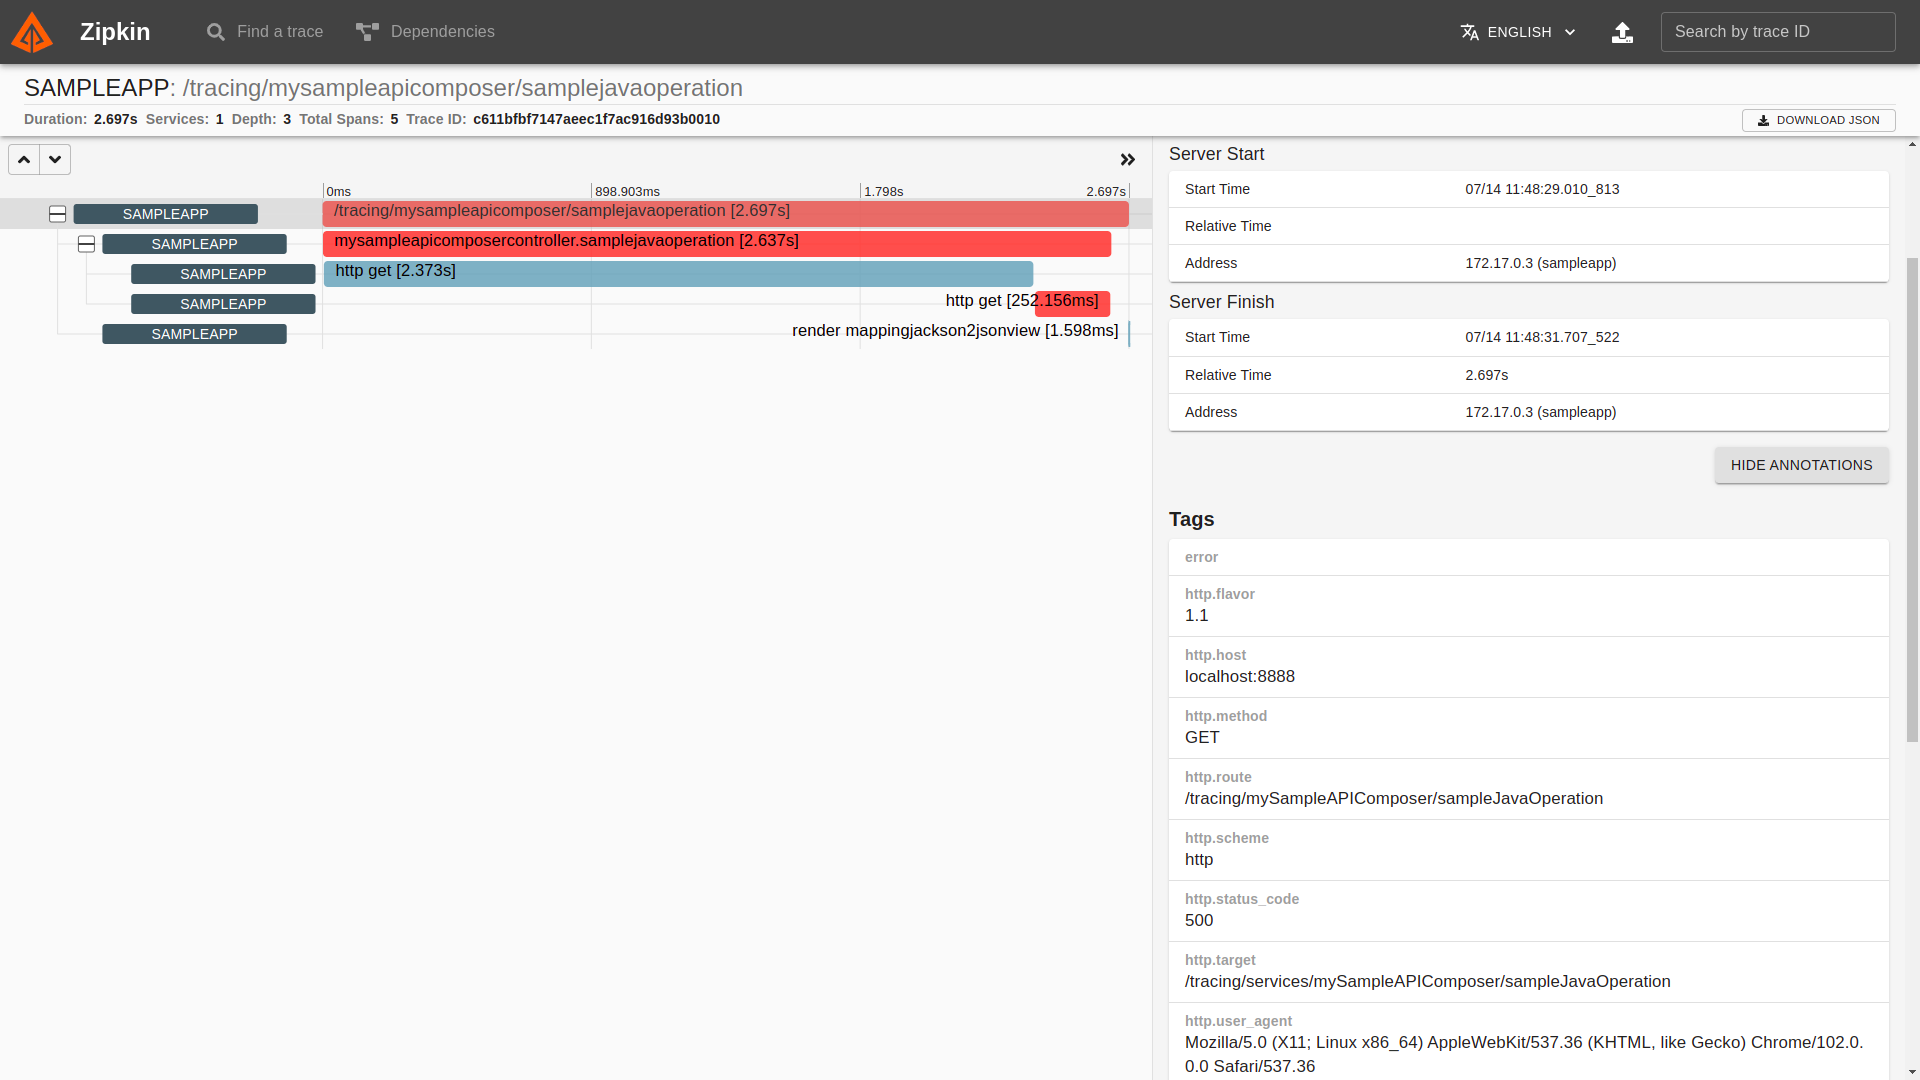
WaveMaker API Composer call trace info with its status code(500) and Server response time details.</p><br><br><br><p><img loading="lazy" alt="Zipkin-APIComposerSuccess" src="/learn/assets/images/Zipkin-APIComposerSuccess-e4636b711df14c96a3a3d17149326698.png" width="1920" height="1080" class="img_ev3q">
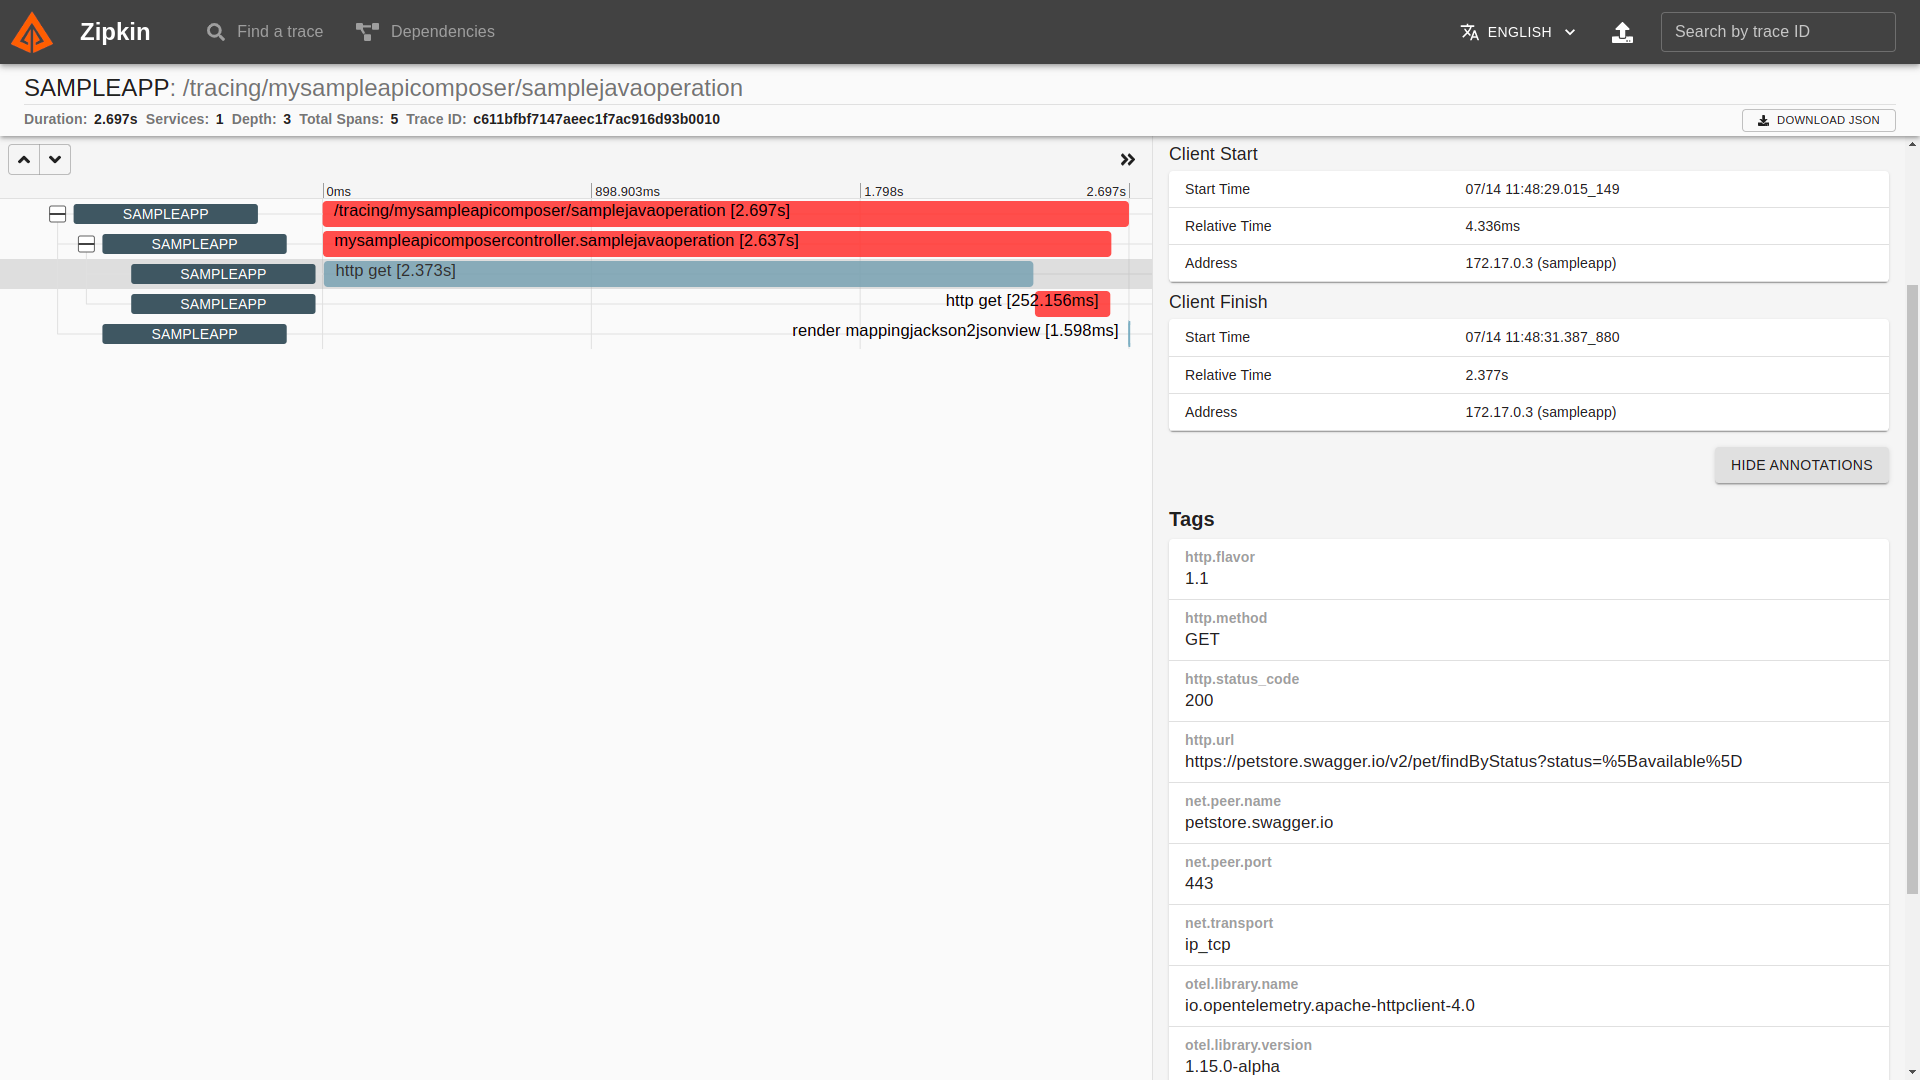
WaveMaker API Composer first GET call with its status code(200) and response time details.</p><br><br><br><p><img loading="lazy" alt="Zipkin-APIComposerfailed" src="/learn/assets/images/Zipkin-APIComposerfailed-4928ccc77fc248ff38d54731a03b5a61.png" width="1920" height="1080" class="img_ev3q">
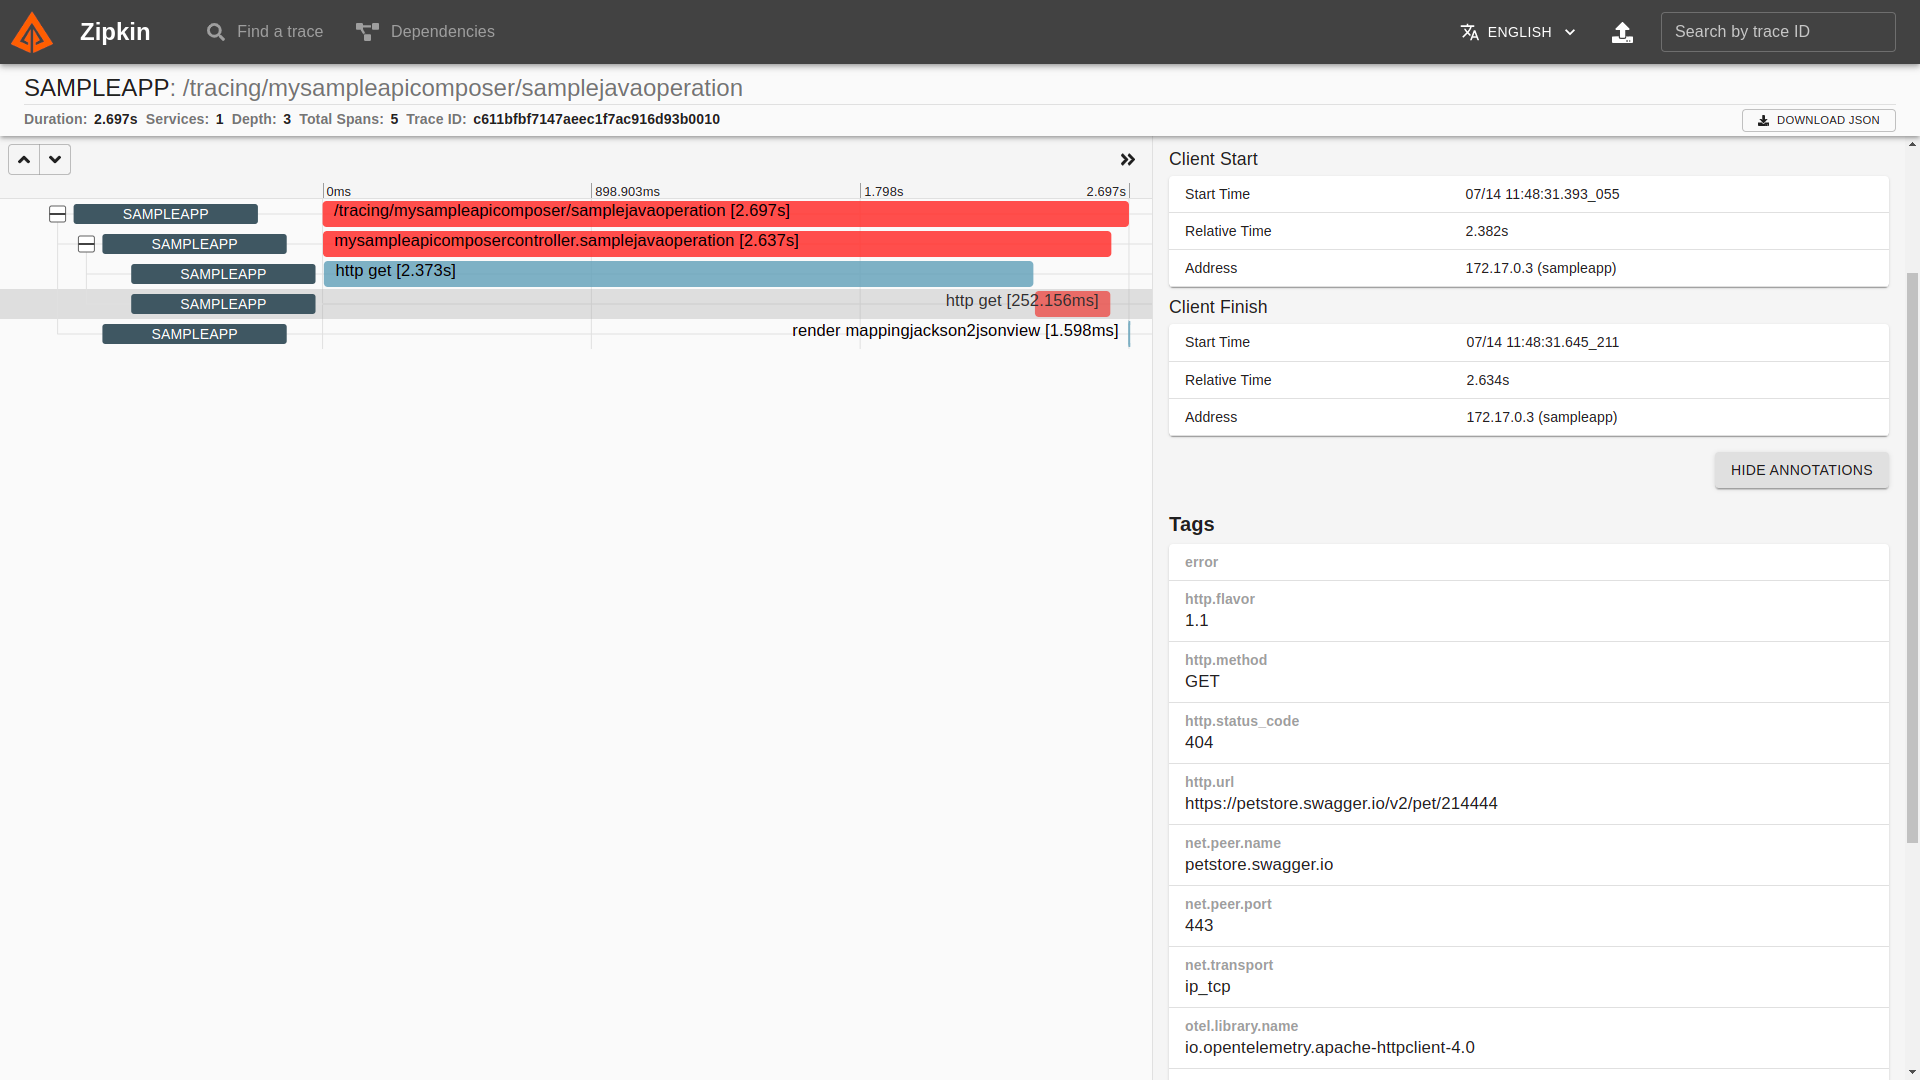
WaveMaker API Composer second GET call with its status code(404) and response time details.</p><br><br><br><p><img loading="lazy" alt="Zipkin-DBCall" src="/learn/assets/images/Zipkin-DBCall-faae4aa63ffec5b700024c1614859b28.png" width="1920" height="1080" class="img_ev3q">
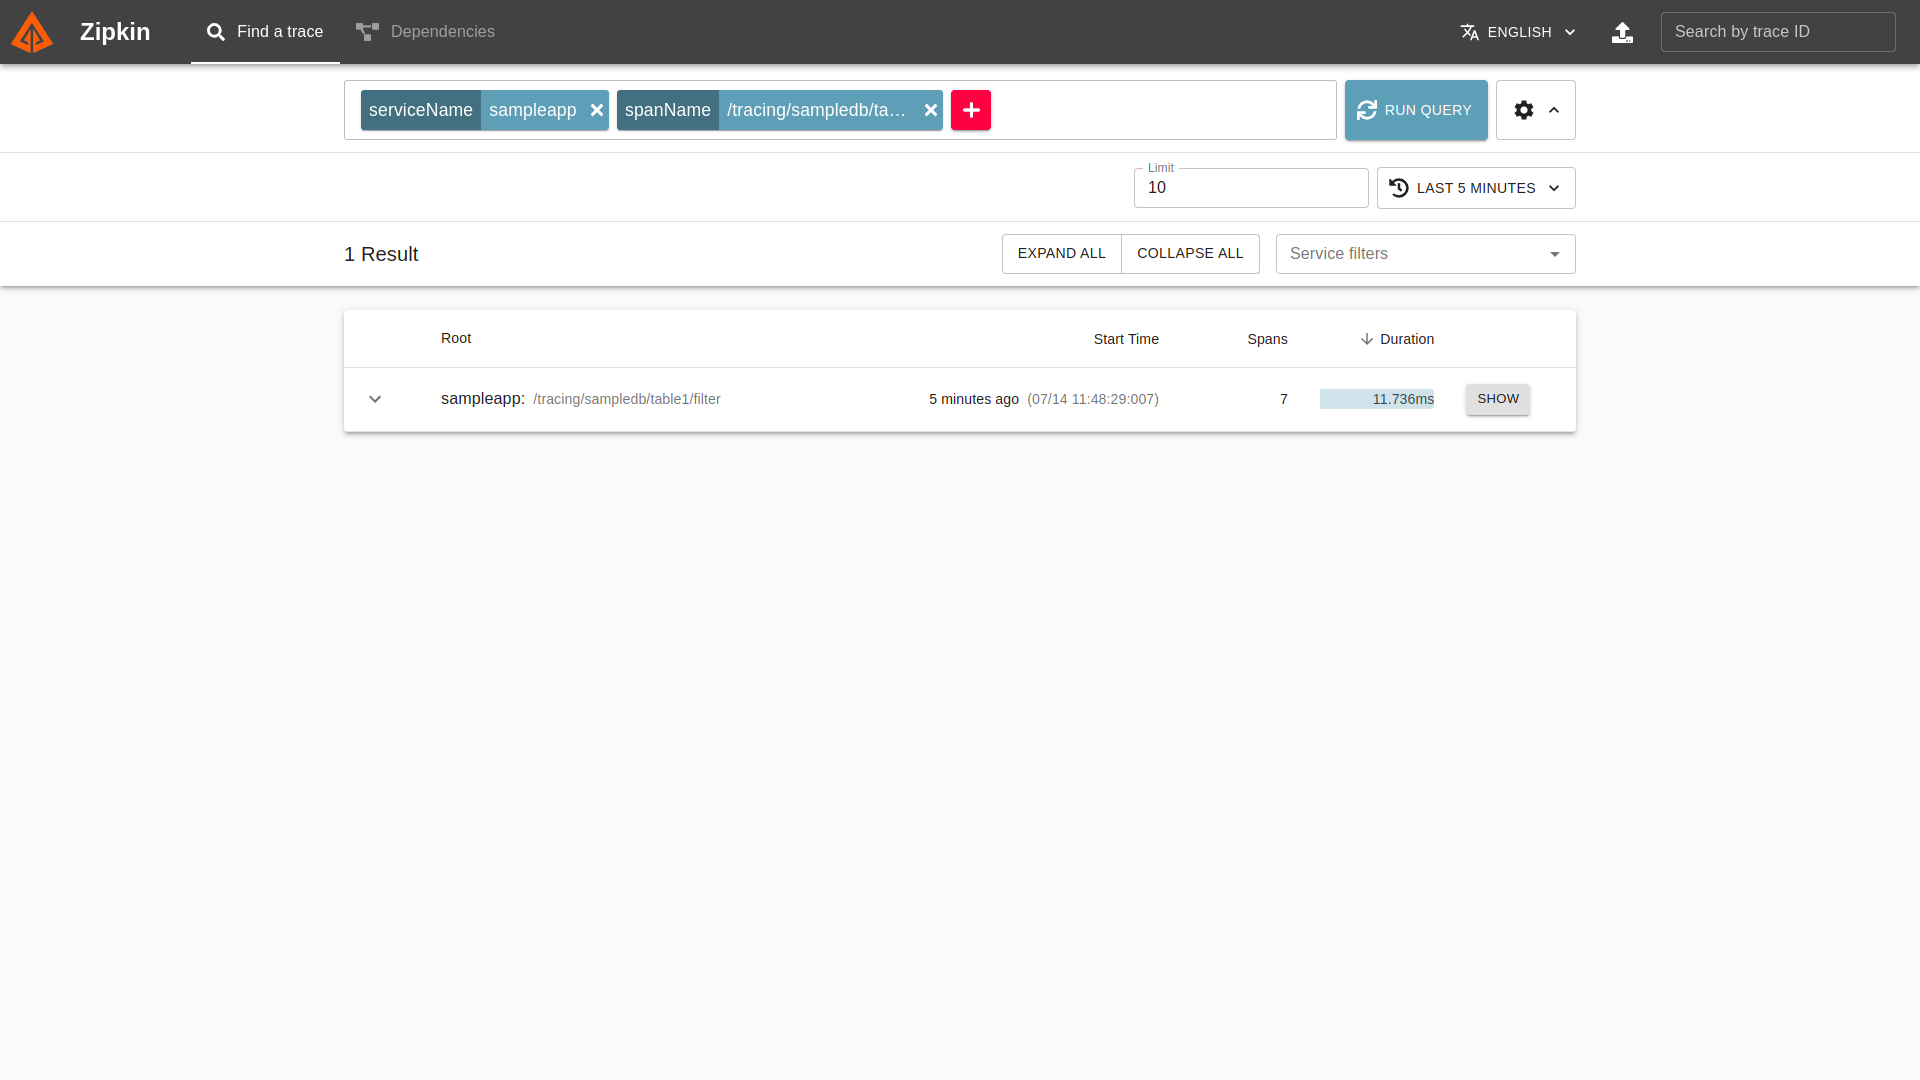
Click on show button for WaveMaker API call details</p><br><br><br><p><img loading="lazy" alt="Zipkin-DBList" src="/learn/assets/images/Zipkin-DBList-fc5a93ed8d4987087a1e896f4e217534.png" width="1843" height="977" class="img_ev3q">
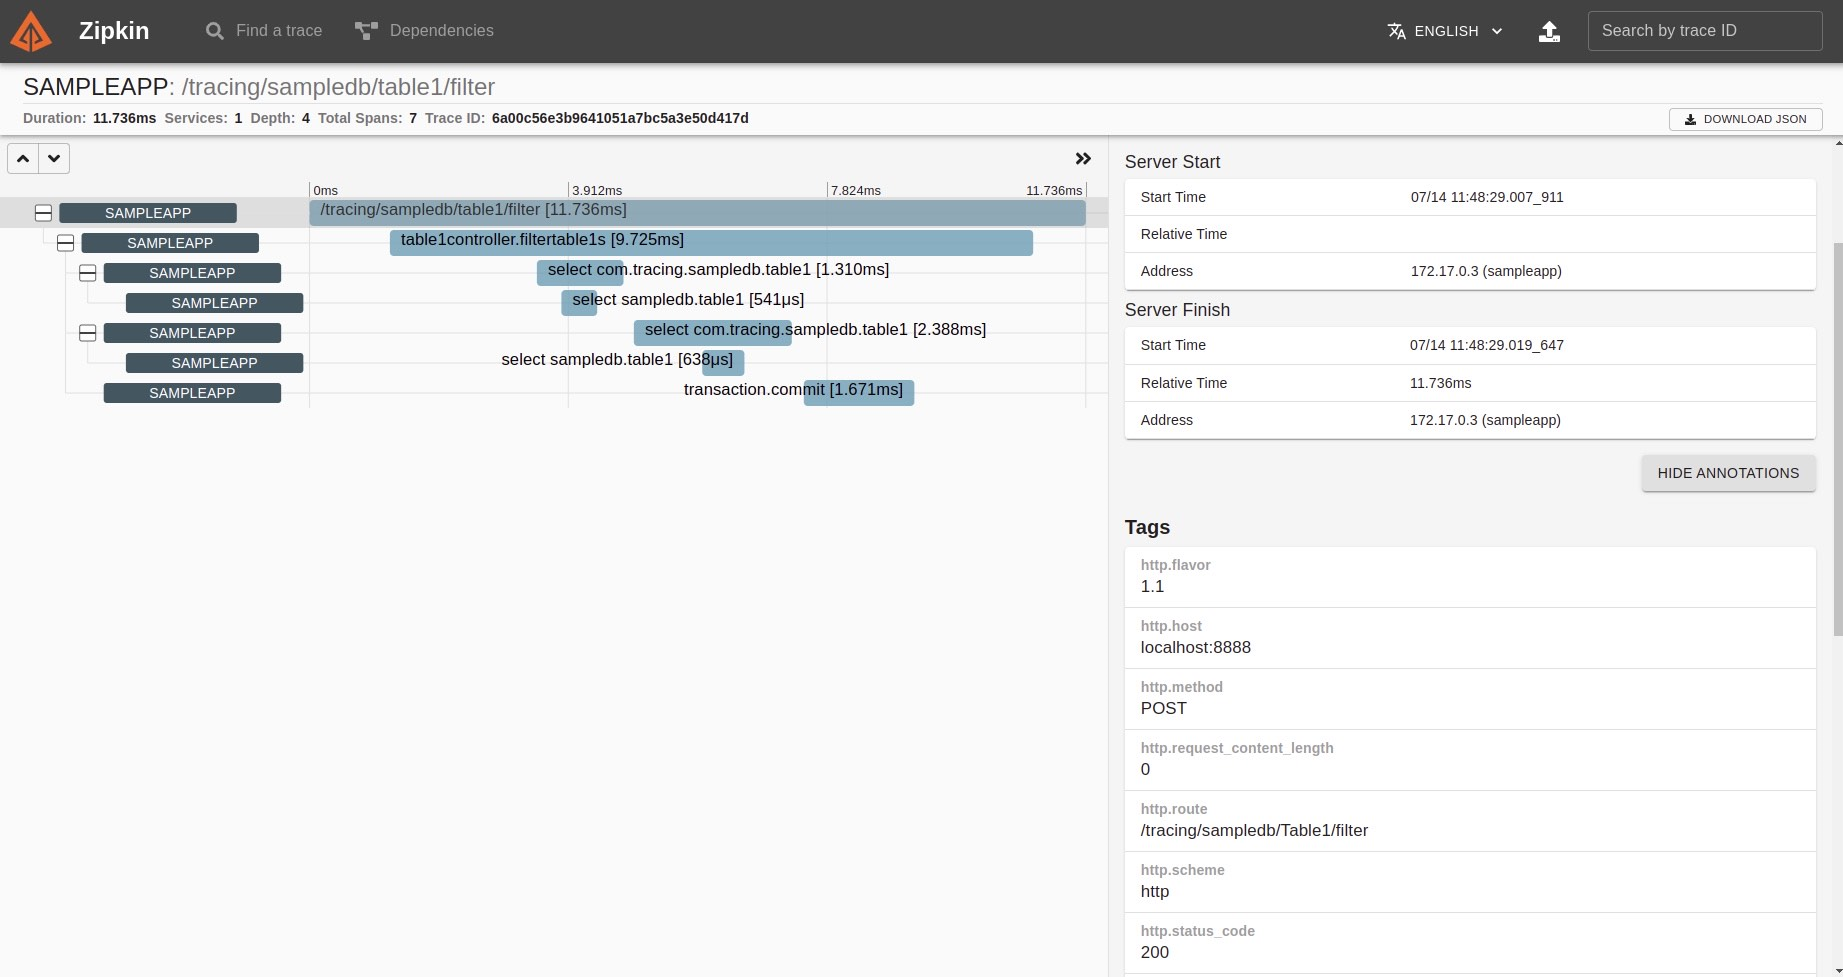
WaveMaker API generated to access DB trace info along with its status code(200) and response time details.</p><br><br><br><p><img loading="lazy" alt="Zipkin-DBtable" src="/learn/assets/images/Zipkin-DBtable-548dfdec14b4f8575181abb54d810039.png" width="1920" height="1080" class="img_ev3q">
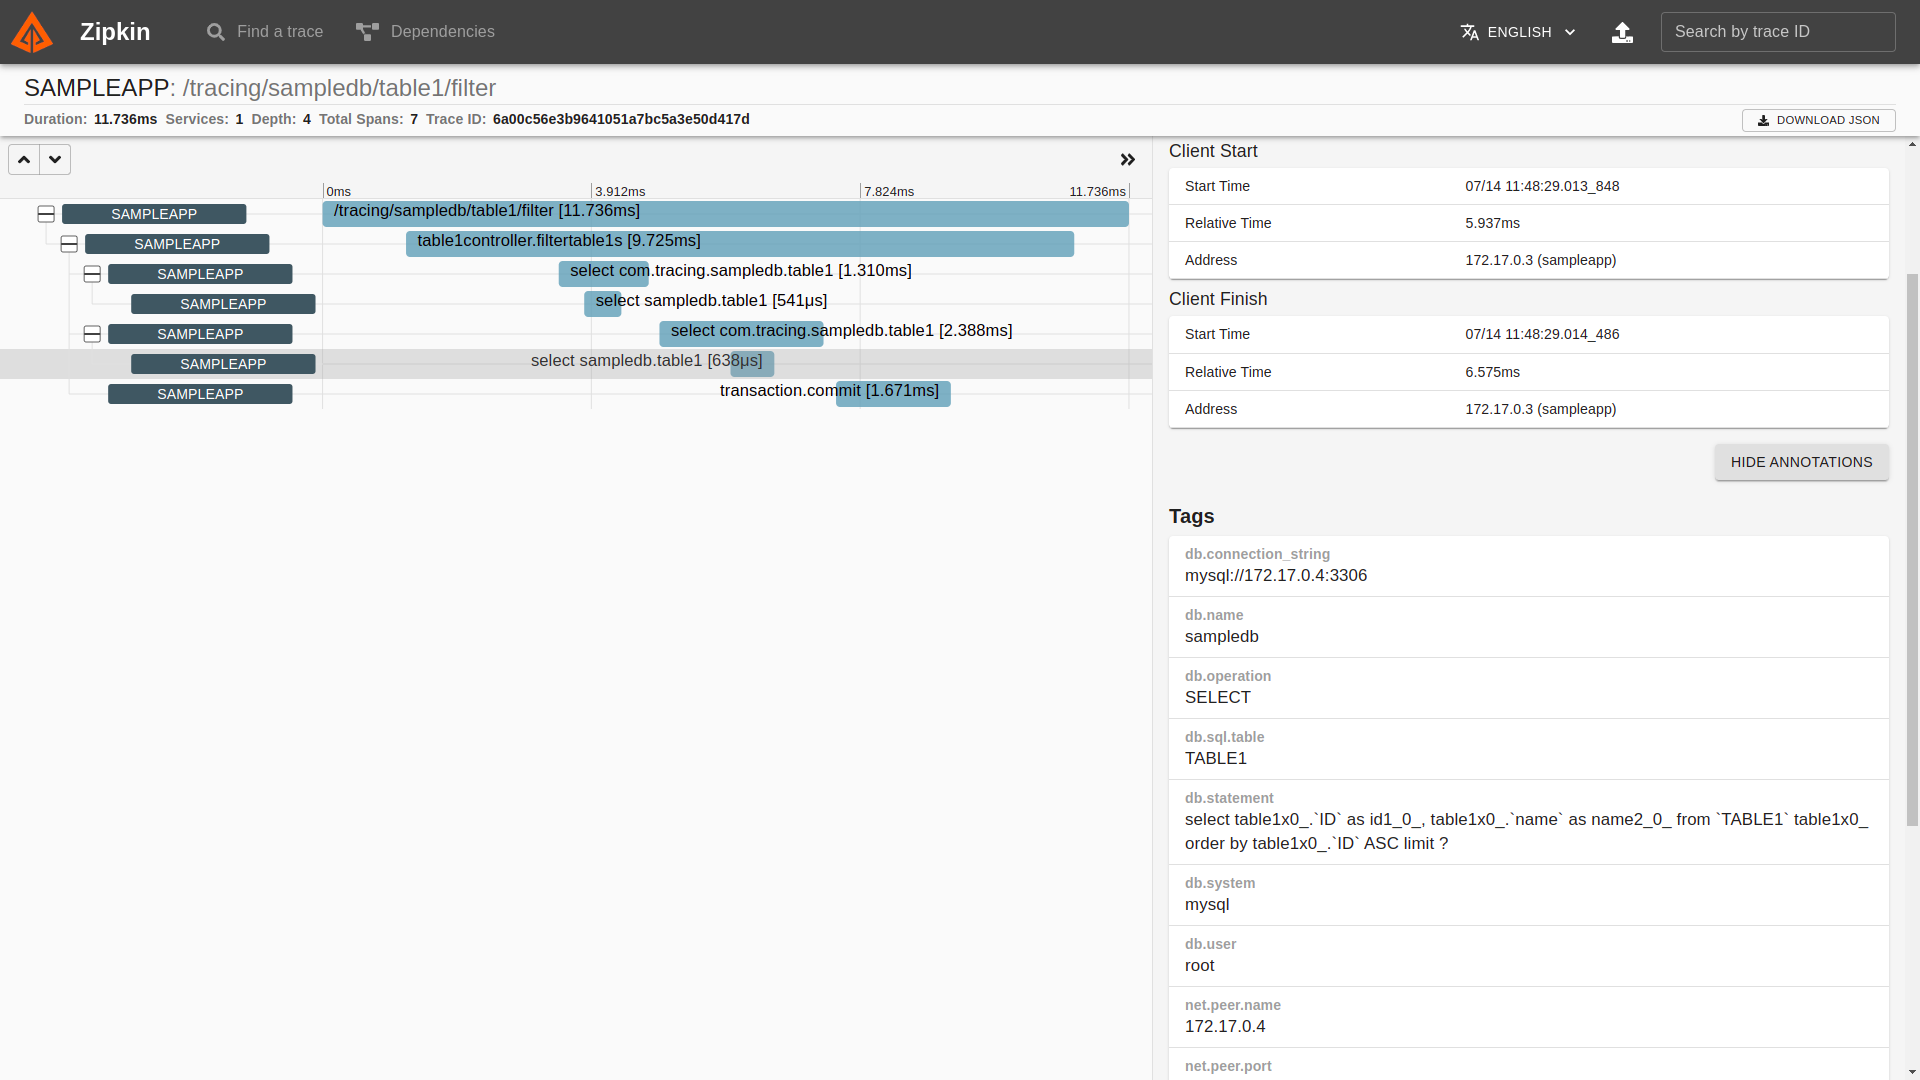
WaveMaker API generated to access DB query and its response time details.</p>]]></content>
        <author>
            <name>Deepika Srimanthula</name>
        </author>
    </entry>
    <entry>
        <title type="html"><![CDATA[Mitigating Spring Zero-day Vulnerability CVE-2022-22965]]></title>
        <id>https://www.wavemaker.com/learn/blog/2022/04/05/mitigating-spring-zero-day-vulnerability</id>
        <link href="https://www.wavemaker.com/learn/blog/2022/04/05/mitigating-spring-zero-day-vulnerability"/>
        <updated>2022-04-05T00:00:00.000Z</updated>
        <summary type="html"><![CDATA[---]]></summary>
        <content type="html"><![CDATA[<hr><p>A new zero-day vulnerability was reported in the Spring library on <strong>29th March 2022</strong>, affecting the library versions <strong>5.3.0 to 5.3.17, 5.2.0 to 5.2.19,</strong> and older versions. The vulnerability impacts Spring MVC applications running on JDK 9+. </p><p>Spring has released a new version on <strong>31st March 2022, 5.3.18</strong>, which fixes the vulnerability. The specific exploit requires the application to run on Tomcat as a WAR deployment. The <a href="https://spring.io/blog/2022/03/31/spring-framework-rce-early-announcement" target="_blank" rel="noopener noreferrer">blog post added by Spring</a> has more details about the vulnerability.</p><h2 class="anchor anchorWithStickyNavbar_LWe7" id="is-wavemaker-application-affected">Is WaveMaker Application Affected?<a href="#is-wavemaker-application-affected" class="hash-link" aria-label="Direct link to Is WaveMaker Application Affected?" title="Direct link to Is WaveMaker Application Affected?">​</a></h2><p>WaveMaker 10 Apps are compiled using Java 8 and supported to deploy on Java 8 only. So ideally, WaveMaker apps are not affected. Applications deployed on Java 9+ are maybe vulnerable if the controller methods use <strong>@ModelAttribute</strong> or have no annotation. WaveMaker generated controllers either use <strong>@RequestParam</strong>, <strong>@PathParam</strong> or @<strong>RequestBody</strong>. So, they are not affected by this vulnerability. </p><div class="theme-admonition theme-admonition-note alert alert--secondary admonition_WoCw"><div class="admonitionHeading_TMsN"><span class="admonitionIcon_Ibzs"><svg viewBox="0 0 14 16"><path fill-rule="evenodd" d="M6.3 5.69a.942.942 0 0 1-.28-.7c0-.28.09-.52.28-.7.19-.18.42-.28.7-.28.28 0 .52.09.7.28.18.19.28.42.28.7 0 .28-.09.52-.28.7a1 1 0 0 1-.7.3c-.28 0-.52-.11-.7-.3zM8 7.99c-.02-.25-.11-.48-.31-.69-.2-.19-.42-.3-.69-.31H6c-.27.02-.48.13-.69.31-.2.2-.3.44-.31.69h1v3c.02.27.11.5.31.69.2.2.42.31.69.31h1c.27 0 .48-.11.69-.31.2-.19.3-.42.31-.69H8V7.98v.01zM7 2.3c-3.14 0-5.7 2.54-5.7 5.68 0 3.14 2.56 5.7 5.7 5.7s5.7-2.55 5.7-5.7c0-3.15-2.56-5.69-5.7-5.69v.01zM7 .98c3.86 0 7 3.14 7 7s-3.14 7-7 7-7-3.12-7-7 3.14-7 7-7z"></path></svg></span>note</div><div class="admonitionContent_vXIg"><p>We recommend mitigating your application using one of the steps mentioned below in the blog as an instant fix.  WaveMaker will release a hotfix to include the Spring version update very soon.</p></div></div><h2 class="anchor anchorWithStickyNavbar_LWe7" id="risk-mitigation">Risk Mitigation<a href="#risk-mitigation" class="hash-link" aria-label="Direct link to Risk Mitigation" title="Direct link to Risk Mitigation">​</a></h2><p>Below are two ways that you can follow to mitigate the risk against CVE-2022-22965 before the scheduled hotfix release.</p><h3 class="anchor anchorWithStickyNavbar_LWe7" id="upgrade-the-spring-version-manually-in-your-pomxml">Upgrade the Spring Version Manually in your pom.xml<a href="#upgrade-the-spring-version-manually-in-your-pomxml" class="hash-link" aria-label="Direct link to Upgrade the Spring Version Manually in your pom.xml" title="Direct link to Upgrade the Spring Version Manually in your pom.xml">​</a></h3><p>Add the latest version of Spring framework bom <strong>5.3.18</strong> as the first dependency under the <code>&lt;dependencies&gt;</code> section of <code>&lt;dependencyManagement&gt;</code> section. Add the following dependencies as specified below.</p><div class="language-xml codeBlockContainer_Ckt0 theme-code-block" style="--prism-color:#bfc7d5;--prism-background-color:#292d3e"><div class="codeBlockContent_biex"><pre tabindex="0" class="prism-code language-xml codeBlock_bY9V thin-scrollbar"><code class="codeBlockLines_e6Vv"><span class="token-line" style="color:#bfc7d5"><span class="token tag punctuation" style="color:rgb(199, 146, 234)">&lt;</span><span class="token tag" style="color:rgb(255, 85, 114)">dependency</span><span class="token tag punctuation" style="color:rgb(199, 146, 234)">&gt;</span><span class="token plain"></span><br></span><span class="token-line" style="color:#bfc7d5"><span class="token plain"> </span><span class="token tag punctuation" style="color:rgb(199, 146, 234)">&lt;</span><span class="token tag" style="color:rgb(255, 85, 114)">groupId</span><span class="token tag punctuation" style="color:rgb(199, 146, 234)">&gt;</span><span class="token plain">org.springframework</span><span class="token tag punctuation" style="color:rgb(199, 146, 234)">&lt;/</span><span class="token tag" style="color:rgb(255, 85, 114)">groupId</span><span class="token tag punctuation" style="color:rgb(199, 146, 234)">&gt;</span><span class="token plain"></span><br></span><span class="token-line" style="color:#bfc7d5"><span class="token plain"> </span><span class="token tag punctuation" style="color:rgb(199, 146, 234)">&lt;</span><span class="token tag" style="color:rgb(255, 85, 114)">artifactId</span><span class="token tag punctuation" style="color:rgb(199, 146, 234)">&gt;</span><span class="token plain">spring-framework-bom</span><span class="token tag punctuation" style="color:rgb(199, 146, 234)">&lt;/</span><span class="token tag" style="color:rgb(255, 85, 114)">artifactId</span><span class="token tag punctuation" style="color:rgb(199, 146, 234)">&gt;</span><span class="token plain"></span><br></span><span class="token-line" style="color:#bfc7d5"><span class="token plain"> </span><span class="token tag punctuation" style="color:rgb(199, 146, 234)">&lt;</span><span class="token tag" style="color:rgb(255, 85, 114)">version</span><span class="token tag punctuation" style="color:rgb(199, 146, 234)">&gt;</span><span class="token plain">5.3.18</span><span class="token tag punctuation" style="color:rgb(199, 146, 234)">&lt;/</span><span class="token tag" style="color:rgb(255, 85, 114)">version</span><span class="token tag punctuation" style="color:rgb(199, 146, 234)">&gt;</span><span class="token plain"></span><br></span><span class="token-line" style="color:#bfc7d5"><span class="token plain"> </span><span class="token tag punctuation" style="color:rgb(199, 146, 234)">&lt;</span><span class="token tag" style="color:rgb(255, 85, 114)">type</span><span class="token tag punctuation" style="color:rgb(199, 146, 234)">&gt;</span><span class="token plain">pom</span><span class="token tag punctuation" style="color:rgb(199, 146, 234)">&lt;/</span><span class="token tag" style="color:rgb(255, 85, 114)">type</span><span class="token tag punctuation" style="color:rgb(199, 146, 234)">&gt;</span><span class="token plain"></span><br></span><span class="token-line" style="color:#bfc7d5"><span class="token plain"> </span><span class="token tag punctuation" style="color:rgb(199, 146, 234)">&lt;</span><span class="token tag" style="color:rgb(255, 85, 114)">scope</span><span class="token tag punctuation" style="color:rgb(199, 146, 234)">&gt;</span><span class="token plain">import</span><span class="token tag punctuation" style="color:rgb(199, 146, 234)">&lt;/</span><span class="token tag" style="color:rgb(255, 85, 114)">scope</span><span class="token tag punctuation" style="color:rgb(199, 146, 234)">&gt;</span><span class="token plain"></span><br></span><span class="token-line" style="color:#bfc7d5"><span class="token plain"></span><span class="token tag punctuation" style="color:rgb(199, 146, 234)">&lt;/</span><span class="token tag" style="color:rgb(255, 85, 114)">dependency</span><span class="token tag punctuation" style="color:rgb(199, 146, 234)">&gt;</span><br></span></code></pre><div class="buttonGroup__atx"><button type="button" aria-label="Copy code to clipboard" title="Copy" class="clean-btn"><span class="copyButtonIcons_eSgA" aria-hidden="true"><svg viewBox="0 0 24 24" class="copyButtonIcon_y97N"><path fill="currentColor" d="M19,21H8V7H19M19,5H8A2,2 0 0,0 6,7V21A2,2 0 0,0 8,23H19A2,2 0 0,0 21,21V7A2,2 0 0,0 19,5M16,1H4A2,2 0 0,0 2,3V17H4V3H16V1Z"></path></svg><svg viewBox="0 0 24 24" class="copyButtonSuccessIcon_LjdS"><path fill="currentColor" d="M21,7L9,19L3.5,13.5L4.91,12.09L9,16.17L19.59,5.59L21,7Z"></path></svg></span></button></div></div></div><div class="theme-admonition theme-admonition-note alert alert--secondary admonition_WoCw"><div class="admonitionHeading_TMsN"><span class="admonitionIcon_Ibzs"><svg viewBox="0 0 14 16"><path fill-rule="evenodd" d="M6.3 5.69a.942.942 0 0 1-.28-.7c0-.28.09-.52.28-.7.19-.18.42-.28.7-.28.28 0 .52.09.7.28.18.19.28.42.28.7 0 .28-.09.52-.28.7a1 1 0 0 1-.7.3c-.28 0-.52-.11-.7-.3zM8 7.99c-.02-.25-.11-.48-.31-.69-.2-.19-.42-.3-.69-.31H6c-.27.02-.48.13-.69.31-.2.2-.3.44-.31.69h1v3c.02.27.11.5.31.69.2.2.42.31.69.31h1c.27 0 .48-.11.69-.31.2-.19.3-.42.31-.69H8V7.98v.01zM7 2.3c-3.14 0-5.7 2.54-5.7 5.68 0 3.14 2.56 5.7 5.7 5.7s5.7-2.55 5.7-5.7c0-3.15-2.56-5.69-5.7-5.69v.01zM7 .98c3.86 0 7 3.14 7 7s-3.14 7-7 7-7-3.12-7-7 3.14-7 7-7z"></path></svg></span>note</div><div class="admonitionContent_vXIg"><p>Ensure it is the first dependency, and it is before the <code>wavemaker-app-runtime-services</code> dependency.</p></div></div><h3 class="anchor anchorWithStickyNavbar_LWe7" id="upgrade-tomcat-version">Upgrade Tomcat Version<a href="#upgrade-tomcat-version" class="hash-link" aria-label="Direct link to Upgrade Tomcat Version" title="Direct link to Upgrade Tomcat Version">​</a></h3><p>Upgrade the Tomcat version to either 9.0.62 or 8.5.78, closing the attack vector on Tomcat's side.</p>]]></content>
        <author>
            <name>Uday Shankar</name>
        </author>
    </entry>
    <entry>
        <title type="html"><![CDATA[Upgrading saml to saml2-service-provider]]></title>
        <id>https://www.wavemaker.com/learn/blog/2022/03/24/saml-library-upgrade</id>
        <link href="https://www.wavemaker.com/learn/blog/2022/03/24/saml-library-upgrade"/>
        <updated>2022-03-24T00:00:00.000Z</updated>
        <summary type="html"><![CDATA[Security Assertion Markup Language (SAML) is an XML-based open standard for exchanging authentication and authorization data between different parties. The SAML exchanges are usually between]]></summary>
        <content type="html"><![CDATA[<p>Security Assertion Markup Language (SAML) is an XML-based open standard for exchanging authentication and authorization data between different parties. The SAML exchanges are usually between</p><ul><li>Identity provider (IdP) - producer of assertions, and</li><li>A service provider (sp) - the consumer of assertions.</li></ul><p>The identity provider could be any vendor like ADFS, OneLogin, Okta etc. which supports SAML-based Single Sign-On (SSO). The service provider is your WaveMaker application which makes use of Identity Provider to enable single sign-on across all your WaveMaker applications.</p><h2 class="anchor anchorWithStickyNavbar_LWe7" id="why-saml-upgrade-is-required">Why SAML upgrade is required?<a href="#why-saml-upgrade-is-required" class="hash-link" aria-label="Direct link to Why SAML upgrade is required?" title="Direct link to Why SAML upgrade is required?">​</a></h2><p>WaveMaker offers many security providers which can be enabled by the user based on their requirements. SAML is one of the security providers which depends on spring security extensions dependency. The spring-security-saml2-core has reached end of life as per the <a href="https://spring.io/blog/2020/09/22/spring-security-saml-extensions-1-x-eol-on-october-6-2021" target="_blank" rel="noopener noreferrer">spring documentation</a>. It means there will no longer be any support or bug fixes for this library from spring.</p><p>The saml2-service-provider is the replacement of spring-security-saml2-core and all the WaveMaker projects that are using SAML as a security provider will be migrated.</p><h2 class="anchor anchorWithStickyNavbar_LWe7" id="user-changes-required-after-saml-upgrade">User changes required after SAML upgrade<a href="#user-changes-required-after-saml-upgrade" class="hash-link" aria-label="Direct link to User changes required after SAML upgrade" title="Direct link to User changes required after SAML upgrade">​</a></h2><p>The new SAML library provided by spring suggests the metadata, audience url, SSO, SLO URLs which are different from the old one. So the user has to update the new URLs in their respective IDP providers. Below is a table that differentiates the old and new SAML URLs.</p><table><thead><tr><th>URL Type</th><th>spring-security-saml2-core (Existing)</th><th>saml2-service-provider (New)</th></tr></thead><tbody><tr><td>Metadata</td><td>{app-url}/saml/metadata</td><td>{app-url}/saml2/service-provider-metadata/saml</td></tr><tr><td>Audience</td><td>{app-url}/saml/metadata</td><td>{app-url}/saml2/service-provider-metadata/saml</td></tr><tr><td>SSO</td><td>{app-url}/saml/SSO</td><td>{app-url}/login/saml2/sso/saml</td></tr><tr><td>SLO</td><td>{app-url}/saml/SingleLogout</td><td>{app-url}/logout/saml2/slo</td></tr></tbody></table><p>Here app-url can be preview or deployed URL.</p><h2 class="anchor anchorWithStickyNavbar_LWe7" id="steps-to-update-the-urls-in-okta-provider">Steps to update the URLs in Okta provider<a href="#steps-to-update-the-urls-in-okta-provider" class="hash-link" aria-label="Direct link to Steps to update the URLs in Okta provider" title="Direct link to Steps to update the URLs in Okta provider">​</a></h2><ol><li><p>Login to the okta provider and open the configured saml application.</p></li><li><p>Click on the General Settings where the metadata, audience, SSO and SLO URLs are configured.</p><p><img loading="lazy" alt="general settings" src="/learn/assets/images/general-settings-okta-old-urls-15a7c56418d1c6106aa0180a312a6e81.png" width="776" height="466" class="img_ev3q"></p></li><li><p>Click on edit and update all the 4 URLs as shown in the below screenshot.</p><p><img loading="lazy" alt="general settings" src="/learn/assets/images/general-settings-okta-new-urls-f6d47846651d1da9480b7d1e8839bbaa.png" width="782" height="450" class="img_ev3q"></p></li><li><p>If SLO is enabled in the application then SLO URL should also be updated.</p><p><img loading="lazy" alt="general settings" src="/learn/assets/images/general-settings-okta-slo-url-31d9a9164a08cee96d6edb8df988ed0e.png" width="787" height="435" class="img_ev3q"></p><p>Here SP issue URL is same as metadata URL.</p></li><li><p>After updating the URLs you can preview the application and verify the SAML flow.</p></li></ol>]]></content>
        <author>
            <name>Praveen Chandra</name>
        </author>
    </entry>
    <entry>
        <title type="html"><![CDATA[WaveMaker application pom.xml]]></title>
        <id>https://www.wavemaker.com/learn/blog/2022/03/24/wavemaker-application-pom</id>
        <link href="https://www.wavemaker.com/learn/blog/2022/03/24/wavemaker-application-pom"/>
        <updated>2022-03-24T00:00:00.000Z</updated>
        <summary type="html"><![CDATA[WaveMaker application encloses a pom.xml. It maintains the build resources, including filters, profiles, repositories, plugin management, dependencies, and user customizations.]]></summary>
        <content type="html"><![CDATA[<p>WaveMaker application encloses a pom.xml. It maintains the build resources, including filters, profiles, repositories, plugin management, dependencies, and user customizations. </p><p>You would have to edit pom.xml when changing the dependency versions or add custom configurations for immediate fixes when needed. When you keep adding these configurations, it lengthens the generated pom.xml with the details of the application configurations and the Studio configurations that the developers only sometimes need access to. For this reason, the pom structure has been remodeled to inherit from the parent pom, making it easy to read and manage the code. </p><h2 class="anchor anchorWithStickyNavbar_LWe7" id="hierarchy-with-a-parent-pom">Hierarchy with a Parent pom<a href="#hierarchy-with-a-parent-pom" class="hash-link" aria-label="Direct link to Hierarchy with a Parent pom" title="Direct link to Hierarchy with a Parent pom">​</a></h2><p>We introduce the parent pom to the generated application. </p><p>Every generated application must depend on this parent pom, which contains all the generic build resources, filters, profiles, and essential profiles like development/production, repositories, and plugin management. </p><p>The parent pom furthermore depends on another pom, i.e., the wavemaker-app-dependencies pom, with all the app runtime dependencies and their versions as properties. The build-helper-maven-plugin is still in the application pom as it contains the list of services created in the application.</p><p><img loading="lazy" alt="pom-hierarchy" src="/learn/assets/images/pom-hierarchy-c6a59b1c5dc384ac1c2de6209b2eea26.png" width="708" height="372" class="img_ev3q"></p><p>This model introduces less verbosity in the generated pom.xml, making it clear and concise for developers to understand, and can easily add further customization to the pom.xml.</p><p>Below is a default pom.xml generated when a WaveMaker project is created.</p><p><img loading="lazy" alt="default-pom" src="/learn/assets/images/default-pom-850b252cf6b92c75006dfb682942f939.png" width="825" height="630" class="img_ev3q"></p><div class="theme-admonition theme-admonition-note alert alert--secondary admonition_WoCw"><div class="admonitionHeading_TMsN"><span class="admonitionIcon_Ibzs"><svg viewBox="0 0 14 16"><path fill-rule="evenodd" d="M6.3 5.69a.942.942 0 0 1-.28-.7c0-.28.09-.52.28-.7.19-.18.42-.28.7-.28.28 0 .52.09.7.28.18.19.28.42.28.7 0 .28-.09.52-.28.7a1 1 0 0 1-.7.3c-.28 0-.52-.11-.7-.3zM8 7.99c-.02-.25-.11-.48-.31-.69-.2-.19-.42-.3-.69-.31H6c-.27.02-.48.13-.69.31-.2.2-.3.44-.31.69h1v3c.02.27.11.5.31.69.2.2.42.31.69.31h1c.27 0 .48-.11.69-.31.2-.19.3-.42.31-.69H8V7.98v.01zM7 2.3c-3.14 0-5.7 2.54-5.7 5.68 0 3.14 2.56 5.7 5.7 5.7s5.7-2.55 5.7-5.7c0-3.15-2.56-5.69-5.7-5.69v.01zM7 .98c3.86 0 7 3.14 7 7s-3.14 7-7 7-7-3.12-7-7 3.14-7 7-7z"></path></svg></span>note</div><div class="admonitionContent_vXIg"><p>The wavemaker-app-parent and wavemaker-app-dependencies pom are published to the maven repository with a new version whenever WaveMaker releases a new version.</p></div></div><h2 class="anchor anchorWithStickyNavbar_LWe7" id="advantages-of-new-pom-structure">Advantages of New Pom Structure<a href="#advantages-of-new-pom-structure" class="hash-link" aria-label="Direct link to Advantages of New Pom Structure" title="Direct link to Advantages of New Pom Structure">​</a></h2><p>Below are a few advantages of adapting to the new inheritance model of pom.</p><h3 class="anchor anchorWithStickyNavbar_LWe7" id="less-verbose">Less Verbose<a href="#less-verbose" class="hash-link" aria-label="Direct link to Less Verbose" title="Direct link to Less Verbose">​</a></h3><p>All the WaveMaker-related configuration is moved to the parent pom. So the generated pom is more readable, and the developer can easily understand the custom configurations.</p><h3 class="anchor anchorWithStickyNavbar_LWe7" id="upgrading-without-migrations">Upgrading without Migrations<a href="#upgrading-without-migrations" class="hash-link" aria-label="Direct link to Upgrading without Migrations" title="Direct link to Upgrading without Migrations">​</a></h3><p>In the previous structure, any migrations made to the application would be visible to the user in their VCS. But, since all the WaveMaker-related configurations are maintained in the parent pom, it avoids confusion, and only the WaveMaker Studio version changes would be visible in the VCS.	</p><h3 class="anchor anchorWithStickyNavbar_LWe7" id="ease-of-library-version-overrides">Ease of Library Version Overrides<a href="#ease-of-library-version-overrides" class="hash-link" aria-label="Direct link to Ease of Library Version Overrides" title="Direct link to Ease of Library Version Overrides">​</a></h3><p>Users can easily override the application runtime libraries, databases, or security dependencies.</p><ol><li><p>By adding the new version in the properties of the application's pom.xml</p><p>Example of upgrading log4j version: </p><p><img loading="lazy" alt="log4j-pom-example" src="/learn/assets/images/log4j-pom-example-f5304246c2c085790744f6ed2bbe9a03.png" width="977" height="78" class="img_ev3q"></p></li><li><p>Bypassing the property during application build.</p><p>Example : <strong>mvn clean install -Dlog4j.version=2.17.2</strong> </p></li></ol><h2 class="anchor anchorWithStickyNavbar_LWe7" id="impact-on-users-project">Impact on Users Project<a href="#impact-on-users-project" class="hash-link" aria-label="Direct link to Impact on Users Project" title="Direct link to Impact on Users Project">​</a></h2><ul><li>Database and Security dependencies will now have only the groupId, and artifactId. The version has been removed since it is inherited from the parent pom. If you want to change the version, you can override it by adding the version details in the properties.</li><li>Any custom configurations you made will still be in the pom.xml after the upgrade.</li></ul>]]></content>
        <author>
            <name>Praveen Chandra</name>
        </author>
    </entry>
    <entry>
        <title type="html"><![CDATA[Archiving WaveMaker 9 Projects]]></title>
        <id>https://www.wavemaker.com/learn/blog/2022/02/01/archiving-9-projects</id>
        <link href="https://www.wavemaker.com/learn/blog/2022/02/01/archiving-9-projects"/>
        <updated>2022-02-01T00:00:00.000Z</updated>
        <summary type="html"><![CDATA[---]]></summary>
        <content type="html"><![CDATA[<hr><p>Earlier in this blog, we announced <a href="/learn/blog/2021/12/08/wavemaker9x-end-of-support">ending support of WaveMaker 9 (WM) Projects</a>. WaveMaker offered support to manage individual versions of your app with our multi-version control system so that you could simultaneously work on both WM 9 and WM 10 projects. One of the key differences between the WM 9 and WM 10 is moving from AngularJS to Angular 11. </p><p>Angular laid its plan in January 2018 for the <a href="https://docs.angularjs.org/misc/version-support-status" target="_blank" rel="noopener noreferrer">final releases of AngularJS</a> before entering long-term support (LTS) and extended the LTS due to the global pandemic until December 31, 2021. As we reach the end of life of AngularJS, we officially withdrew support of WM 9 projects starting <strong>WM 10.12 release planned for February 2, 2022</strong>. As a result, the existing WM 9 projects get archived.</p><h2 class="anchor anchorWithStickyNavbar_LWe7" id="wavemaker-archived-apps">WaveMaker Archived Apps<a href="#wavemaker-archived-apps" class="hash-link" aria-label="Direct link to WaveMaker Archived Apps" title="Direct link to WaveMaker Archived Apps">​</a></h2><p>Typically, when <a href="/learn/how-tos/guide-to-upgrade-an-app-wavemaker-9x-to-wavemaker-10-0/#initiating-the-project-upgrade">initiating project migration</a>, you have two versions of the project in one folder containing WM 9 and WM 10 projects. </p><p>The following diagram illustrates which projects move to the archived location. </p><p><img loading="lazy" src="/learn/assets/images/wm9-projects-archive-architecture-64a79ed6080210b4ce6a600e1b10d03f.png" width="2418" height="1308" class="img_ev3q"></p><h3 class="anchor anchorWithStickyNavbar_LWe7" id="project-upgraded">Project Upgraded<a href="#project-upgraded" class="hash-link" aria-label="Direct link to Project Upgraded" title="Direct link to Project Upgraded">​</a></h3><p><strong>Case-1:</strong> When you finish the upgrade process, the WM 9 project gets archived in that folder. In this case, the upgraded project, WM 10, remains in WaveMaker apps and has all functionality that a regular WaveMaker app has. The WM 9 version of the project moves to the archived location, which should be safe to delete. </p><h3 class="anchor anchorWithStickyNavbar_LWe7" id="upgrade-in-progress">Upgrade in Progress<a href="#upgrade-in-progress" class="hash-link" aria-label="Direct link to Upgrade in Progress" title="Direct link to Upgrade in Progress">​</a></h3><p><strong>Case-2:</strong> The projects that have just initiated the upgrade, move to the Archive location as individual projects of their own versions, such as WM 9 and WM 10 projects. These projects automatically move to the Archive location separately. To work on these projects, you can download the project as Zip and import; the project gets imported as a WM 10 version.</p><h3 class="anchor anchorWithStickyNavbar_LWe7" id="upgrade-not-initiated">Upgrade not Initiated<a href="#upgrade-not-initiated" class="hash-link" aria-label="Direct link to Upgrade not Initiated" title="Direct link to Upgrade not Initiated">​</a></h3><p><strong>Case-3:</strong> The projects that have not yet initiated upgrading to WM 10 move to the Archived location as is. You can still import the project as zip and import to use its content.</p><h2 class="anchor anchorWithStickyNavbar_LWe7" id="accessing-archived-apps">Accessing Archived Apps<a href="#accessing-archived-apps" class="hash-link" aria-label="Direct link to Accessing Archived Apps" title="Direct link to Accessing Archived Apps">​</a></h2><p>In WaveMaker Studio, navigate to the topnav tabs displaying WaveMaker apps.</p><ul><li>Go to the <strong>Archived Apps</strong> tab. You can view all your archived apps here.</li></ul><p><img loading="lazy" alt="screenshot showing how to locate" src="/learn/assets/images/wm9-archived-projects-6321aac029efdaf43ba537e96eeffeea.png" width="1562" height="747" class="img_ev3q"></p><h3 class="anchor anchorWithStickyNavbar_LWe7" id="archived-actions">Archived Actions<a href="#archived-actions" class="hash-link" aria-label="Direct link to Archived Actions" title="Direct link to Archived Actions">​</a></h3><p>Archived apps are accessible with limited access. Allowed actions include:</p><ul><li>Download Project as Zip</li><li>Delete Project</li></ul><h2 class="anchor anchorWithStickyNavbar_LWe7" id="wm-9-project-deployments-not-supported">WM 9 Project Deployments Not Supported<a href="#wm-9-project-deployments-not-supported" class="hash-link" aria-label="Direct link to WM 9 Project Deployments Not Supported" title="Direct link to WM 9 Project Deployments Not Supported">​</a></h2><p>With WM 9 projects archived, deploying WM 9 apps are not supported anymore. WaveMaker will not display WM 9 projects in <strong>Manage Deployed Apps</strong>. All the details related to the project, including logs, releases, history, and app URLs, are removed. However, you can continue to access deployed apps on servers, such as AWS, Google, Azure.</p>]]></content>
        <author>
            <name>Swetha Kundaram</name>
        </author>
    </entry>
    <entry>
        <title type="html"><![CDATA[URL Change in WaveMaker Android WebView]]></title>
        <id>https://www.wavemaker.com/learn/blog/2022/01/10/cordova-android-change-in-webview-url</id>
        <link href="https://www.wavemaker.com/learn/blog/2022/01/10/cordova-android-change-in-webview-url"/>
        <updated>2022-01-10T00:00:00.000Z</updated>
        <summary type="html"><![CDATA[---]]></summary>
        <content type="html"><![CDATA[<hr><p>In WaveMaker 10.10, Cordova-android is upgraded to 10.1.0. With that change, it is observed that third-party cookies are not getting stored on the WebView. Cookies are required for WaveMaker authentication. So, a plugin <strong><a href="https://www.npmjs.com/package/wm-cordova-plugin-advanced-http" target="_blank" rel="noopener noreferrer">wm-cordova-plugin-advanced-http</a></strong> was used to make ajax calls instead of browser XHR. Following are the drawbacks of using the plugin.</p><ul><li>All network calls are logged into the console of chrome dev tools instead of the network tab.</li><li>There are gaps between plugin API and XmlHttpRequest. Some of these gaps are addressed in the WaveMaker platform to make it work in WaveMaker without any changes in the existing code.</li></ul><p>In WaveMaker 10.11, another method is implemented to solve the cookie problem.</p><h2 class="anchor anchorWithStickyNavbar_LWe7" id="method">Method<a href="#method" class="hash-link" aria-label="Direct link to Method" title="Direct link to Method">​</a></h2><p><a href="https://cordova.apache.org/announcements/2021/07/20/cordova-android-10.0.0.html" target="_blank" rel="noopener noreferrer">Cordova allows developers to set the hostname</a> through preference in config.xml. 'localhost' is the default hostname. Using this hostname preference, WaveMaker platform automatically sets the server path's (given in export Cordova zip dialog) domain as the hostname. This is done during Cordova zip export. Thus, all cookies from the server path become first-party cookies, and WebView is allowing them to be stored.</p><h2 class="anchor anchorWithStickyNavbar_LWe7" id="changes-needed-from-the-developer">Changes needed from the Developer<a href="#changes-needed-from-the-developer" class="hash-link" aria-label="Direct link to Changes needed from the Developer" title="Direct link to Changes needed from the Developer">​</a></h2><p>By default, this methodology gets implemented in all projects. If the hostname preference is mentioned in config.xml under the Android platform, then WaveMaker does not apply this change and fallback to plugin usage. No changes are required from the WaveMaker developer.</p><h2 class="anchor anchorWithStickyNavbar_LWe7" id="changes-to-note">Changes to note<a href="#changes-to-note" class="hash-link" aria-label="Direct link to Changes to note" title="Direct link to Changes to note">​</a></h2><p>In Android Apps, location.href now has the server domain as the host. All local app files are served at path <strong>https://${server_domain}/_www</strong>.</p><h2 class="anchor anchorWithStickyNavbar_LWe7" id="additional-info">Additional Info<a href="#additional-info" class="hash-link" aria-label="Direct link to Additional Info" title="Direct link to Additional Info">​</a></h2><p>As iOS does not allow to set scheme as HTTP/HTTPS, this same methodology does not work for iOS. So, the plugin is still being used in iOS for marking AJAX calls.</p>]]></content>
        <author>
            <name>Srinivasa Rao Boyina</name>
        </author>
    </entry>
    <entry>
        <title type="html"><![CDATA[Announcement about Angular 11 Update]]></title>
        <id>https://www.wavemaker.com/learn/blog/2021/12/17/angular-11-update</id>
        <link href="https://www.wavemaker.com/learn/blog/2021/12/17/angular-11-update"/>
        <updated>2021-12-17T00:00:00.000Z</updated>
        <summary type="html"><![CDATA[---]]></summary>
        <content type="html"><![CDATA[<hr><p>WaveMaker generates code for applications based on Angular. As part of the continuous improvement efforts, we upgrade WaveMaker to the next major Angular version, 11, in the <strong>release 10.11</strong>, scheduled for the second week of January 2022. </p><table><thead><tr><th>Current version</th><th>Updating to</th></tr></thead><tbody><tr><td>Angular 10.2.5</td><td>11.2.14</td></tr></tbody></table><p>To learn more, see <a href="https://blog.angular.io/version-11-of-angular-now-available-74721b7952f7" target="_blank" rel="noopener noreferrer">Angular Version 11 - what's in the release</a>.</p><div class="theme-admonition theme-admonition-note alert alert--secondary admonition_WoCw"><div class="admonitionHeading_TMsN"><span class="admonitionIcon_Ibzs"><svg viewBox="0 0 14 16"><path fill-rule="evenodd" d="M6.3 5.69a.942.942 0 0 1-.28-.7c0-.28.09-.52.28-.7.19-.18.42-.28.7-.28.28 0 .52.09.7.28.18.19.28.42.28.7 0 .28-.09.52-.28.7a1 1 0 0 1-.7.3c-.28 0-.52-.11-.7-.3zM8 7.99c-.02-.25-.11-.48-.31-.69-.2-.19-.42-.3-.69-.31H6c-.27.02-.48.13-.69.31-.2.2-.3.44-.31.69h1v3c.02.27.11.5.31.69.2.2.42.31.69.31h1c.27 0 .48-.11.69-.31.2-.19.3-.42.31-.69H8V7.98v.01zM7 2.3c-3.14 0-5.7 2.54-5.7 5.68 0 3.14 2.56 5.7 5.7 5.7s5.7-2.55 5.7-5.7c0-3.15-2.56-5.69-5.7-5.69v.01zM7 .98c3.86 0 7 3.14 7 7s-3.14 7-7 7-7-3.12-7-7 3.14-7 7-7z"></path></svg></span>note</div><div class="admonitionContent_vXIg"><p>Angular 10 is scheduled to end its support by 24th Dec 2021. For more information, see <a href="https://angular.io/guide/releases#support-policy-and-schedule" target="_blank" rel="noopener noreferrer">Angular Support Details</a>.</p></div></div><h3 class="anchor anchorWithStickyNavbar_LWe7" id="testing-apps-on-wavemaker-1011-beta">Testing Apps on WaveMaker 10.11 Beta<a href="#testing-apps-on-wavemaker-1011-beta" class="hash-link" aria-label="Direct link to Testing Apps on WaveMaker 10.11 Beta" title="Direct link to Testing Apps on WaveMaker 10.11 Beta">​</a></h3><div class="theme-admonition theme-admonition-note alert alert--secondary admonition_WoCw"><div class="admonitionHeading_TMsN"><span class="admonitionIcon_Ibzs"><svg viewBox="0 0 14 16"><path fill-rule="evenodd" d="M6.3 5.69a.942.942 0 0 1-.28-.7c0-.28.09-.52.28-.7.19-.18.42-.28.7-.28.28 0 .52.09.7.28.18.19.28.42.28.7 0 .28-.09.52-.28.7a1 1 0 0 1-.7.3c-.28 0-.52-.11-.7-.3zM8 7.99c-.02-.25-.11-.48-.31-.69-.2-.19-.42-.3-.69-.31H6c-.27.02-.48.13-.69.31-.2.2-.3.44-.31.69h1v3c.02.27.11.5.31.69.2.2.42.31.69.31h1c.27 0 .48-.11.69-.31.2-.19.3-.42.31-.69H8V7.98v.01zM7 2.3c-3.14 0-5.7 2.54-5.7 5.68 0 3.14 2.56 5.7 5.7 5.7s5.7-2.55 5.7-5.7c0-3.15-2.56-5.69-5.7-5.69v.01zM7 .98c3.86 0 7 3.14 7 7s-3.14 7-7 7-7-3.12-7-7 3.14-7 7-7z"></path></svg></span>note</div><div class="admonitionContent_vXIg"><p>Applies to WaveMaker Online (WMO) and WaveMaker Enterprise (WME) users.</p></div></div><p>We invite you to test your applications on the WaveMaker 10.11 beta before officially releasing the 10.11 version. This service is exclusively provided on request. Please get in touch with our <a href="mailto:support@wavemaker.com" target="_blank" rel="noopener noreferrer">support</a> team to access the WaveMaker 10.11 beta service.</p><p>The areas change in WaveMaker has been with how lazy loading of JS artifacts work. Our QA team has tested this area, and the release candidate build is now deployed on staging. While testing your applications, pay closer attention to the areas of your application that may be using <a href="/learn/app-development/custom-widgets/creating-prefabs">Prefabs</a> and <a href="/learn/app-development/ui-design/page-concepts/partial-pages">Partials</a> in particular. </p><h4 class="anchor anchorWithStickyNavbar_LWe7" id="to-do">To do<a href="#to-do" class="hash-link" aria-label="Direct link to To do" title="Direct link to To do">​</a></h4><ul class="contains-task-list containsTaskList_mC6p"><li class="task-list-item"><input type="checkbox" disabled=""> <!-- -->Run and test applications containing Prefabs</li><li class="task-list-item"><input type="checkbox" disabled=""> <!-- -->Run and test applications containing Partials</li></ul><h3 class="anchor anchorWithStickyNavbar_LWe7" id="whats-deprecated">What's Deprecated?<a href="#whats-deprecated" class="hash-link" aria-label="Direct link to What's Deprecated?" title="Direct link to What's Deprecated?">​</a></h3><p>Support of IE 9 and 10 was deprecated in Angular 10 and removed entirely in Angular 11. </p><div class="theme-admonition theme-admonition-note alert alert--secondary admonition_WoCw"><div class="admonitionHeading_TMsN"><span class="admonitionIcon_Ibzs"><svg viewBox="0 0 14 16"><path fill-rule="evenodd" d="M6.3 5.69a.942.942 0 0 1-.28-.7c0-.28.09-.52.28-.7.19-.18.42-.28.7-.28.28 0 .52.09.7.28.18.19.28.42.28.7 0 .28-.09.52-.28.7a1 1 0 0 1-.7.3c-.28 0-.52-.11-.7-.3zM8 7.99c-.02-.25-.11-.48-.31-.69-.2-.19-.42-.3-.69-.31H6c-.27.02-.48.13-.69.31-.2.2-.3.44-.31.69h1v3c.02.27.11.5.31.69.2.2.42.31.69.31h1c.27 0 .48-.11.69-.31.2-.19.3-.42.31-.69H8V7.98v.01zM7 2.3c-3.14 0-5.7 2.54-5.7 5.68 0 3.14 2.56 5.7 5.7 5.7s5.7-2.55 5.7-5.7c0-3.15-2.56-5.69-5.7-5.69v.01zM7 .98c3.86 0 7 3.14 7 7s-3.14 7-7 7-7-3.12-7-7 3.14-7 7-7z"></path></svg></span>note</div><div class="admonitionContent_vXIg"><p>This Angular update does not include Ivy Engine but covers critical bug fixes and performance improvements. As part of the process, we continue to use View Engine and will move to use Ivy in the subsequent major release.</p></div></div>]]></content>
        <author>
            <name>Swetha Kundaram</name>
        </author>
    </entry>
    <entry>
        <title type="html"><![CDATA[Mitigating Log4J 2 Vulnerability CVE 2021 44228]]></title>
        <id>https://www.wavemaker.com/learn/blog/2021/12/13/zero-day-vulnerability</id>
        <link href="https://www.wavemaker.com/learn/blog/2021/12/13/zero-day-vulnerability"/>
        <updated>2021-12-13T00:00:00.000Z</updated>
        <summary type="html"><![CDATA[---]]></summary>
        <content type="html"><![CDATA[<hr><div class="theme-admonition theme-admonition-important alert alert--info admonition_WoCw"><div class="admonitionHeading_TMsN"><span class="admonitionIcon_Ibzs"><svg viewBox="0 0 14 16"><path fill-rule="evenodd" d="M7 2.3c3.14 0 5.7 2.56 5.7 5.7s-2.56 5.7-5.7 5.7A5.71 5.71 0 0 1 1.3 8c0-3.14 2.56-5.7 5.7-5.7zM7 1C3.14 1 0 4.14 0 8s3.14 7 7 7 7-3.14 7-7-3.14-7-7-7zm1 3H6v5h2V4zm0 6H6v2h2v-2z"></path></svg></span>info</div><div class="admonitionContent_vXIg"><h3 class="anchor anchorWithStickyNavbar_LWe7" id="wmo-wavemaker-online-users">WMO (WaveMaker Online) Users<a href="#wmo-wavemaker-online-users" class="hash-link" aria-label="Direct link to WMO (WaveMaker Online) Users" title="Direct link to WMO (WaveMaker Online) Users">​</a></h3><p><strong><em>Updated on 24-Jan-2022</em></strong></p><p>WaveMaker has released 10.11.1 on 24 Jan 2021, updating Log4j2 dependency, which mitigates against the vulnerability <a href="https://cve.mitre.org/cgi-bin/cvename.cgi?name=CVE-2021-44832" target="_blank" rel="noopener noreferrer">CVE-2021-44832</a>. For more information about the release, see <a href="/learn/wavemaker-release-notes/v10-11-1">WaveMaker 10.11.1</a>.</p><ul><li>Log4j2 upgraded to <strong>2.17.1</strong></li></ul><p><strong><em>Updated on 23-Dec-2021</em></strong></p><p>WMO (WaveMaker Online) has released 10.10.3 on 23 Dec 2021, updating Log4j2 dependency, which mitigates against the vulnerability <a href="https://nvd.nist.gov/vuln/detail/CVE-2021-45105" target="_blank" rel="noopener noreferrer">CVE-2021-45105</a>. For more information about the release, see <a href="/learn/wavemaker-release-notes/v10-10-3">WaveMaker 10.10.3</a>.</p><ul><li>Log4j2 upgraded to <strong>2.17.0</strong></li></ul><p><strong><em>Updated on 16-Dec-2021</em></strong></p><p>WMO (WaveMaker Online) has released 10.10.2 on 16 Dec 2021, updating Spring and Log4j2 dependencies, which mitigates against vulnerabilities <a href="https://nvd.nist.gov/vuln/detail/CVE-2021-44228" target="_blank" rel="noopener noreferrer">CVE-2021-44228</a> and <a href="https://nvd.nist.gov/vuln/detail/CVE-2021-22096" target="_blank" rel="noopener noreferrer">CVE-2021-22096</a>. For more information about the release, see <a href="/learn/wavemaker-release-notes/v10-10-2">WaveMaker 10.10.2</a>.</p><ul><li>Log4j2 upgraded to <strong>2.16.0</strong></li><li>Spring Framework upgraded to <strong>5.3.13</strong></li></ul><h3 class="anchor anchorWithStickyNavbar_LWe7" id="action-items">Action items<a href="#action-items" class="hash-link" aria-label="Direct link to Action items" title="Direct link to Action items">​</a></h3><ol><li><p>If you are a WaveMaker Online (WMO) user and have already mitigated risk by adding <a href="#maven-upgrade-the-log4j2-version-manually">Log4j2 dependencies</a> to <strong>2.15.0</strong> or <strong>2.16.0</strong> or <strong>2.17.0</strong>, you need to undo those changes from the <strong><code>&lt;dependencies&gt;</code></strong> section in <code>pom.xml</code>. </p></li><li><p>Also, there is no need to add the <a href="#system-properties-disable-lookups-in-log4j2">System property or Environment variable</a> in the deployment section if you redeploy with the latest project build.</p></li></ol></div></div><div class="theme-admonition theme-admonition-caution alert alert--warning admonition_WoCw"><div class="admonitionHeading_TMsN"><span class="admonitionIcon_Ibzs"><svg viewBox="0 0 16 16"><path fill-rule="evenodd" d="M8.893 1.5c-.183-.31-.52-.5-.887-.5s-.703.19-.886.5L.138 13.499a.98.98 0 0 0 0 1.001c.193.31.53.501.886.501h13.964c.367 0 .704-.19.877-.5a1.03 1.03 0 0 0 .01-1.002L8.893 1.5zm.133 11.497H6.987v-2.003h2.039v2.003zm0-3.004H6.987V5.987h2.039v4.006z"></path></svg></span>caution</div><div class="admonitionContent_vXIg"><h3 class="anchor anchorWithStickyNavbar_LWe7" id="wme-wavemaker-enterprise-users">WME (WaveMaker Enterprise) Users<a href="#wme-wavemaker-enterprise-users" class="hash-link" aria-label="Direct link to WME (WaveMaker Enterprise) Users" title="Direct link to WME (WaveMaker Enterprise) Users">​</a></h3><p>WaveMaker Enterprise users should continue to follow the risk mitigation provided in this blog.</p></div></div><p>A zero-day vulnerability is an unintentional software security flaw identified in the application, poses a zero-day threat. </p><p>A new <a href="https://cve.mitre.org/cgi-bin/cvename.cgi?name=CVE-2021-44228" target="_blank" rel="noopener noreferrer">zero-day vulnerability</a> was reported in the Log4j2 library on 9th Dec 2021, <strong>affecting the library versions &gt;=2.0-beta9 and &lt;=2.14</strong>. It has the potential to allow an attacker to execute the code remotely. Log4j has provided the fix by releasing the 2.15.0 version on the same day. Plus, Log4j has released a newer 2.17.0 version, which is available for production now. For more information, see <a href="https://logging.apache.org/log4j/2.x/changes-report.html#a2.17.0" target="_blank" rel="noopener noreferrer">LOG4J changes report</a>.</p><h2 class="anchor anchorWithStickyNavbar_LWe7" id="is-wavemaker-application-affected">Is WaveMaker Application Affected?<a href="#is-wavemaker-application-affected" class="hash-link" aria-label="Direct link to Is WaveMaker Application Affected?" title="Direct link to Is WaveMaker Application Affected?">​</a></h2><p>WaveMaker applications that depend on Log4j2 <strong>2.14.1</strong> (WM 10.10.1) or lower versions are at risk of the zero-day vulnerability. </p><h1>Risk Mitigation</h1><p>There are two ways to mitigate the risk before the planned hotfix release.</p><h2 class="anchor anchorWithStickyNavbar_LWe7" id="maven-upgrade-the-log4j2-version-manually">Maven: Upgrade the Log4j2 Version Manually<a href="#maven-upgrade-the-log4j2-version-manually" class="hash-link" aria-label="Direct link to Maven: Upgrade the Log4j2 Version Manually" title="Direct link to Maven: Upgrade the Log4j2 Version Manually">​</a></h2><p>Add the latest version of Log4j2 <strong>2.17.0</strong> dependencies in the <strong><code>&lt;dependencies&gt;</code></strong> section, and NOT under the <code>&lt;dependencyManagement&gt;</code> section in your project's <code>pom.xml</code> file.</p><div class="theme-admonition theme-admonition-note alert alert--secondary admonition_WoCw"><div class="admonitionHeading_TMsN"><span class="admonitionIcon_Ibzs"><svg viewBox="0 0 14 16"><path fill-rule="evenodd" d="M6.3 5.69a.942.942 0 0 1-.28-.7c0-.28.09-.52.28-.7.19-.18.42-.28.7-.28.28 0 .52.09.7.28.18.19.28.42.28.7 0 .28-.09.52-.28.7a1 1 0 0 1-.7.3c-.28 0-.52-.11-.7-.3zM8 7.99c-.02-.25-.11-.48-.31-.69-.2-.19-.42-.3-.69-.31H6c-.27.02-.48.13-.69.31-.2.2-.3.44-.31.69h1v3c.02.27.11.5.31.69.2.2.42.31.69.31h1c.27 0 .48-.11.69-.31.2-.19.3-.42.31-.69H8V7.98v.01zM7 2.3c-3.14 0-5.7 2.54-5.7 5.68 0 3.14 2.56 5.7 5.7 5.7s5.7-2.55 5.7-5.7c0-3.15-2.56-5.69-5.7-5.69v.01zM7 .98c3.86 0 7 3.14 7 7s-3.14 7-7 7-7-3.12-7-7 3.14-7 7-7z"></path></svg></span>note</div><div class="admonitionContent_vXIg"><p>Since this mitigation needs a change in the project, the application must be rebuilt and redeployed.</p></div></div><div class="language-xml codeBlockContainer_Ckt0 theme-code-block" style="--prism-color:#bfc7d5;--prism-background-color:#292d3e"><div class="codeBlockContent_biex"><pre tabindex="0" class="prism-code language-xml codeBlock_bY9V thin-scrollbar"><code class="codeBlockLines_e6Vv"><span class="token-line" style="color:#bfc7d5"><span class="token tag punctuation" style="color:rgb(199, 146, 234)">&lt;</span><span class="token tag" style="color:rgb(255, 85, 114)">dependency</span><span class="token tag punctuation" style="color:rgb(199, 146, 234)">&gt;</span><span class="token plain"></span><br></span><span class="token-line" style="color:#bfc7d5"><span class="token plain">    </span><span class="token tag punctuation" style="color:rgb(199, 146, 234)">&lt;</span><span class="token tag" style="color:rgb(255, 85, 114)">groupId</span><span class="token tag punctuation" style="color:rgb(199, 146, 234)">&gt;</span><span class="token plain">org.apache.logging.log4j</span><span class="token tag punctuation" style="color:rgb(199, 146, 234)">&lt;/</span><span class="token tag" style="color:rgb(255, 85, 114)">groupId</span><span class="token tag punctuation" style="color:rgb(199, 146, 234)">&gt;</span><span class="token plain"></span><br></span><span class="token-line" style="color:#bfc7d5"><span class="token plain">    </span><span class="token tag punctuation" style="color:rgb(199, 146, 234)">&lt;</span><span class="token tag" style="color:rgb(255, 85, 114)">artifactId</span><span class="token tag punctuation" style="color:rgb(199, 146, 234)">&gt;</span><span class="token plain">log4j-api</span><span class="token tag punctuation" style="color:rgb(199, 146, 234)">&lt;/</span><span class="token tag" style="color:rgb(255, 85, 114)">artifactId</span><span class="token tag punctuation" style="color:rgb(199, 146, 234)">&gt;</span><span class="token plain"></span><br></span><span class="token-line" style="color:#bfc7d5"><span class="token plain">    </span><span class="token tag punctuation" style="color:rgb(199, 146, 234)">&lt;</span><span class="token tag" style="color:rgb(255, 85, 114)">version</span><span class="token tag punctuation" style="color:rgb(199, 146, 234)">&gt;</span><span class="token plain">2.17.0</span><span class="token tag punctuation" style="color:rgb(199, 146, 234)">&lt;/</span><span class="token tag" style="color:rgb(255, 85, 114)">version</span><span class="token tag punctuation" style="color:rgb(199, 146, 234)">&gt;</span><span class="token plain"></span><br></span><span class="token-line" style="color:#bfc7d5"><span class="token plain"></span><span class="token tag punctuation" style="color:rgb(199, 146, 234)">&lt;/</span><span class="token tag" style="color:rgb(255, 85, 114)">dependency</span><span class="token tag punctuation" style="color:rgb(199, 146, 234)">&gt;</span><span class="token plain"></span><br></span><span class="token-line" style="color:#bfc7d5"><span class="token plain"></span><span class="token tag punctuation" style="color:rgb(199, 146, 234)">&lt;</span><span class="token tag" style="color:rgb(255, 85, 114)">dependency</span><span class="token tag punctuation" style="color:rgb(199, 146, 234)">&gt;</span><span class="token plain"></span><br></span><span class="token-line" style="color:#bfc7d5"><span class="token plain">    </span><span class="token tag punctuation" style="color:rgb(199, 146, 234)">&lt;</span><span class="token tag" style="color:rgb(255, 85, 114)">groupId</span><span class="token tag punctuation" style="color:rgb(199, 146, 234)">&gt;</span><span class="token plain">org.apache.logging.log4j</span><span class="token tag punctuation" style="color:rgb(199, 146, 234)">&lt;/</span><span class="token tag" style="color:rgb(255, 85, 114)">groupId</span><span class="token tag punctuation" style="color:rgb(199, 146, 234)">&gt;</span><span class="token plain"></span><br></span><span class="token-line" style="color:#bfc7d5"><span class="token plain">    </span><span class="token tag punctuation" style="color:rgb(199, 146, 234)">&lt;</span><span class="token tag" style="color:rgb(255, 85, 114)">artifactId</span><span class="token tag punctuation" style="color:rgb(199, 146, 234)">&gt;</span><span class="token plain">log4j-core</span><span class="token tag punctuation" style="color:rgb(199, 146, 234)">&lt;/</span><span class="token tag" style="color:rgb(255, 85, 114)">artifactId</span><span class="token tag punctuation" style="color:rgb(199, 146, 234)">&gt;</span><span class="token plain"></span><br></span><span class="token-line" style="color:#bfc7d5"><span class="token plain">    </span><span class="token tag punctuation" style="color:rgb(199, 146, 234)">&lt;</span><span class="token tag" style="color:rgb(255, 85, 114)">version</span><span class="token tag punctuation" style="color:rgb(199, 146, 234)">&gt;</span><span class="token plain">2.17.0</span><span class="token tag punctuation" style="color:rgb(199, 146, 234)">&lt;/</span><span class="token tag" style="color:rgb(255, 85, 114)">version</span><span class="token tag punctuation" style="color:rgb(199, 146, 234)">&gt;</span><span class="token plain"></span><br></span><span class="token-line" style="color:#bfc7d5"><span class="token plain"></span><span class="token tag punctuation" style="color:rgb(199, 146, 234)">&lt;/</span><span class="token tag" style="color:rgb(255, 85, 114)">dependency</span><span class="token tag punctuation" style="color:rgb(199, 146, 234)">&gt;</span><span class="token plain"></span><br></span><span class="token-line" style="color:#bfc7d5"><span class="token plain"></span><span class="token tag punctuation" style="color:rgb(199, 146, 234)">&lt;</span><span class="token tag" style="color:rgb(255, 85, 114)">dependency</span><span class="token tag punctuation" style="color:rgb(199, 146, 234)">&gt;</span><span class="token plain"></span><br></span><span class="token-line" style="color:#bfc7d5"><span class="token plain">    </span><span class="token tag punctuation" style="color:rgb(199, 146, 234)">&lt;</span><span class="token tag" style="color:rgb(255, 85, 114)">groupId</span><span class="token tag punctuation" style="color:rgb(199, 146, 234)">&gt;</span><span class="token plain">org.apache.logging.log4j</span><span class="token tag punctuation" style="color:rgb(199, 146, 234)">&lt;/</span><span class="token tag" style="color:rgb(255, 85, 114)">groupId</span><span class="token tag punctuation" style="color:rgb(199, 146, 234)">&gt;</span><span class="token plain"></span><br></span><span class="token-line" style="color:#bfc7d5"><span class="token plain">    </span><span class="token tag punctuation" style="color:rgb(199, 146, 234)">&lt;</span><span class="token tag" style="color:rgb(255, 85, 114)">artifactId</span><span class="token tag punctuation" style="color:rgb(199, 146, 234)">&gt;</span><span class="token plain">log4j-slf4j-impl</span><span class="token tag punctuation" style="color:rgb(199, 146, 234)">&lt;/</span><span class="token tag" style="color:rgb(255, 85, 114)">artifactId</span><span class="token tag punctuation" style="color:rgb(199, 146, 234)">&gt;</span><span class="token plain"></span><br></span><span class="token-line" style="color:#bfc7d5"><span class="token plain">    </span><span class="token tag punctuation" style="color:rgb(199, 146, 234)">&lt;</span><span class="token tag" style="color:rgb(255, 85, 114)">version</span><span class="token tag punctuation" style="color:rgb(199, 146, 234)">&gt;</span><span class="token plain">2.17.0</span><span class="token tag punctuation" style="color:rgb(199, 146, 234)">&lt;/</span><span class="token tag" style="color:rgb(255, 85, 114)">version</span><span class="token tag punctuation" style="color:rgb(199, 146, 234)">&gt;</span><span class="token plain"></span><br></span><span class="token-line" style="color:#bfc7d5"><span class="token plain"></span><span class="token tag punctuation" style="color:rgb(199, 146, 234)">&lt;/</span><span class="token tag" style="color:rgb(255, 85, 114)">dependency</span><span class="token tag punctuation" style="color:rgb(199, 146, 234)">&gt;</span><br></span></code></pre><div class="buttonGroup__atx"><button type="button" aria-label="Copy code to clipboard" title="Copy" class="clean-btn"><span class="copyButtonIcons_eSgA" aria-hidden="true"><svg viewBox="0 0 24 24" class="copyButtonIcon_y97N"><path fill="currentColor" d="M19,21H8V7H19M19,5H8A2,2 0 0,0 6,7V21A2,2 0 0,0 8,23H19A2,2 0 0,0 21,21V7A2,2 0 0,0 19,5M16,1H4A2,2 0 0,0 2,3V17H4V3H16V1Z"></path></svg><svg viewBox="0 0 24 24" class="copyButtonSuccessIcon_LjdS"><path fill="currentColor" d="M21,7L9,19L3.5,13.5L4.91,12.09L9,16.17L19.59,5.59L21,7Z"></path></svg></span></button></div></div></div><h2 class="anchor anchorWithStickyNavbar_LWe7" id="system-properties-disable-lookups-in-log4j2">System Properties: Disable Lookups in Log4j2<a href="#system-properties-disable-lookups-in-log4j2" class="hash-link" aria-label="Direct link to System Properties: Disable Lookups in Log4j2" title="Direct link to System Properties: Disable Lookups in Log4j2">​</a></h2><p>Set either the System Property <strong><code>log4j2.formatMsgNoLookups</code></strong> or Environment Variable <strong><code>LOG4J_FORMAT_MSG_NO_LOOKUPS</code></strong> to <strong><code>True</code></strong>. This mitigation does not need rebuilding of the war file. Tomcat or any web application server where the WaveMaker application is running needs to be set to one of the above-mentioned properties and restarted.</p><div class="theme-admonition theme-admonition-note alert alert--secondary admonition_WoCw"><div class="admonitionHeading_TMsN"><span class="admonitionIcon_Ibzs"><svg viewBox="0 0 14 16"><path fill-rule="evenodd" d="M6.3 5.69a.942.942 0 0 1-.28-.7c0-.28.09-.52.28-.7.19-.18.42-.28.7-.28.28 0 .52.09.7.28.18.19.28.42.28.7 0 .28-.09.52-.28.7a1 1 0 0 1-.7.3c-.28 0-.52-.11-.7-.3zM8 7.99c-.02-.25-.11-.48-.31-.69-.2-.19-.42-.3-.69-.31H6c-.27.02-.48.13-.69.31-.2.2-.3.44-.31.69h1v3c.02.27.11.5.31.69.2.2.42.31.69.31h1c.27 0 .48-.11.69-.31.2-.19.3-.42.31-.69H8V7.98v.01zM7 2.3c-3.14 0-5.7 2.54-5.7 5.68 0 3.14 2.56 5.7 5.7 5.7s5.7-2.55 5.7-5.7c0-3.15-2.56-5.69-5.7-5.69v.01zM7 .98c3.86 0 7 3.14 7 7s-3.14 7-7 7-7-3.12-7-7 3.14-7 7-7z"></path></svg></span>note</div><div class="admonitionContent_vXIg"><p>This mitigation is required in the runtime environment; therefore, there is no need to rebuild the application. Restarting the Tomcat or Web server would be enough.</p></div></div><h4 class="anchor anchorWithStickyNavbar_LWe7" id="examples-for-apache-tomcat">Examples for Apache Tomcat<a href="#examples-for-apache-tomcat" class="hash-link" aria-label="Direct link to Examples for Apache Tomcat" title="Direct link to Examples for Apache Tomcat">​</a></h4><p>Follow the below-specified changes to set the System property and System environment variable.</p><h3 class="anchor anchorWithStickyNavbar_LWe7" id="unix-and-mac-systems">Unix and Mac Systems<a href="#unix-and-mac-systems" class="hash-link" aria-label="Direct link to Unix and Mac Systems" title="Direct link to Unix and Mac Systems">​</a></h3><p>Add the below in the <code>setenv.sh</code> file of the Tomcat bin folder. </p><ol><li>The following adds a System property.</li></ol><div class="codeBlockContainer_Ckt0 theme-code-block" style="--prism-color:#bfc7d5;--prism-background-color:#292d3e"><div class="codeBlockContent_biex"><pre tabindex="0" class="prism-code language-text codeBlock_bY9V thin-scrollbar"><code class="codeBlockLines_e6Vv"><span class="token-line" style="color:#bfc7d5"><span class="token plain">export JAVA_OPTS="$JAVA_OPTS -Dlog4j2.formatMsgNoLookups=true” </span><br></span></code></pre><div class="buttonGroup__atx"><button type="button" aria-label="Copy code to clipboard" title="Copy" class="clean-btn"><span class="copyButtonIcons_eSgA" aria-hidden="true"><svg viewBox="0 0 24 24" class="copyButtonIcon_y97N"><path fill="currentColor" d="M19,21H8V7H19M19,5H8A2,2 0 0,0 6,7V21A2,2 0 0,0 8,23H19A2,2 0 0,0 21,21V7A2,2 0 0,0 19,5M16,1H4A2,2 0 0,0 2,3V17H4V3H16V1Z"></path></svg><svg viewBox="0 0 24 24" class="copyButtonSuccessIcon_LjdS"><path fill="currentColor" d="M21,7L9,19L3.5,13.5L4.91,12.09L9,16.17L19.59,5.59L21,7Z"></path></svg></span></button></div></div></div><ol start="2"><li>The following add an Environment variable.</li></ol><div class="codeBlockContainer_Ckt0 theme-code-block" style="--prism-color:#bfc7d5;--prism-background-color:#292d3e"><div class="codeBlockContent_biex"><pre tabindex="0" class="prism-code language-text codeBlock_bY9V thin-scrollbar"><code class="codeBlockLines_e6Vv"><span class="token-line" style="color:#bfc7d5"><span class="token plain">export LOG4J_FORMAT_MSG_NO_LOOKUPS=true </span><br></span></code></pre><div class="buttonGroup__atx"><button type="button" aria-label="Copy code to clipboard" title="Copy" class="clean-btn"><span class="copyButtonIcons_eSgA" aria-hidden="true"><svg viewBox="0 0 24 24" class="copyButtonIcon_y97N"><path fill="currentColor" d="M19,21H8V7H19M19,5H8A2,2 0 0,0 6,7V21A2,2 0 0,0 8,23H19A2,2 0 0,0 21,21V7A2,2 0 0,0 19,5M16,1H4A2,2 0 0,0 2,3V17H4V3H16V1Z"></path></svg><svg viewBox="0 0 24 24" class="copyButtonSuccessIcon_LjdS"><path fill="currentColor" d="M21,7L9,19L3.5,13.5L4.91,12.09L9,16.17L19.59,5.59L21,7Z"></path></svg></span></button></div></div></div><h3 class="anchor anchorWithStickyNavbar_LWe7" id="windows-system">Windows System<a href="#windows-system" class="hash-link" aria-label="Direct link to Windows System" title="Direct link to Windows System">​</a></h3><p>Add the below in the <code>setenv.bat</code> file of the Tomcat bin folder.</p><ol><li>The following adds a System property.</li></ol><div class="codeBlockContainer_Ckt0 theme-code-block" style="--prism-color:#bfc7d5;--prism-background-color:#292d3e"><div class="codeBlockContent_biex"><pre tabindex="0" class="prism-code language-text codeBlock_bY9V thin-scrollbar"><code class="codeBlockLines_e6Vv"><span class="token-line" style="color:#bfc7d5"><span class="token plain">set JAVA_OPTS="%JAVA_OPTS% -Dlog4j2.formatMsgNoLookups=true”</span><br></span></code></pre><div class="buttonGroup__atx"><button type="button" aria-label="Copy code to clipboard" title="Copy" class="clean-btn"><span class="copyButtonIcons_eSgA" aria-hidden="true"><svg viewBox="0 0 24 24" class="copyButtonIcon_y97N"><path fill="currentColor" d="M19,21H8V7H19M19,5H8A2,2 0 0,0 6,7V21A2,2 0 0,0 8,23H19A2,2 0 0,0 21,21V7A2,2 0 0,0 19,5M16,1H4A2,2 0 0,0 2,3V17H4V3H16V1Z"></path></svg><svg viewBox="0 0 24 24" class="copyButtonSuccessIcon_LjdS"><path fill="currentColor" d="M21,7L9,19L3.5,13.5L4.91,12.09L9,16.17L19.59,5.59L21,7Z"></path></svg></span></button></div></div></div><ol start="2"><li>The following adds an Environment variable.</li></ol><div class="codeBlockContainer_Ckt0 theme-code-block" style="--prism-color:#bfc7d5;--prism-background-color:#292d3e"><div class="codeBlockContent_biex"><pre tabindex="0" class="prism-code language-text codeBlock_bY9V thin-scrollbar"><code class="codeBlockLines_e6Vv"><span class="token-line" style="color:#bfc7d5"><span class="token plain">set LOG4J_FORMAT_MSG_NO_LOOKUPS=true </span><br></span></code></pre><div class="buttonGroup__atx"><button type="button" aria-label="Copy code to clipboard" title="Copy" class="clean-btn"><span class="copyButtonIcons_eSgA" aria-hidden="true"><svg viewBox="0 0 24 24" class="copyButtonIcon_y97N"><path fill="currentColor" d="M19,21H8V7H19M19,5H8A2,2 0 0,0 6,7V21A2,2 0 0,0 8,23H19A2,2 0 0,0 21,21V7A2,2 0 0,0 19,5M16,1H4A2,2 0 0,0 2,3V17H4V3H16V1Z"></path></svg><svg viewBox="0 0 24 24" class="copyButtonSuccessIcon_LjdS"><path fill="currentColor" d="M21,7L9,19L3.5,13.5L4.91,12.09L9,16.17L19.59,5.59L21,7Z"></path></svg></span></button></div></div></div><h2 class="anchor anchorWithStickyNavbar_LWe7" id="wavemaker-log4j2-vulnerability-releases">WaveMaker Log4j2 Vulnerability Releases<a href="#wavemaker-log4j2-vulnerability-releases" class="hash-link" aria-label="Direct link to WaveMaker Log4j2 Vulnerability Releases" title="Direct link to WaveMaker Log4j2 Vulnerability Releases">​</a></h2><p><a href="/learn/wavemaker-release-notes/v10-10-3">WaveMaker v10.10.3</a><br>
<a href="/learn/wavemaker-release-notes/v10-10-2">WaveMaker v10.10.2</a></p>]]></content>
        <author>
            <name>Uday Shankar</name>
        </author>
    </entry>
    <entry>
        <title type="html"><![CDATA[Ending Support of WaveMaker 9 Projects]]></title>
        <id>https://www.wavemaker.com/learn/blog/2021/12/08/wavemaker9x-end-of-support</id>
        <link href="https://www.wavemaker.com/learn/blog/2021/12/08/wavemaker9x-end-of-support"/>
        <updated>2021-12-08T00:00:00.000Z</updated>
        <summary type="html"><![CDATA[The End of Support (EOS) stage marks the official withdrawal of support for WaveMaker 9.x projects.]]></summary>
        <content type="html"><![CDATA[<p>The End of Support (EOS) stage marks the official withdrawal of support for WaveMaker 9.x projects. </p><p>WaveMaker app development generates Angular code, as Angular marks the official withdrawal of the previous Angular versions, including AngularJS and Angular 1.x. Therefore, WaveMaker will be ending the support of WaveMaker 9.x projects that use AngularJS and Angular 1.x by 31 Jan 2022, as <a href="https://docs.angularjs.org/misc/version-support-status" target="_blank" rel="noopener noreferrer">Angular announced</a>. The update is primarily focused on improving performance, security, and bug fixes.</p><p>We have covered some essential FAQs to help you understand how you can migrate to the latest version of WaveMaker Studio.</p><h2 class="anchor anchorWithStickyNavbar_LWe7" id="what-does-the-end-of-support-for-wavemaker-9x-entail">What does the end of support for WaveMaker 9.x entail?<a href="#what-does-the-end-of-support-for-wavemaker-9x-entail" class="hash-link" aria-label="Direct link to What does the end of support for WaveMaker 9.x entail?" title="Direct link to What does the end of support for WaveMaker 9.x entail?">​</a></h2><p>Suppose you are using 9.x projects. In that case, WaveMaker will automatically update to the latest version of WaveMaker. The update can break applications that contain custom JavaScript code because of the Angular breaking changes. We have created a guide to help you update to the current version used by WaveMaker, Angular 10.</p><p>Please note that following 31 Jan 2022, we will not be supporting project migrations. Therefore, we recommend you plan to update your WaveMaker 9 projects to receive support before the established deadline for a smooth migration process.</p><h2 class="anchor anchorWithStickyNavbar_LWe7" id="why-is-wavemaker-ending-support-for-the-9x-version">Why is WaveMaker ending support for the 9.x version?<a href="#why-is-wavemaker-ending-support-for-the-9x-version" class="hash-link" aria-label="Direct link to Why is WaveMaker ending support for the 9.x version?" title="Direct link to Why is WaveMaker ending support for the 9.x version?">​</a></h2><p>End of previous version system means moving on to newer and better systems. Even though some updates are not entirely responsible for security vulnerabilities, they might impact stability and usability. Other updates address bug fixes and customer-requested features.</p><p>View the progress of WaveMaker features and fixes in Studio.</p><p><img loading="lazy" alt="end of support" src="/learn/assets/images/end-of-support-1cc44ae20faa173b6d8cefea5d9d6653.png" width="2918" height="1260" class="img_ev3q"></p><p><strong>A glimpse of the updates</strong>:</p><ul><li>Outdated application stack: AngularJS ends the support by 31 Jan 2022, including security issues. <a href="https://docs.angularjs.org/misc/version-support-status" target="_blank" rel="noopener noreferrer">Learn more about AngularJS version support status</a></li><li>Latest angular stack Angular 10</li><li>Several performance improvements</li><li>Security vulnerabilities in the dependent third party libraries to get the benefits of <a href="/learn/wavemaker-release-notes#technology-stack">up to date technology stack</a></li><li>Support for new <a href="/learn/wavemaker-release-notes/v10-2-0#enhancements">compression technique</a></li><li>Enabling <a href="/learn/wavemaker-release-notes/v10-5-0/#support-for-microfrontend-single-spa-framework">micro frontend enablement</a></li><li>Wavemaker-generated code is now <a href="/learn/blog/2021/12/08/weaving-security-into-low-code-development/">Veracode certificated</a></li><li><a href="/learn/wavemaker-release-notes/v10-4-0/#upgrade-to-latest-version-of-ngx---bootstrap">ngx-bootstrap upgrade</a> with enhanced features</li></ul><p><strong>Some Examples of UI Enhancements</strong>:</p><ul><li>Enhanced DSL APIs exposed on various widgets</li><li>Advanced client-side and server-side validations on Form fields</li><li>Custom Data Formatters for UI widgets</li><li>Summary row in Datatable widget</li><li>Ability to add multiple views in a prefab through partials</li><li>Ability to provide widget level properties in a prefab</li><li>Adding tablet view support to Mobile apps</li></ul><p>And so much more. Read <a href="/learn/wavemaker-release-notes">WaveMaker release notes</a> to understand the features and fixes better.</p><h2 class="anchor anchorWithStickyNavbar_LWe7" id="how-do-i-know-if-i-have-wavemaker-9x-apps">How do I know if I have WaveMaker 9.x apps?<a href="#how-do-i-know-if-i-have-wavemaker-9x-apps" class="hash-link" aria-label="Direct link to How do I know if I have WaveMaker 9.x apps?" title="Direct link to How do I know if I have WaveMaker 9.x apps?">​</a></h2><p>When you launch WaveMaker Studio, you can see the orange bar at the top indicating that you are using 9.x projects. </p><p>When you start the project update, the project card converts into a folder. The folder contains all the versions of the app, including WM 9.x and WM 10.0. You can independently work on both versions.</p><p><img loading="lazy" alt="two versions of the project" src="/learn/assets/images/two-versions-9-10-apps-d6a9f6c674a7ed309f9c3c80056dea45.png" width="1556" height="597" class="img_ev3q"></p><p>For more information and a guide to update, see <a href="/learn/how-tos/guide-to-upgrade-an-app-wavemaker-9x-to-wavemaker-10-0/">Upgrading an App from WaveMaker 9.x to WaveMaker 10.0</a>.</p><h2 class="anchor anchorWithStickyNavbar_LWe7" id="how-wavemaker-will-help-you-with-the-update">How WaveMaker will help you with the update?<a href="#how-wavemaker-will-help-you-with-the-update" class="hash-link" aria-label="Direct link to How WaveMaker will help you with the update?" title="Direct link to How WaveMaker will help you with the update?">​</a></h2><p>Updating Angular is not relatively straightforward. However, our developers at WaveMaker have made it a little easier for you. When you initiate an update, WaveMaker takes care of the major part behind the scenes. </p><p>Even so, if you have included customizations, i.e., adding custom JavaScript code, you'll have to check and accept changes manually by verifying every single customization that runs through the process. This approach is taken care of by the <a href="/learn/app-development/dev-integration/inspection-framework/">inspection framework</a> that we explicitly developed to guide you through the migration process. Further to this, you can reach out to our support team for more assistance. </p><h2 class="anchor anchorWithStickyNavbar_LWe7" id="what-does-end-of-support-mean-for-your-customers">What does end of support mean for your customers?<a href="#what-does-end-of-support-mean-for-your-customers" class="hash-link" aria-label="Direct link to What does end of support mean for your customers?" title="Direct link to What does end of support mean for your customers?">​</a></h2><p>The deployed apps will not be affected by the change to the end-users.</p><h2 class="anchor anchorWithStickyNavbar_LWe7" id="what-happens-if-you-do-not-upgrade-to-wavemaker-10">What happens if you do not upgrade to WaveMaker 10?<a href="#what-happens-if-you-do-not-upgrade-to-wavemaker-10" class="hash-link" aria-label="Direct link to What happens if you do not upgrade to WaveMaker 10?" title="Direct link to What happens if you do not upgrade to WaveMaker 10?">​</a></h2><p>If you have already deployed the 9.x WaveMaker applications, the change will not affect it. However, making alterations would no longer be possible for the app. </p><h3 class="anchor anchorWithStickyNavbar_LWe7" id="wavemaker-online-wmo">WaveMaker Online (WMO)<a href="#wavemaker-online-wmo" class="hash-link" aria-label="Direct link to WaveMaker Online (WMO)" title="Direct link to WaveMaker Online (WMO)">​</a></h3><p>The application projects will automatically upgrade to the latest version of the Studio. </p><h3 class="anchor anchorWithStickyNavbar_LWe7" id="wavemaker-enterprise-wme">WaveMaker Enterprise (WME)<a href="#wavemaker-enterprise-wme" class="hash-link" aria-label="Direct link to WaveMaker Enterprise (WME)" title="Direct link to WaveMaker Enterprise (WME)">​</a></h3><p>You will no longer receive support, and we cannot offer the license extension.</p><h2 class="anchor anchorWithStickyNavbar_LWe7" id="wavemaker-10-releases">WaveMaker 10 Releases<a href="#wavemaker-10-releases" class="hash-link" aria-label="Direct link to WaveMaker 10 Releases" title="Direct link to WaveMaker 10 Releases">​</a></h2><ul><li><a href="/learn/wavemaker-release-notes/v10-0-preview">WaveMaker 10 Preview</a></li><li><a href="/learn/wavemaker-release-notes/v10-0-ga">WaveMaker 10.GA</a></li><li><a href="/learn/wavemaker-release-notes/v10-1-0">WaveMaker 10.1</a></li><li><a href="/learn/wavemaker-release-notes/v10-2-0">WaveMaker 10.2</a></li><li><a href="/learn/wavemaker-release-notes/v10-3-0">WaveMaker 10.3</a></li><li><a href="/learn/wavemaker-release-notes/v10-4-0">WaveMaker 10.4</a></li><li><a href="/learn/wavemaker-release-notes/v10-5-0">WaveMaker 10.5</a></li><li><a href="/learn/wavemaker-release-notes/v10-6-0">WaveMaker 10.6</a></li><li><a href="/learn/wavemaker-release-notes/v10-7-0">WaveMaker 10.7</a></li><li><a href="/learn/wavemaker-release-notes/v10-8-0">WaveMaker 10.8</a></li><li><a href="/learn/wavemaker-release-notes/v10-9-0">WaveMaker 10.9</a></li><li><a href="/learn/wavemaker-release-notes/v10-10-0">WaveMaker 10.10</a></li><li><a href="/learn/wavemaker-release-notes/v10-10-3">WM 10.10.3 - Log4j2 Dependency Vulnerability</a></li></ul><p>For the detailed list of releases, including biweekly ones, see <a href="/learn/wavemaker-release-notes">WaveMaker Release Notes</a>.</p>]]></content>
        <author>
            <name>Swetha Kundaram</name>
        </author>
    </entry>
    <entry>
        <title type="html"><![CDATA[Git Branching Strategy]]></title>
        <id>https://www.wavemaker.com/learn/blog/2021/09/17/git-branching-strategy</id>
        <link href="https://www.wavemaker.com/learn/blog/2021/09/17/git-branching-strategy"/>
        <updated>2021-09-17T00:00:00.000Z</updated>
        <summary type="html"><![CDATA[Project branching allows developers to checkout code from the existing git branch and isolates their work from others. If you are a member of WaveMaker Teams, read further to understand best practices for managing branches in WaveMaker.]]></summary>
        <content type="html"><![CDATA[<p>Project branching allows developers to checkout code from the existing git branch and isolates their work from others. If you are a member of WaveMaker Teams, read further to understand best practices for managing branches in WaveMaker. </p><p>In Git flow, the <strong>main</strong> (or master) branch contains your production-ready code. You can use the <strong>main</strong> (or master) branch for CI/CD integration. The other branches, feature branches, hotfix branches should contain work on new features and bug fixes and will be merged back into the <strong>main</strong> (or master) branch when the work is finished and properly reviewed.</p><p><img loading="lazy" alt="branching model" src="/learn/assets/images/branching-model-121bd320dd2f5972a5f6ce2fb19a3f4e.png" width="583" height="276" class="img_ev3q"></p><h2 class="anchor anchorWithStickyNavbar_LWe7" id="git-flow-considerations">Git Flow Considerations<a href="#git-flow-considerations" class="hash-link" aria-label="Direct link to Git Flow Considerations" title="Direct link to Git Flow Considerations">​</a></h2><p>While working with the Git flow branching strategy, there are six principles you should adhere to to ensure you maintain good code.</p><ol><li>Any code in the main(or master) branch should be deployable, production-ready.</li><li>Create new descriptively-named branches off the main branch for new work, such as feature/add-new-payment-types.</li><li>Commit new work to your local branches and regularly push work to the remote.</li><li>To request feedback, help, or when you think your work is ready to merge into the main branch, open a pull request. </li><li>After your work or feature has been reviewed and approved. It can be merged into the main branch.</li><li>Once your work has been merged into the main branch, it should be deployed.</li></ol><h2 class="anchor anchorWithStickyNavbar_LWe7" id="advantages-of-git-flow">Advantages of Git Flow<a href="#advantages-of-git-flow" class="hash-link" aria-label="Direct link to Advantages of Git Flow" title="Direct link to Advantages of Git Flow">​</a></h2><ol><li>Because of the simplicity of the workflow, this Git branching strategy allows for Continuous Delivery and Continuous Integration.</li><li>This Git branch strategy works great for small teams and web applications.</li></ol><h2 class="anchor anchorWithStickyNavbar_LWe7" id="implementing-in-wavemaker">Implementing in WaveMaker<a href="#implementing-in-wavemaker" class="hash-link" aria-label="Direct link to Implementing in WaveMaker" title="Direct link to Implementing in WaveMaker">​</a></h2><p>  <img loading="lazy" alt="features branching" src="/learn/assets/images/features-branching-280ecc27b8f3e8fb49393e34eb4c37b0.png" width="614" height="437" class="img_ev3q"></p><p>WaveMaker supports the creation of a project using an existing branch in Git. We can follow the above Git model using the below steps:</p><ol><li>Creating an Application (for example, SampleApp) from WaveMaker will create a repository with the <strong>main</strong> (or master) branch in Git. </li><li>By Default, all Contributors of this Project will push their changes to <strong>main</strong> (or master).</li><li>Anything in the <strong>main</strong> (or master) branch is deployable.</li><li>The above application will always point to the <strong>main</strong> (or master) branch. </li></ol><div class="theme-admonition theme-admonition-warning alert alert--danger admonition_WoCw"><div class="admonitionHeading_TMsN"><span class="admonitionIcon_Ibzs"><svg viewBox="0 0 12 16"><path fill-rule="evenodd" d="M5.05.31c.81 2.17.41 3.38-.52 4.31C3.55 5.67 1.98 6.45.9 7.98c-1.45 2.05-1.7 6.53 3.53 7.7-2.2-1.16-2.67-4.52-.3-6.61-.61 2.03.53 3.33 1.94 2.86 1.39-.47 2.3.53 2.27 1.67-.02.78-.31 1.44-1.13 1.81 3.42-.59 4.78-3.42 4.78-5.56 0-2.84-2.53-3.22-1.25-5.61-1.52.13-2.03 1.13-1.89 2.75.09 1.08-1.02 1.8-1.86 1.33-.67-.41-.66-1.19-.06-1.78C8.18 5.31 8.68 2.45 5.05.32L5.03.3l.02.01z"></path></svg></span>danger</div><div class="admonitionContent_vXIg"><ul><li>Use this application to always PULL from <strong>main</strong> (or master) branch.</li><li>Do not commit to the <strong>main</strong> ( or master) directly. Do not hotfix into <strong>main</strong> (or master). Instead, use a feature/hotfix branch.</li></ul></div></div><ol start="5"><li>To work on something new, go to the Git portal (for example, Github, Gitlab etc) and create a branch from <strong>main</strong> (or master) in the repository (for example, SampleApp). Give it a descriptive name (for example, feature/new-oauth2-scopes).</li></ol><p><img loading="lazy" alt="create a branch" src="/learn/assets/images/create-a-branch-b20e8d48c35797eeee72a772bf429bed.png" width="980" height="555" class="img_ev3q"></p><ol start="6"><li>Now again, from WaveMaker, go to option <strong>Create Project Branch</strong> for the application mentioned above (for example, SampleApp), and create a project branch by selecting the appropriate branch. Following the above example, we’ll select branch <code>feature/new-oauth2-scopes</code>. This will create a new branch project, pointing to the branch <code>feature/new-oauth2-scopes</code>. </li></ol><p><img loading="lazy" alt="wm project branch" src="/learn/assets/images/wm-project-branch-3cf9329aa30a37814ebd46ba6417614a.png" width="1042" height="507" class="img_ev3q"></p><p><img loading="lazy" alt="create project existing branch" src="/learn/assets/images/create-project-existing-branch-f8e7e83de7384bf1d8e349989ddfa293.png" width="962" height="567" class="img_ev3q"></p><ol start="7"><li><p>Developers can start collaborating and working on this project, named <code>feature/new-oauth2-scopes</code>, and can regularly push their work.</p><ol><li>Developers can review the changes using <strong>Preview</strong> in WaveMaker.</li></ol><p><img loading="lazy" alt="preview application" src="/learn/assets/images/preview-application-ef2df47df27549b23200cc85d49ea9dd.png" width="1315" height="635" class="img_ev3q"></p><ol start="2"><li>Users can also deploy the feature branch to an external testing environment using a branch from Git or exporting a war file from WaveMaker. Refer to the below screenshot to download the war file. </li></ol><p><img loading="lazy" alt="project as war" src="/learn/assets/images/project-as-war-1fea9345c3acf41e407a279e4502ee9e.png" width="1366" height="768" class="img_ev3q"></p></li><li><p>After the required changes are done and tested in the feature branch, you can merge it into the <strong>main</strong> (or master). Merging the feature branch into the <strong>main</strong> (or master) branch is done outside of WaveMaker and through Git portals like Github, Gitlab, etc.</p><ol><li>In our example, Merge <code>feature/new-oauth2-scopes</code> branch into the <strong>main</strong> (or master) branch from Git portals like Github, Gitlab, etc.</li></ol></li><li><p>Once it is merged and pushed to <strong>main</strong> (or master) branch, you can PULL the latest changes into the <strong>main</strong> (Master) Project (refer to Steps 1, 2 &amp; 3) and deploy from WaveMaker or use CI/CD to deploy from the <strong>main</strong> (Master) branch.</p><ol><li>Users can deploy from a master project from WaveMaker for Testing the <strong>main</strong> (or master) branch.</li></ol><p><img loading="lazy" alt="deploy from master" src="/learn/assets/images/deploy-from-master-1e8dbad8621ed4fedaff849e6713f3fb.png" width="820" height="461" class="img_ev3q"></p><ol start="2"><li>User can configure the <strong>main</strong> (or master) for Continuous Integration and Continuous Deployment in their external deployment pipeline.</li></ol></li></ol>]]></content>
        <author>
            <name>Tarun Dubey</name>
        </author>
    </entry>
    <entry>
        <title type="html"><![CDATA[Important Announcement about Angular 10 Update]]></title>
        <id>https://www.wavemaker.com/learn/blog/2021/09/01/angular-10-update</id>
        <link href="https://www.wavemaker.com/learn/blog/2021/09/01/angular-10-update"/>
        <updated>2021-09-01T00:00:00.000Z</updated>
        <summary type="html"><![CDATA[WaveMaker currently generates code based on Angular 9 for applications. With the announcement on ending support of Angular 9, we are upgrading to the next Angular version, 10.2.5.]]></summary>
        <content type="html"><![CDATA[<p>WaveMaker currently generates code based on Angular 9 for applications. With the announcement on ending support of Angular 9, we are upgrading to the next Angular version, 10.2.5. </p><p>Consequently, we have developed a roadmap to update the platform with the <strong>Release 10.9</strong> scheduled for the 13th of September 2021, which includes the Angular 10 update. If you are a WaveMaker application developer who uses your own infrastructure to build and deploy the application, you need to read further.</p><p>This update requires you to take action, i.e., updating the Node and NPM versions. To avoid breaking changes, we have recommended the following steps described in this blog post. </p><div class="theme-admonition theme-admonition-note alert alert--secondary admonition_WoCw"><div class="admonitionHeading_TMsN"><span class="admonitionIcon_Ibzs"><svg viewBox="0 0 14 16"><path fill-rule="evenodd" d="M6.3 5.69a.942.942 0 0 1-.28-.7c0-.28.09-.52.28-.7.19-.18.42-.28.7-.28.28 0 .52.09.7.28.18.19.28.42.28.7 0 .28-.09.52-.28.7a1 1 0 0 1-.7.3c-.28 0-.52-.11-.7-.3zM8 7.99c-.02-.25-.11-.48-.31-.69-.2-.19-.42-.3-.69-.31H6c-.27.02-.48.13-.69.31-.2.2-.3.44-.31.69h1v3c.02.27.11.5.31.69.2.2.42.31.69.31h1c.27 0 .48-.11.69-.31.2-.19.3-.42.31-.69H8V7.98v.01zM7 2.3c-3.14 0-5.7 2.54-5.7 5.68 0 3.14 2.56 5.7 5.7 5.7s5.7-2.55 5.7-5.7c0-3.15-2.56-5.69-5.7-5.69v.01zM7 .98c3.86 0 7 3.14 7 7s-3.14 7-7 7-7-3.12-7-7 3.14-7 7-7z"></path></svg></span>note</div><div class="admonitionContent_vXIg"><p>Please note that this Angular update does not include Ivy Engine but covers some critical bug fixes. As part of the process, we continue to use View Engine and will move to use Ivy in the subsequent versions.</p></div></div><h2 class="anchor anchorWithStickyNavbar_LWe7" id="whats-in-the-update">What's in the Update<a href="#whats-in-the-update" class="hash-link" aria-label="Direct link to What's in the Update" title="Direct link to What's in the Update">​</a></h2><p>This update impacts building WaveMaker apps using your own <a href="/learn/app-development/deployment/deployment-overview">CI/CD pipeline</a> using the <a href="/learn/app-development/deployment/build-options#angular-build">Angular Build</a>. </p><table><thead><tr><th>Description</th><th>Current Version</th><th>Moving to</th></tr></thead><tbody><tr><td><strong>Node</strong></td><td>10.15</td><td>12.22.3</td></tr><tr><td><strong>NPM</strong></td><td>6.4</td><td>6.14.13</td></tr></tbody></table><div class="theme-admonition theme-admonition-important alert alert--info admonition_WoCw"><div class="admonitionHeading_TMsN"><span class="admonitionIcon_Ibzs"><svg viewBox="0 0 14 16"><path fill-rule="evenodd" d="M7 2.3c3.14 0 5.7 2.56 5.7 5.7s-2.56 5.7-5.7 5.7A5.71 5.71 0 0 1 1.3 8c0-3.14 2.56-5.7 5.7-5.7zM7 1C3.14 1 0 4.14 0 8s3.14 7 7 7 7-3.14 7-7-3.14-7-7-7zm1 3H6v5h2V4zm0 6H6v2h2v-2z"></path></svg></span>info</div><div class="admonitionContent_vXIg"><p><strong>Update Node JS Version</strong>: Angular 10 requires Node JS version 12.22.3. So you must upgrade Node and NPM on your build infrastructure with the versions mentioned above.</p></div></div><h2 class="anchor anchorWithStickyNavbar_LWe7" id="how-wavemaker-can-help">How WaveMaker can Help<a href="#how-wavemaker-can-help" class="hash-link" aria-label="Direct link to How WaveMaker can Help" title="Direct link to How WaveMaker can Help">​</a></h2><p>There are two ways to upgrade to your build system with Angular 10.</p><ol><li>Download and install Node and NPM in the build system with the versions specified above.</li><li>Use resources provided by WaveMaker team.</li></ol><h3 class="anchor anchorWithStickyNavbar_LWe7" id="using-docker-option">Using Docker Option<a href="#using-docker-option" class="hash-link" aria-label="Direct link to Using Docker Option" title="Direct link to Using Docker Option">​</a></h3><p>If you are using Docker images for building WaveMaker application, you can use them in the following ways:</p><ul><li>Using them from the public repo containing pre-built Docker image developed and published by WaveMaker.</li><li>Using Docker files to build the Docker images. For more information, see <a href="/learn/app-development/deployment/build-with-docker">Build with Docker</a>. </li></ul><h3 class="anchor anchorWithStickyNavbar_LWe7" id="testing-your-application">Testing your Application<a href="#testing-your-application" class="hash-link" aria-label="Direct link to Testing your Application" title="Direct link to Testing your Application">​</a></h3><div class="theme-admonition theme-admonition-tip alert alert--success admonition_WoCw"><div class="admonitionHeading_TMsN"><span class="admonitionIcon_Ibzs"><svg viewBox="0 0 12 16"><path fill-rule="evenodd" d="M6.5 0C3.48 0 1 2.19 1 5c0 .92.55 2.25 1 3 1.34 2.25 1.78 2.78 2 4v1h5v-1c.22-1.22.66-1.75 2-4 .45-.75 1-2.08 1-3 0-2.81-2.48-5-5.5-5zm3.64 7.48c-.25.44-.47.8-.67 1.11-.86 1.41-1.25 2.06-1.45 3.23-.02.05-.02.11-.02.17H5c0-.06 0-.13-.02-.17-.2-1.17-.59-1.83-1.45-3.23-.2-.31-.42-.67-.67-1.11C2.44 6.78 2 5.65 2 5c0-2.2 2.02-4 4.5-4 1.22 0 2.36.42 3.22 1.19C10.55 2.94 11 3.94 11 5c0 .66-.44 1.78-.86 2.48zM4 14h5c-.23 1.14-1.3 2-2.5 2s-2.27-.86-2.5-2z"></path></svg></span>tip</div><div class="admonitionContent_vXIg"><p>To make the transition smooth, we can provide the beta link on demand to test your application. Please reach out to the <a href="mailto:support@wavemaker.com" target="_blank" rel="noopener noreferrer">support team</a> for more details. </p></div></div><p>We recommend you test the application to see if the build is successful. For this, you must test the application using the <a href="/learn/app-development/deployment/build-options#angular-build">Angular Build</a>. If the build fails, we request you to contact our support team with logs.</p>]]></content>
        <author>
            <name>Swetha Kundaram</name>
        </author>
    </entry>
    <entry>
        <title type="html"><![CDATA[Accessibility Support in WaveMaker]]></title>
        <id>https://www.wavemaker.com/learn/blog/2021/08/23/accessibility-feature</id>
        <link href="https://www.wavemaker.com/learn/blog/2021/08/23/accessibility-feature"/>
        <updated>2021-08-23T00:00:00.000Z</updated>
        <summary type="html"><![CDATA[Accessibility is essential for individuals and organizations that want to create high-quality websites and applications. It enables people with disabilities to use different Assistive Technologies (AT) and Adaptive Strategies for the business benefits of Web Accessibility. WaveMaker also focuses on enabling their product with international standards for Web Accessibility from World Wide Web Consortium (W3C), including Web Content Accessibility Guidelines (WCAG) and Web Accessibility Initiative - Accessible Rich Internet Applications (WAI-ARIA) as the first step in applying them.]]></summary>
        <content type="html"><![CDATA[<p><strong>Accessibility</strong> is essential for individuals and organizations that want to create high-quality websites and applications. It enables people with disabilities to use different Assistive Technologies (AT) and Adaptive Strategies for the business benefits of Web Accessibility. WaveMaker also focuses on enabling their product with international standards for Web Accessibility from World Wide Web Consortium (W3C), including Web Content Accessibility Guidelines (WCAG) and Web Accessibility Initiative - Accessible Rich Internet Applications (WAI-ARIA) as the first step in applying them. </p><h2 class="anchor anchorWithStickyNavbar_LWe7" id="why-accessibility">Why Accessibility?<a href="#why-accessibility" class="hash-link" aria-label="Direct link to Why Accessibility?" title="Direct link to Why Accessibility?">​</a></h2><p>Although Accessibility is designed for people with disabilities, it helps everyone in general. Accessibility promotes usability. Everyone, in general, can benefit from clear instructions, opportunities to correct form errors, simple visual layouts, high color contrast, and the option to read a transcript or captions to a video or audio recording.</p><p>In the IT world, Accessibility often describes hardware and software designed to help those who experience disabilities. </p><h3 class="anchor anchorWithStickyNavbar_LWe7" id="features-of-accessibility-websites">Features of Accessibility Websites<a href="#features-of-accessibility-websites" class="hash-link" aria-label="Direct link to Features of Accessibility Websites" title="Direct link to Features of Accessibility Websites">​</a></h3><ul><li>Good use of HTML headings</li><li>Accessible with the keyboard</li><li>Accessible images</li><li>Accessible menus</li><li>Accessible forms</li><li>Accessible tables</li><li>Effective use of color</li><li>Meaningful link text</li></ul><h2 class="anchor anchorWithStickyNavbar_LWe7" id="accessibility-in-wavemaker">Accessibility in WaveMaker<a href="#accessibility-in-wavemaker" class="hash-link" aria-label="Direct link to Accessibility in WaveMaker" title="Direct link to Accessibility in WaveMaker">​</a></h2><p>To make components accessible, all the text on the web page must be unique, along with its captions and roles. To make it possible, we have introduced <strong>aria-labels</strong> attributes for all the <code>wm-widgets</code> which are configurable and certain <a href="https://developer.mozilla.org/en-US/docs/Web/Accessibility/ARIA/Roles" target="_blank" rel="noopener noreferrer">Role</a> to identify every component as per their standard behavior. This ARIA "roles" and "attributes" will benefit the group of people using Assistive Technology Readers (ATR) to read the text and the purpose of the widget aloud to the users. </p><p>WaveMaker Accessibility enhancements will cover Web Content Accessibility Guidelines (WCAG) "A" and "AA" compliance for all non-text content, including the following.</p><p>Name Role &amp; Value, Info, Relationships, Meaning Sequence, Sensory Characteristics, Identify Input Purpose, Non-Text Contrast, Page Titled, Headings and Labels, Label in Name, Language of Page, Status Messages, Error Prevention.</p><h3 class="anchor anchorWithStickyNavbar_LWe7" id="good-use-of-headings">Good Use of Headings<a href="#good-use-of-headings" class="hash-link" aria-label="Direct link to Good Use of Headings" title="Direct link to Good Use of Headings">​</a></h3><p>To make good use of headings on a page, add CSS class name from the <strong>Style</strong> properties tab, for example .h1, .h2, .h3, etc. Using any of the above headings class name, an attribute <strong>"aria-level"</strong> will be assigned to the HTML structure to make the screen readers understand the text specificity while scanning a page. You can copy the heading caption to the <em>hint</em> property to make it ARIA accessible.</p><p>For more information on how to use accessibility, see <a href="/learn/app-development/ui-design/accessibility">Accessibility in WaveMaker</a>.</p>]]></content>
        <author>
            <name>Lovin Ahmed</name>
        </author>
    </entry>
    <entry>
        <title type="html"><![CDATA[Generating .aab files using wm-cordova-cli or AppChef]]></title>
        <id>https://www.wavemaker.com/learn/blog/2021/07/19/aab-support</id>
        <link href="https://www.wavemaker.com/learn/blog/2021/07/19/aab-support"/>
        <updated>2021-07-19T00:00:00.000Z</updated>
        <summary type="html"><![CDATA[Android App Bundle (aab) is a new and an alternate to Android application package (apk).]]></summary>
        <content type="html"><![CDATA[<p>Android App Bundle (aab) is a new and an alternate to Android application package (apk).
Google introduced this format mainly to reduce the size of installer for end users. Please check <a href="https://developer.android.com/platform/technology/app-bundle" target="_blank" rel="noopener noreferrer">this</a> post from Google to learn about aab. Starting from @wavemaker/<a href="mailto:wm-cordova-cli@2.0.0" target="_blank" rel="noopener noreferrer">wm-cordova-cli@2.0.0</a>, generation of aab files from WaveMaker mobile projects is supported.  </p><h2 class="anchor anchorWithStickyNavbar_LWe7" id="bundle-tool">Bundle Tool<a href="#bundle-tool" class="hash-link" aria-label="Direct link to Bundle Tool" title="Direct link to Bundle Tool">​</a></h2><p>An <strong>aab</strong> file cannot be installed directly on a device. This is a format for publishing to Play Store. For development, <strong>apk</strong> can still be used. Incase if you want to install aab file, apk file has to be generated from aab file. Google released a tool called bundle tool to help developers in this regard. BundleTool is a jar file (requires Java8 or higher) that can be downloaded from <a href="https://github.com/google/bundletool/releases" target="_blank" rel="noopener noreferrer">here</a>. After downloading the jar, create an alias (in Linux or MAC) as follows in bashrc. </p><div class="codeBlockContainer_Ckt0 theme-code-block" style="--prism-color:#bfc7d5;--prism-background-color:#292d3e"><div class="codeBlockContent_biex"><pre tabindex="0" class="prism-code language-text codeBlock_bY9V thin-scrollbar"><code class="codeBlockLines_e6Vv"><span class="token-line" style="color:#bfc7d5"><span class="token plain">alias bundletool="java -jar BUNDLE_TOOL_JAR_PATH"</span><br></span></code></pre><div class="buttonGroup__atx"><button type="button" aria-label="Copy code to clipboard" title="Copy" class="clean-btn"><span class="copyButtonIcons_eSgA" aria-hidden="true"><svg viewBox="0 0 24 24" class="copyButtonIcon_y97N"><path fill="currentColor" d="M19,21H8V7H19M19,5H8A2,2 0 0,0 6,7V21A2,2 0 0,0 8,23H19A2,2 0 0,0 21,21V7A2,2 0 0,0 19,5M16,1H4A2,2 0 0,0 2,3V17H4V3H16V1Z"></path></svg><svg viewBox="0 0 24 24" class="copyButtonSuccessIcon_LjdS"><path fill="currentColor" d="M21,7L9,19L3.5,13.5L4.91,12.09L9,16.17L19.59,5.59L21,7Z"></path></svg></span></button></div></div></div><p>Example command to generate apk file:</p><div class="codeBlockContainer_Ckt0 theme-code-block" style="--prism-color:#bfc7d5;--prism-background-color:#292d3e"><div class="codeBlockContent_biex"><pre tabindex="0" class="prism-code language-text codeBlock_bY9V thin-scrollbar"><code class="codeBlockLines_e6Vv"><span class="token-line" style="color:#bfc7d5"><span class="token plain"> bundletool build-apks --bundle="./people_wavemaker(0.0.1).debug.aab" --output="./people_from_aab.apks"</span><br></span></code></pre><div class="buttonGroup__atx"><button type="button" aria-label="Copy code to clipboard" title="Copy" class="clean-btn"><span class="copyButtonIcons_eSgA" aria-hidden="true"><svg viewBox="0 0 24 24" class="copyButtonIcon_y97N"><path fill="currentColor" d="M19,21H8V7H19M19,5H8A2,2 0 0,0 6,7V21A2,2 0 0,0 8,23H19A2,2 0 0,0 21,21V7A2,2 0 0,0 19,5M16,1H4A2,2 0 0,0 2,3V17H4V3H16V1Z"></path></svg><svg viewBox="0 0 24 24" class="copyButtonSuccessIcon_LjdS"><path fill="currentColor" d="M21,7L9,19L3.5,13.5L4.91,12.09L9,16.17L19.59,5.59L21,7Z"></path></svg></span></button></div></div></div><p>Example command to install apk on a connected device</p><div class="codeBlockContainer_Ckt0 theme-code-block" style="--prism-color:#bfc7d5;--prism-background-color:#292d3e"><div class="codeBlockContent_biex"><pre tabindex="0" class="prism-code language-text codeBlock_bY9V thin-scrollbar"><code class="codeBlockLines_e6Vv"><span class="token-line" style="color:#bfc7d5"><span class="token plain">bundletool install-apks --apks="./people_from_aab.apks"</span><br></span></code></pre><div class="buttonGroup__atx"><button type="button" aria-label="Copy code to clipboard" title="Copy" class="clean-btn"><span class="copyButtonIcons_eSgA" aria-hidden="true"><svg viewBox="0 0 24 24" class="copyButtonIcon_y97N"><path fill="currentColor" d="M19,21H8V7H19M19,5H8A2,2 0 0,0 6,7V21A2,2 0 0,0 8,23H19A2,2 0 0,0 21,21V7A2,2 0 0,0 19,5M16,1H4A2,2 0 0,0 2,3V17H4V3H16V1Z"></path></svg><svg viewBox="0 0 24 24" class="copyButtonSuccessIcon_LjdS"><path fill="currentColor" d="M21,7L9,19L3.5,13.5L4.91,12.09L9,16.17L19.59,5.59L21,7Z"></path></svg></span></button></div></div></div><p>For more commands supported by bundletool, check this <a href="https://developer.android.com/studio/command-line/bundletool" target="_blank" rel="noopener noreferrer">link</a>.</p><h2 class="anchor anchorWithStickyNavbar_LWe7" id="wm-cordova-cli-breaking-change">wm-cordova-cli breaking change<a href="#wm-cordova-cli-breaking-change" class="hash-link" aria-label="Direct link to wm-cordova-cli breaking change" title="Direct link to wm-cordova-cli breaking change">​</a></h2><p>Previously, <strong>packageType</strong> is an argument in the build command to specify the type of build (development or production). This argument is renamed to <strong>buildType</strong> in 2.0.0. Now, <strong>packageType</strong> is used to specify the type of package. For Android build, options available under packageType are <strong>bundle</strong> (for aab) and <strong>apk</strong>. Since, ipa is the only format available for ios apps, there is no <strong>packageType</strong> option for ios build.</p><h2 class="anchor anchorWithStickyNavbar_LWe7" id="changes-in-appchef">Changes in AppChef<a href="#changes-in-appchef" class="hash-link" aria-label="Direct link to Changes in AppChef" title="Direct link to Changes in AppChef">​</a></h2><p>In the build step of creating a new cordova build, a new dropdown is introduced to capture User's choice of Android Package. This dropdown is only visible when a ceretificate for Android build is selected. This dropdown has only two options (aab and apk). If the build type is <strong>development</strong>, then Android package is set as <strong>apk</strong>. If the build type is <strong>production</strong>, then Android package is set as <strong>aab</strong>. Users can override the default behaviour with their choice.</p><p><img loading="lazy" alt="aab support in Appchef" src="/learn/assets/images/aab_support_in_appchef-92aa94137e39d8e5d33bc86a73dc16df.png" width="869" height="772" class="img_ev3q"></p><h2 class="anchor anchorWithStickyNavbar_LWe7" id="google-anouncement">Google Anouncement<a href="#google-anouncement" class="hash-link" aria-label="Direct link to Google Anouncement" title="Direct link to Google Anouncement">​</a></h2><p>Starting from August 1st 2021, Google Play Store will allow only new app submissions in <strong>aab</strong> format. Check the Google Anouncement <a href="https://android-developers.googleblog.com/2021/06/the-future-of-android-app-bundles-is.html" target="_blank" rel="noopener noreferrer">here</a>.</p>]]></content>
        <author>
            <name>Srinivasa Rao Boyina</name>
        </author>
    </entry>
    <entry>
        <title type="html"><![CDATA[WaveMaker Studio enables faster database imports]]></title>
        <id>https://www.wavemaker.com/learn/blog/2021/06/24/faster-database-imports-in-studio</id>
        <link href="https://www.wavemaker.com/learn/blog/2021/06/24/faster-database-imports-in-studio"/>
        <updated>2021-06-24T00:00:00.000Z</updated>
        <summary type="html"><![CDATA[WaveMaker platform offers the feature for applications to integrate with external databases like MySQL, SQLServer, Oracle, IBM DB2, PostgreSQL, Amazon Redshift, SAP HANA.]]></summary>
        <content type="html"><![CDATA[<p>WaveMaker platform offers the feature for applications to integrate with external databases like MySQL, SQLServer, Oracle, IBM DB2, PostgreSQL, Amazon Redshift, SAP HANA.</p><p>These database import flows have now been optimised to enable faster database imports in the application. Let's have a look ahead on how this was done and how would this affect the app developers.</p><h3 class="anchor anchorWithStickyNavbar_LWe7" id="how-did-we-enable-faster-database-imports-in-studio">How did we enable faster database imports in Studio?<a href="#how-did-we-enable-faster-database-imports-in-studio" class="hash-link" aria-label="Direct link to How did we enable faster database imports in Studio?" title="Direct link to How did we enable faster database imports in Studio?">​</a></h3><p>When a database is imported into an application, the schema is read to discover relationships between the tables and individual table schema as well. Armed with this information, WaveMaker generates REST API and creates hibernate entities for each of tables in the database.</p><p>Like mentioned, during this import operation, to read the schema information and relationships metadata for the tables, there are a set of metadata queries for each respective database type, that are run in background on the system tables in the database.
These metadata queries have now been fine tuned across all database types, keeping in accordance with the query standards listed for high performing queries.</p><h3 class="anchor anchorWithStickyNavbar_LWe7" id="how-were-the-queries-optimised">How were the queries optimised?<a href="#how-were-the-queries-optimised" class="hash-link" aria-label="Direct link to How were the queries optimised?" title="Direct link to How were the queries optimised?">​</a></h3><p>Below is a short insight about the approaches taken to fine tune the queries for better loading times:</p><ul><li>Nested select queries were avoided</li><li>Avoided iterating through the same resultset due to join operation</li><li>Used left outer joins instead of general joins or where clauses</li><li>Select field instead of select * from system tables</li><li>Used WHERE instead of HAVING to define filters</li></ul><h3 class="anchor anchorWithStickyNavbar_LWe7" id="how-does-it-impact-the-studio-developer">How does it impact the Studio developer?<a href="#how-does-it-impact-the-studio-developer" class="hash-link" aria-label="Direct link to How does it impact the Studio developer?" title="Direct link to How does it impact the Studio developer?">​</a></h3><p>As a result of this enhancement, the WaveMaker developer will have a better experience when working with databases while building the application.
The import/re-import operations of database in the application will be quicker than the earlier times.</p><p>From the tests we did, the some of the queries used in database import operation are 600x faster.
As a result, the time taken for the entire process of code generation for database entities during database import operation and the respective API generation powered by WaveMaker, is almost cut by half approximately.</p><p>Note: The performance improvement ratio is proportional to the number of constraints and relations defined for the tables in the database. </p><p>Based on the statistics generated at our end during the QA phase, the metadata for a database with around 800+ tables and heavy constraints for the entities was read in less than 4 seconds due to the optimised metadata queries. </p><p>Do try out our database import feature and let us know your feedback.</p>]]></content>
        <author>
            <name>Sanjana Raheja</name>
        </author>
    </entry>
    <entry>
        <title type="html"><![CDATA[Redshift Database Integration]]></title>
        <id>https://www.wavemaker.com/learn/blog/2021/06/18/redshift</id>
        <link href="https://www.wavemaker.com/learn/blog/2021/06/18/redshift"/>
        <updated>2021-06-18T00:00:00.000Z</updated>
        <summary type="html"><![CDATA[WaveMaker supports Redshift architecture to develop WaveMaker apps by importing the Redshift database into the Studio. You can customize tables and perform queries like any other databases supported by WaveMaker to present data in the UI.]]></summary>
        <content type="html"><![CDATA[<p>WaveMaker supports Redshift architecture to develop WaveMaker apps by importing the Redshift database into the Studio. You can customize tables and perform queries like any other databases supported by WaveMaker to present data in the UI.</p><h2 class="anchor anchorWithStickyNavbar_LWe7" id="how-redshift-architecture-works">How Redshift Architecture Works<a href="#how-redshift-architecture-works" class="hash-link" aria-label="Direct link to How Redshift Architecture Works" title="Direct link to How Redshift Architecture Works">​</a></h2><p>Amazon Redshift is a fully managed, petabyte-scale data warehouse service in the cloud. You can start with just a few hundred gigabytes of data and scale to a petabyte or more.</p><p>Amazon Redshift achieves efficient storage and optimum query performance through a combination of massively parallel processing, columnar data storage, and very efficient, targeted data compression encoding schemes.</p><p><img loading="lazy" alt="Redshift Architecture" src="/learn/assets/images/redshift-architecture-8515122c32d222bdec29a06c178082b4.png" width="863" height="506" class="img_ev3q"></p><p>Redshift is a data warehouse cluster which is a combination of nodes. If a cluster has two or more clusters then an additional leader node exists which coordinates between the nodes and handles external communication. Each compute node has its own dedicated CPU, memory, and attached disk storage, which are determined by the node type. </p><p>A compute node is partitioned into slices. Each slice is allocated a portion of the node's memory and disk space, where it processes a portion of the workload assigned to the node. The leader node manages distributing data to the slices and apportions the workload for any queries or other database operations to the slices. The slices then work in parallel to complete the operation.</p><h2 class="anchor anchorWithStickyNavbar_LWe7" id="redshift-in-wavemaker">Redshift in WaveMaker<a href="#redshift-in-wavemaker" class="hash-link" aria-label="Direct link to Redshift in WaveMaker" title="Direct link to Redshift in WaveMaker">​</a></h2><p>From <a href="/learn/wavemaker-release-notes/v10-7-0#support-for-red-shift-database">version 10.7.0</a>, WaveMaker has extended its support to allow a dedicated section for the Redshift database. </p><p>If you have been working with the Redshift database earlier, which allowed importing as read-only mode, you can now import a Redshift database with read and editable modes. Further, you can customize Redshift tables in the database designer. Perform queries and create variables to compose data that you can incorporate into the UI to display devised data in Charts, List, Data Table, and more.</p><h3 class="anchor anchorWithStickyNavbar_LWe7" id="connecting-to-database">Connecting to Database<a href="#connecting-to-database" class="hash-link" aria-label="Direct link to Connecting to Database" title="Direct link to Connecting to Database">​</a></h3><p>Using the <strong>Connect to DB</strong> option allows you to import the Redshift database from the <strong>Databases</strong> menu. WaveMaker takes care of adding the driver dependency in <code>pom.xml</code>. </p><p>For instance, in the following image, consider an employee table was imported into the project.</p><p><img loading="lazy" alt="Redshift Table Options" src="/learn/assets/images/redshift-table-options-764b885a5f88ae8786f617dfb461c8aa.png" width="799" height="467" class="img_ev3q"></p><p>By importing Redshift tables in editable mode, you can create new tables and modify existing tables from the database designer directly in WaveMaker instead of using the Redshift DB console.</p><p>Using the above table, you can create List, Data Table widgets, etc., and perform CRUD operations on it.</p><h3 class="anchor anchorWithStickyNavbar_LWe7" id="querying-redshift-database-in-wavemaker">Querying Redshift Database in WaveMaker<a href="#querying-redshift-database-in-wavemaker" class="hash-link" aria-label="Direct link to Querying Redshift Database in WaveMaker" title="Direct link to Querying Redshift Database in WaveMaker">​</a></h3><p>From the Query Editor in the Databases menu, you can run all types of queries and procedures and save them, which you can use to create variables and bind them to the widgets. </p><p>The queries can also have parameters that you can dynamically pass during runtime. Below is an example query of the Employee table that has <code>employeeId</code> as a parameter. For more information, see <a href="/learn/app-development/services/database-services/working-with-queries">Working with Queries in WaveMaker</a>.</p><p><img loading="lazy" alt="Redshift Query" src="/learn/assets/images/redshift-queries-f113f1fae0ea12095df49beb600cf529.png" width="1485" height="740" class="img_ev3q"></p><h3 class="anchor anchorWithStickyNavbar_LWe7" id="using-redshift-db-for-creating-a-list-widget">Using Redshift DB for Creating a List Widget<a href="#using-redshift-db-for-creating-a-list-widget" class="hash-link" aria-label="Direct link to Using Redshift DB for Creating a List Widget" title="Direct link to Using Redshift DB for Creating a List Widget">​</a></h3><p>Drag and drop a List widget and configure the List widget by selecting the same employee table discussed in the earlier points.</p><p><img loading="lazy" alt="Redshift Configure List" src="/learn/assets/images/redshift-configure-list-1716c5d0acb48f0983195f65a0d3760c.png" width="802" height="380" class="img_ev3q"></p><p>After configuring the widget, you can preview the application and view the table data as a list.</p><h3 class="anchor anchorWithStickyNavbar_LWe7" id="already-using-a-redshift-database">Already using a Redshift database?<a href="#already-using-a-redshift-database" class="hash-link" aria-label="Direct link to Already using a Redshift database?" title="Direct link to Already using a Redshift database?">​</a></h3><p>Import the Redshift database by following the how-to’s doc <a href="/learn/how-tos/configuring-aws-redshiftdb">Connect To AWS Redshift Database</a>.</p><h3 class="anchor anchorWithStickyNavbar_LWe7" id="in-case-you-dont">In case you don't<a href="#in-case-you-dont" class="hash-link" aria-label="Direct link to In case you don't" title="Direct link to In case you don't">​</a></h3><p>Below are the steps to get you started to launch a Redshift cluster:</p><ol><li>Sign in to AWS Management Console. Use the following link to open Amazon Redshift console − <a href="https://console.aws.amazon.com/redshift/" target="_blank" rel="noopener noreferrer">https://console.aws.amazon.com/redshift/</a></li><li>Create a Cluster and select the number of nodes, node capacity, and other database configurations.</li><li>After the cluster creation, you can get the hostname, port, JDBC connection string from the cluster console. Use them to import into WaveMaker.</li></ol>]]></content>
        <author>
            <name>Praveen Chandra</name>
        </author>
    </entry>
    <entry>
        <title type="html"><![CDATA[Integrate SAP HANA Database with WaveMaker]]></title>
        <id>https://www.wavemaker.com/learn/blog/2021/06/18/sap-hana</id>
        <link href="https://www.wavemaker.com/learn/blog/2021/06/18/sap-hana"/>
        <updated>2021-06-18T00:00:00.000Z</updated>
        <summary type="html"><![CDATA[With constantly changing business needs, WaveMaker puts forward a seamless integration with the SAP HANA database. Develop personalized, intelligent solutions and customer experiences end to end by enabling CRUD (Create, Read, Update and Delete) operations across WaveMaker applications.]]></summary>
        <content type="html"><![CDATA[<p>With constantly changing business needs, WaveMaker puts forward a seamless integration with the SAP HANA database. Develop personalized, intelligent solutions and customer experiences end to end by enabling CRUD (Create, Read, Update and Delete) operations across WaveMaker applications. </p><h2 class="anchor anchorWithStickyNavbar_LWe7" id="sap-hana-database">SAP HANA Database<a href="#sap-hana-database" class="hash-link" aria-label="Direct link to SAP HANA Database" title="Direct link to SAP HANA Database">​</a></h2><p>SAP HANA Cloud is a fully managed in-memory and column-based cloud Database as a Service (DBaaS) offered by SAP that helps in managing your data storage and integration while running powerful applications.</p><p>In SAP HANA, the data is completely stored in the main memory. When the main memory limit is reached, the whole database objects, including table, view, etc., that are not used will be unloaded from the main memory and saved into the disk. For example, in a column store table, data is stored vertically. So, similar data types come together, which provides faster memory read and write operations with the help of the In-Memory Computing Engine.</p><h2 class="anchor anchorWithStickyNavbar_LWe7" id="sap-hana-in-wavemaker">SAP HANA in WaveMaker<a href="#sap-hana-in-wavemaker" class="hash-link" aria-label="Direct link to SAP HANA in WaveMaker" title="Direct link to SAP HANA in WaveMaker">​</a></h2><p>Earlier, you could import and integrate the SAP HANA database with WaveMaker applications. However, when importing a SAP HANA database using the <strong>Other</strong> option, you could get read-only mode. </p><p>With release 10.7.0, WaveMaker supports read and editable modes with a dedicated section for SAP HANA. Hence, with this upgrade, you can create variables with CRUD functionality to develop List, Data Table, and develop an application using more such widgets within a few clicks.</p><h3 class="anchor anchorWithStickyNavbar_LWe7" id="connecting-to-database">Connecting to Database<a href="#connecting-to-database" class="hash-link" aria-label="Direct link to Connecting to Database" title="Direct link to Connecting to Database">​</a></h3><p>Using the <strong>Connect to DB</strong> option allows you to import the SAP HANA database from the <strong>Databases</strong> menu. WaveMaker takes care of adding the driver dependency in <code>pom.xml</code>. </p><p>For instance, in the following image, consider an employee table was imported into the project.</p><p><img loading="lazy" alt="SAP HANA Design" src="/learn/assets/images/sap-design-page-4650d57cca3249ebd04642af622b98a8.png" width="797" height="288" class="img_ev3q"></p><p>Using the above table, you can create List, Data Table widgets, etc., and perform CRUD operations.</p><h3 class="anchor anchorWithStickyNavbar_LWe7" id="using-sap-hana-db-for-creating-a-list-widget">Using SAP HANA DB for Creating a List Widget<a href="#using-sap-hana-db-for-creating-a-list-widget" class="hash-link" aria-label="Direct link to Using SAP HANA DB for Creating a List Widget" title="Direct link to Using SAP HANA DB for Creating a List Widget">​</a></h3><p>Drag and drop the List widget and configure the List widget by selecting the same employee table discussed in the earlier points.</p><p><img loading="lazy" alt="SAP HANA Configure List" src="/learn/assets/images/sap-configure-list-596d2a8ea530e77d3268363fb3ae1b47.png" width="798" height="508" class="img_ev3q"></p><p>After configuring the widget, you can preview the application and view the table data as a list.</p><p><img loading="lazy" alt="SAP HANA List Widget" src="/learn/assets/images/sap-list-widget-d1437cfeb1b3be286eb19629ca20f1cd.png" width="797" height="401" class="img_ev3q"></p><h3 class="anchor anchorWithStickyNavbar_LWe7" id="editing-tables">Editing Tables<a href="#editing-tables" class="hash-link" aria-label="Direct link to Editing Tables" title="Direct link to Editing Tables">​</a></h3><p>When you import SAP HANA tables in editable mode, you can create new tables and modify existing tables from the database designer in WaveMaker instead of using the SAP HANA console.</p><p><img loading="lazy" alt="SAP HANA Table Options" src="/learn/assets/images/sap-table-options-e7aa729354016df0f20ad2fa31be8905.png" width="797" height="463" class="img_ev3q"></p><h3 class="anchor anchorWithStickyNavbar_LWe7" id="already-have-a-sap-hana-database">Already have a SAP HANA Database?<a href="#already-have-a-sap-hana-database" class="hash-link" aria-label="Direct link to Already have a SAP HANA Database?" title="Direct link to Already have a SAP HANA Database?">​</a></h3><p>Import the SAP HANA database by following the how-to’s doc <a href="/learn/how-tos/configuring-sap-hana-clouddb">Connect To SAP HANA Database</a>.</p><h3 class="anchor anchorWithStickyNavbar_LWe7" id="in-case-you-dont">In case you don't<a href="#in-case-you-dont" class="hash-link" aria-label="Direct link to In case you don't" title="Direct link to In case you don't">​</a></h3><p>The following steps help you to launch the SAP HANA instance: </p><ol><li>Sign in to SAP HANA cloud central console.</li><li>Launch an SAP HANA instance with the required memory and other database configurations.</li><li>After the instance creation, you can get the hostname, port from the SAP HANA database explorer.</li></ol>]]></content>
        <author>
            <name>Praveen Chandra</name>
        </author>
    </entry>
    <entry>
        <title type="html"><![CDATA[Important Announcement about Changes to Documentation Domain]]></title>
        <id>https://www.wavemaker.com/learn/blog/2021/06/15/announcement-documentation-hostname-update</id>
        <link href="https://www.wavemaker.com/learn/blog/2021/06/15/announcement-documentation-hostname-update"/>
        <updated>2021-06-15T00:00:00.000Z</updated>
        <summary type="html"><![CDATA[docs hostname announcement]]></summary>
        <content type="html"><![CDATA[<p><img loading="lazy" alt="docs hostname announcement" src="/learn/assets/images/docs-hostname-e618719457a73f2a8d464dc3c9f64a98.jpg" width="975" height="282" class="img_ev3q"></p><p>As a part of brand unification, our digital team has been working hard to create a better online experience for our customers. For this reason, we are moving to a new domain for WaveMaker Documentation.</p><p>Starting June 21, 2021, our new domain for Documentation will be <strong><a href="https://docs.wavemaker.com/learn/" target="_blank" rel="noopener noreferrer">docs.wavemaker.com/learn</a></strong>. </p><h3 class="anchor anchorWithStickyNavbar_LWe7" id="rss-feed">RSS Feed<a href="#rss-feed" class="hash-link" aria-label="Direct link to RSS Feed" title="Direct link to RSS Feed">​</a></h3><p>If you have subscribed to our Team Blog via RSS feed, we request you to update the feed URL to continue to receive news and updates from our Engineering team.</p><h4 class="anchor anchorWithStickyNavbar_LWe7" id="updated-url">Updated URL<a href="#updated-url" class="hash-link" aria-label="Direct link to Updated URL" title="Direct link to Updated URL">​</a></h4><div class="codeBlockContainer_Ckt0 theme-code-block" style="--prism-color:#bfc7d5;--prism-background-color:#292d3e"><div class="codeBlockContent_biex"><pre tabindex="0" class="prism-code language-text codeBlock_bY9V thin-scrollbar"><code class="codeBlockLines_e6Vv"><span class="token-line" style="color:#bfc7d5"><span class="token plain">https://docs.wavemaker.com/learn/blog/feed.xml</span><br></span></code></pre><div class="buttonGroup__atx"><button type="button" aria-label="Copy code to clipboard" title="Copy" class="clean-btn"><span class="copyButtonIcons_eSgA" aria-hidden="true"><svg viewBox="0 0 24 24" class="copyButtonIcon_y97N"><path fill="currentColor" d="M19,21H8V7H19M19,5H8A2,2 0 0,0 6,7V21A2,2 0 0,0 8,23H19A2,2 0 0,0 21,21V7A2,2 0 0,0 19,5M16,1H4A2,2 0 0,0 2,3V17H4V3H16V1Z"></path></svg><svg viewBox="0 0 24 24" class="copyButtonSuccessIcon_LjdS"><path fill="currentColor" d="M21,7L9,19L3.5,13.5L4.91,12.09L9,16.17L19.59,5.59L21,7Z"></path></svg></span></button></div></div></div><p>Alternatively, find the updated URL when you navigate to <strong><a href="/learn/blog">blogs</a></strong> as well, as shown below.</p><p><img loading="lazy" alt="rss feed" src="/learn/assets/images/rss-update-9180f5f4a8f78510c8b247fa448498b4.png" width="1562" height="372" class="img_ev3q"></p><p>Though there are no other significant changes in the layout and context, we have made it just a little easier for our customers and clients to find us online and convey a more cohesive brand identity.</p>]]></content>
        <author>
            <name>Swetha Kundaram</name>
        </author>
    </entry>
    <entry>
        <title type="html"><![CDATA[WaveMaker Releases 10.7 Version]]></title>
        <id>https://www.wavemaker.com/learn/blog/2021/05/09/product-update-10-7-whats-new</id>
        <link href="https://www.wavemaker.com/learn/blog/2021/05/09/product-update-10-7-whats-new"/>
        <updated>2021-05-09T00:00:00.000Z</updated>
        <summary type="html"><![CDATA[WaveMaker releases the 10.7.0 update on 09 May 2021. For the detailed list of features and fixes, see WaveMaker release notes 10.7.0.]]></summary>
        <content type="html"><![CDATA[<p>WaveMaker releases the <strong>10.7.0 update</strong> on 09 May 2021. For the detailed list of features and fixes, see <a href="/learn/wavemaker-release-notes/v10-7-0">WaveMaker release notes 10.7.0</a>.</p><p>Take a peek into what's new in this release. </p><h2 class="anchor anchorWithStickyNavbar_LWe7" id="whats-new">What's New<a href="#whats-new" class="hash-link" aria-label="Direct link to What's New" title="Direct link to What's New">​</a></h2><ul><li><strong><a href="/learn/wavemaker-release-notes/v10-7-0#work-in-branches">Working in branches</a></strong> offers the standard SDLC workflow for making fixes on already released version of your WaveMaker aoo while rest of the team continues sprinting on the next release. You can now create a branch for the released version of the app and make your hotfix on that branch from within WaveMaker. This feature is available in our "Teams" offering. </li></ul><ul><li>While support for branching requires enhancements to <strong><a href="/learn/wavemaker-release-notes/v10-7-0#vcs-enhancements">how VCS operates</a></strong>, including how you manage projects, groups, and organizations. See how these changes your <a href="/learn/wavemaker-release-notes/v10-7-0#vcs-enhancements">current workflow</a> if you are a member of WMO Teams.</li></ul><ul><li>Are you already a part of the Amazon ecosystem? In that case, we have good news for you. With the <strong><a href="/learn/wavemaker-release-notes/v10-7-0#support-for-red-shift-database">support of the Redshift database</a></strong> in WaveMaker, get speedy, high performance, horizontally scalable, with the ability to add massive capacity storage—all in the cloud using clustering model.</li></ul><ul><li><p>Are you using <strong><a href="/learn/wavemaker-release-notes/v10-7-0#support-for-sap-hana-database">SAP HANA</a></strong> in your SAP modules? With SAP HANA implementation in WaveMaker, import the SAP HANA database into your WaveMaker application for seamless integration, supporting the columnar data model. It improves flexibility, performance and uses an in-memory store with the read and editable modes.</p></li><li><p>Limitations to access public servers apply to most organizations. We understand. All the essential <strong><a href="/learn/wavemaker-release-notes/v10-7-0#ui-artifacts-now-published-to-npm">UI Artifacts</a></strong>  to generate and build an Angular app are published to the npm central repository. Incorporate UI Artifacts and simplify your CI-CD pipeline using the standard npm repo without worrying about firewall restrictions safely.</p></li><li><p>In the times before world changed, and you could go grocery shopping, you knew where to find the items you need as they are neatly classified into categories. A new property called <strong><a href="/learn/wavemaker-release-notes/v10-7-0#other-improvements">Groupby</a></strong> helps you group and classify data to arrange things systematically. We introduced this property within several widgets, including Select, Search, Chip, Radioset, and Autocomplete. </p></li></ul><h2 class="anchor anchorWithStickyNavbar_LWe7" id="improvements-and-bug-fixes">Improvements and Bug Fixes<a href="#improvements-and-bug-fixes" class="hash-link" aria-label="Direct link to Improvements and Bug Fixes" title="Direct link to Improvements and Bug Fixes">​</a></h2><p>In addition to new features, improving the existing ones is just as important. We fixed some critical bug fixes and enhanced several features. See the full list of <a href="/learn/wavemaker-release-notes/v10-7-0/#bug-fixes">bug fixes here</a> and <a href="/learn/wavemaker-release-notes/v10-7-0#other-improvements">enhancements here</a>.</p><p>Do you have a great idea of what you'd like to see next? Let us know <a href="mailto:info@wavemaker.com" target="_blank" rel="noopener noreferrer">here</a>.</p><h2 class="anchor anchorWithStickyNavbar_LWe7" id="see-also">See Also<a href="#see-also" class="hash-link" aria-label="Direct link to See Also" title="Direct link to See Also">​</a></h2><p><a href="/learn/wavemaker-release-notes/v10-6-0/">Release Notes 10.6</a><br>
<a href="/learn/wavemaker-release-notes/v10-5-0/">Release Notes 10.5</a><br>
<a href="/learn/wavemaker-release-notes/v10-4-0/">Release Notes 10.4</a></p>]]></content>
        <author>
            <name>Swetha Kundaram</name>
        </author>
    </entry>
    <entry>
        <title type="html"><![CDATA[Theme Builder with some coding (Build + Edit)]]></title>
        <id>https://www.wavemaker.com/learn/blog/2021/04/19/Build-theme-and-edit</id>
        <link href="https://www.wavemaker.com/learn/blog/2021/04/19/Build-theme-and-edit"/>
        <updated>2021-04-19T00:00:00.000Z</updated>
        <summary type="html"><![CDATA[Theme builder app is expanding its capability of creating a theme with an Edit feature to customize advanced changes. This feature will extend the ability to develop themes beyond the basics and add more advanced styling based on projects. This will also help to preview applied changes and test the theme's overall look and feel.]]></summary>
        <content type="html"><![CDATA[<p><a href="https://apps.wavemakeronline.com/Theme_Builder/#/Dashboard" target="_blank" rel="noopener noreferrer">Theme builder</a> app is expanding its capability of creating a theme with an Edit feature to customize advanced changes. This feature will extend the ability to develop themes beyond the basics and add more advanced styling based on projects. This will also help to preview applied changes and test the theme's overall look and feel.</p><h2 class="anchor anchorWithStickyNavbar_LWe7" id="why">Why?<a href="#why" class="hash-link" aria-label="Direct link to Why?" title="Direct link to Why?">​</a></h2><p>Over time, we have seen that though the theme builder tool was efficient to kick start with branding changes, it lacked in the styling details of what each project needs. There was a need to handle the advanced styles with an option to view the changes. We understand that only coding without preview is baseless, So here is the solution to those problems that every developer faces. </p><p>With the new enhancement to the theme builder tool, We have introduced a new code editing option to create themes more efficiently. The new feature will help develop a full-fledged theme with the branding configuration and advanced modifications as per project requirments.</p><p><img loading="lazy" alt="Code editor Button" src="/learn/assets/images/code-editor-button-29705f9e0e6927704491fa3d99a850e1.png" width="254" height="384" class="img_ev3q"></p><h2 class="anchor anchorWithStickyNavbar_LWe7" id="how-does-it-work">How does it work?<a href="#how-does-it-work" class="hash-link" aria-label="Direct link to How does it work?" title="Direct link to How does it work?">​</a></h2><p><a href="https://apps.wavemakeronline.com/Theme_Builder/#/Editor" target="_blank" rel="noopener noreferrer">Theme editor</a> will continue the styling configurations till Step 4, followed by a new <strong>"Code Editor"</strong> button, which starts a new window to the bottom of the screen. </p><h3 class="anchor anchorWithStickyNavbar_LWe7" id="steps-to-follow"><strong>Steps to follow:</strong><a href="#steps-to-follow" class="hash-link" aria-label="Direct link to steps-to-follow" title="Direct link to steps-to-follow">​</a></h3><ul><li>Click next to continue the initial flow till Step 4.</li><li>Click on the code editor button to the left corner in the footer. </li><li>A code panel will popup to the bottom, with the preview application vertically sectioned. </li><li>Explore the capabilities like Add, Override, and Modify based on the needs of each project and save the file. </li></ul><div class="theme-admonition theme-admonition-note alert alert--secondary admonition_WoCw"><div class="admonitionHeading_TMsN"><span class="admonitionIcon_Ibzs"><svg viewBox="0 0 14 16"><path fill-rule="evenodd" d="M6.3 5.69a.942.942 0 0 1-.28-.7c0-.28.09-.52.28-.7.19-.18.42-.28.7-.28.28 0 .52.09.7.28.18.19.28.42.28.7 0 .28-.09.52-.28.7a1 1 0 0 1-.7.3c-.28 0-.52-.11-.7-.3zM8 7.99c-.02-.25-.11-.48-.31-.69-.2-.19-.42-.3-.69-.31H6c-.27.02-.48.13-.69.31-.2.2-.3.44-.31.69h1v3c.02.27.11.5.31.69.2.2.42.31.69.31h1c.27 0 .48-.11.69-.31.2-.19.3-.42.31-.69H8V7.98v.01zM7 2.3c-3.14 0-5.7 2.54-5.7 5.68 0 3.14 2.56 5.7 5.7 5.7s5.7-2.55 5.7-5.7c0-3.15-2.56-5.69-5.7-5.69v.01zM7 .98c3.86 0 7 3.14 7 7s-3.14 7-7 7-7-3.12-7-7 3.14-7 7-7z"></path></svg></span>note</div><div class="admonitionContent_vXIg"><p>All the changes will reflect in the preview application only when clicked on save button. </p></div></div><ul><li>Checked your changes and repeat the steps to style more.</li><li>Bring the focus to the editing lines and try <strong>Ctrl F</strong> to search for classnames whenever required. </li><li>Close the editor to go back to the branding changes anytime and choose "Okay" to override the progressive changes made.</li></ul><p><img loading="lazy" alt="Code editor window" src="/learn/assets/images/code-editor-window-b04d01d45900c008be296d36eba1ce71.png" width="1280" height="645" class="img_ev3q"></p><p><img loading="lazy" alt="Code editor override" src="/learn/assets/images/code-editor-override-de9ddffd7e3de8ac1e330466795a8fa0.png" width="342" height="516" class="img_ev3q"></p><ul><li>When ready, download the theme and import to the projects.</li></ul><div class="theme-admonition theme-admonition-note alert alert--secondary admonition_WoCw"><div class="admonitionHeading_TMsN"><span class="admonitionIcon_Ibzs"><svg viewBox="0 0 14 16"><path fill-rule="evenodd" d="M6.3 5.69a.942.942 0 0 1-.28-.7c0-.28.09-.52.28-.7.19-.18.42-.28.7-.28.28 0 .52.09.7.28.18.19.28.42.28.7 0 .28-.09.52-.28.7a1 1 0 0 1-.7.3c-.28 0-.52-.11-.7-.3zM8 7.99c-.02-.25-.11-.48-.31-.69-.2-.19-.42-.3-.69-.31H6c-.27.02-.48.13-.69.31-.2.2-.3.44-.31.69h1v3c.02.27.11.5.31.69.2.2.42.31.69.31h1c.27 0 .48-.11.69-.31.2-.19.3-.42.31-.69H8V7.98v.01zM7 2.3c-3.14 0-5.7 2.54-5.7 5.68 0 3.14 2.56 5.7 5.7 5.7s5.7-2.55 5.7-5.7c0-3.15-2.56-5.69-5.7-5.69v.01zM7 .98c3.86 0 7 3.14 7 7s-3.14 7-7 7-7-3.12-7-7 3.14-7 7-7z"></path></svg></span>note</div><div class="admonitionContent_vXIg"><p>For information on how to import a theme, see <a href="/learn/app-development/ui-design/themes#import-theme">Importing Theme</a>.</p></div></div><h2 class="anchor anchorWithStickyNavbar_LWe7" id="editors-tips-and-tricks">Editor's tips and tricks<a href="#editors-tips-and-tricks" class="hash-link" aria-label="Direct link to Editor's tips and tricks" title="Direct link to Editor's tips and tricks">​</a></h2><p>We will share few easy way tips to help you get faster and more productive while editing the theme file. </p><ul><li>The editable file is in .less format. Hence, the changes should start inside the class name parenthesis <strong>.wm-app{ }</strong>.</li><li>The code editing starts from the 11th line from .wm-app{ }. The lines above are not editable due to complications with the respective path.</li><li>With every change, saving the file is mandatory to reflect the changes in the preview application</li><li>The <strong>CtrlF</strong> function will work when focused on the editable lines.</li><li><strong>CtrlZ</strong> function will revert your changes to the initial state. </li><li>To override the styles, search for the class name and address applicable changes.</li><li>If theme selected is <strong>flat</strong> or <strong>gradient</strong>, The classnames might duplicate for overriding purpose. Search and modify accordingly.</li></ul><div class="theme-admonition theme-admonition-warning alert alert--danger admonition_WoCw"><div class="admonitionHeading_TMsN"><span class="admonitionIcon_Ibzs"><svg viewBox="0 0 12 16"><path fill-rule="evenodd" d="M5.05.31c.81 2.17.41 3.38-.52 4.31C3.55 5.67 1.98 6.45.9 7.98c-1.45 2.05-1.7 6.53 3.53 7.7-2.2-1.16-2.67-4.52-.3-6.61-.61 2.03.53 3.33 1.94 2.86 1.39-.47 2.3.53 2.27 1.67-.02.78-.31 1.44-1.13 1.81 3.42-.59 4.78-3.42 4.78-5.56 0-2.84-2.53-3.22-1.25-5.61-1.52.13-2.03 1.13-1.89 2.75.09 1.08-1.02 1.8-1.86 1.33-.67-.41-.66-1.19-.06-1.78C8.18 5.31 8.68 2.45 5.05.32L5.03.3l.02.01z"></path></svg></span>danger</div><div class="admonitionContent_vXIg"><p>Order of precedence for code edited will be last come first to apply.</p></div></div><ul><li>Add proper comments for every piece of code rewritten in the file.</li></ul><h2 class="anchor anchorWithStickyNavbar_LWe7" id="bug-fixes">Bug Fixes<a href="#bug-fixes" class="hash-link" aria-label="Direct link to Bug Fixes" title="Direct link to Bug Fixes">​</a></h2><ol><li>Added more screens in the preview application with all the WaveMaker components to test the theme styles.</li><li>Checkboxes and radio button borders were half cut when set the font size to 10px or 11px. Fixed now</li><li>When the secondary button is focused, the text changes to primary color instead of active contrast color. Fixed now.</li><li>Changed the build settings of the preview application to load the assets faster.</li><li>Fixed the alignment issue for the select widget down arrow when the gradient theme is selected and imported to projects.</li><li>Dynamic form labels were not vertically aligned when selected a flat theme or gradient theme. Fixed now.</li></ol><p>Will be back with more updates.</p>]]></content>
        <author>
            <name>Lovin Ahmed</name>
        </author>
    </entry>
    <entry>
        <title type="html"><![CDATA[Understanding Scaling of WaveMaker Applications]]></title>
        <id>https://www.wavemaker.com/learn/blog/2021/01/04/spring-session-persistence</id>
        <link href="https://www.wavemaker.com/learn/blog/2021/01/04/spring-session-persistence"/>
        <updated>2021-01-04T00:00:00.000Z</updated>
        <summary type="html"><![CDATA[You have developed an exceptional application, and the demand for your application is increasing. You need to expand its accessibility and develop a plan to scale your application. Understanding how to scale an application means ensuring that your application can handle a larger number of users simultaneously. WaveMaker generates code based on open standards and brings best practices to the way applications should be architected. This makes scaling the application easy to understand and apply.]]></summary>
        <content type="html"><![CDATA[<p>You have developed an exceptional application, and the demand for your application is increasing. You need to expand its accessibility and develop a plan to scale your application. Understanding how to scale an application means ensuring that your application can handle a larger number of users simultaneously. WaveMaker generates code based on open standards and brings best practices to the way applications should be architected. This makes scaling the application easy to understand and apply.</p><p>What happens if you don't scale your application?</p><p>It is the point when an application can no longer handle additional requests effectively that will limit its scalability. This limit is reached when the resources run out, requiring more machines or more capacity.</p><p>In this article, learn about scaling approaches and how WaveMaker scales an application.</p><h2 class="anchor anchorWithStickyNavbar_LWe7" id="understanding-scaling-approaches">Understanding Scaling Approaches<a href="#understanding-scaling-approaches" class="hash-link" aria-label="Direct link to Understanding Scaling Approaches" title="Direct link to Understanding Scaling Approaches">​</a></h2><p>Following are the two approaches for scaling an application.</p><ol><li>Vertical Scaling</li><li>Horizontal Scaling</li></ol><h3 class="anchor anchorWithStickyNavbar_LWe7" id="vertical-scaling">Vertical Scaling<a href="#vertical-scaling" class="hash-link" aria-label="Direct link to Vertical Scaling" title="Direct link to Vertical Scaling">​</a></h3><p>In simple terms, Vertical scaling means adding more resources to the server, for example, increasing the capacity of the CPU, RAM, and DISK space in a single machine to "scale-up". Vertical scaling is limited to the capacity of a single machine, therefore, scaling beyond that capacity often involves downtime when switching from a small machine to a bigger machine.</p><h3 class="anchor anchorWithStickyNavbar_LWe7" id="horizontal-scaling">Horizontal Scaling<a href="#horizontal-scaling" class="hash-link" aria-label="Direct link to Horizontal Scaling" title="Direct link to Horizontal Scaling">​</a></h3><p>Horizontal scaling means it scales an application by adding more machines into the pool across the horizontal direction to "scale-out", and the scaling is based on partitioning the data. It replicates the application by growing the number of <a href="https://www.onixnet.com/insights/kubernetes-101-what-are-nodes-and-clusters#:~:text=Every%20cluster%20has%20one%20master,to%20be%20a%20single%20system." target="_blank" rel="noopener noreferrer">nodes in the cluster</a>. Also, distributing the responsibilities of each node and providing additional end-points for client connections. </p><h3 class="anchor anchorWithStickyNavbar_LWe7" id="which-one-is-better-for-your-application">Which one is better for your application?<a href="#which-one-is-better-for-your-application" class="hash-link" aria-label="Direct link to Which one is better for your application?" title="Direct link to Which one is better for your application?">​</a></h3><p>The decision depends on a number of factors, including the following.</p><ol><li>Is the application request volume steadily growing?</li><li>Is the application's current growth experiencing <a href="https://www.techopedia.com/definition/33767/spike-testing" target="_blank" rel="noopener noreferrer">spikes</a> that lead to service degradation?</li></ol><p>Combine these factors with the application's unique requirement to evaluate and determine the optimal scaling approach.</p><p>However, when you compare both Vertical and Horizontal approaches, Horizontal scaling offers a benefit of elasticity. Instead of taking your server down while you are scaling up to a better one, you keep your existing pool of resources online while adding more to what you already have. By adding more machines to the existing pool, you are not limited to the capacity of a single machine, and that scales your application with almost no downtime, and you do not get caught into the resource-shortfall.</p><h2 class="anchor anchorWithStickyNavbar_LWe7" id="wavemakers-approach-for-scaling-applications">WaveMaker's approach for Scaling Applications<a href="#wavemakers-approach-for-scaling-applications" class="hash-link" aria-label="Direct link to WaveMaker's approach for Scaling Applications" title="Direct link to WaveMaker's approach for Scaling Applications">​</a></h2><p>Although horizontal scaling is the desirable approach for scaling an application, there are still a few challenges that need to be addressed. Let's understand that first.</p><h3 class="anchor anchorWithStickyNavbar_LWe7" id="how-data-partition-can-be-a-challenge-in-horizontal-scaling">How data partition can be a challenge in Horizontal scaling<a href="#how-data-partition-can-be-a-challenge-in-horizontal-scaling" class="hash-link" aria-label="Direct link to How data partition can be a challenge in Horizontal scaling" title="Direct link to How data partition can be a challenge in Horizontal scaling">​</a></h3><p>The following image shows a deployment architecture of Horizontal scaling.</p><p><img loading="lazy" alt="Horizontal Scaling Deployment Architecture" src="/learn/assets/images/horizontal-scaling-e7c4017b077a0733e3a19efece5371cc.png" width="1072" height="390" class="img_ev3q"></p><p>With Horizontal scaling, the data gets distributed among the nodes, and each node contains only a part of the data. Therefore, the user-session created by a node cannot be understood by the other node. In this case, when the user logins again, it rejects the request if the request goes to another node.</p><p>WaveMaker generates open standards code based on Spring for the back end. So, for Horizontal scaling, <a href="https://spring.io/projects/spring-session" target="_blank" rel="noopener noreferrer">Spring Session Module</a> implementation can be used, configured to handle session management for the application.</p><h3 class="anchor anchorWithStickyNavbar_LWe7" id="integrating-spring-session-with-wavemaker">Integrating Spring Session with WaveMaker<a href="#integrating-spring-session-with-wavemaker" class="hash-link" aria-label="Direct link to Integrating Spring Session with WaveMaker" title="Direct link to Integrating Spring Session with WaveMaker">​</a></h3><p>Spring Session manages user's http session information while supporting clustered sessions without being tied to an application container specific solution.</p><p>In the following illustration, see how WaveMaker applications scale horizontally; specifically, storing user authenticated sessions when the requests are served by different nodes using the round-robin mechanism and without using any sticky sessions.</p><h4 class="anchor anchorWithStickyNavbar_LWe7" id="distributed-persistence-of-user-authentication-session-architecture">Distributed Persistence of User Authentication Session Architecture<a href="#distributed-persistence-of-user-authentication-session-architecture" class="hash-link" aria-label="Direct link to Distributed Persistence of User Authentication Session Architecture" title="Direct link to Distributed Persistence of User Authentication Session Architecture">​</a></h4><p><img loading="lazy" alt="Distributed Persistence of User Authentication Session" src="/learn/assets/images/session-persistence-7179081128c4f45a8a9cb439a5193189.png" width="1144" height="548" class="img_ev3q"></p><p>For this approach, WaveMaker uses <code>spring-session-core</code> as a runtime dependency. It distributes the persistence of the user authentication session. With a distributed session registry, the user session created by a node can be understood by the other nodes by persisting the user sessions in a distributed manner.</p><h3 class="anchor anchorWithStickyNavbar_LWe7" id="spring-session-based-on-external-store">Spring-session based on External Store<a href="#spring-session-based-on-external-store" class="hash-link" aria-label="Direct link to Spring-session based on External Store" title="Direct link to Spring-session based on External Store">​</a></h3><p>There are two ways for configuring external session stores depending on your requirements by choosing from Redis and JDBC. To configure with Redis as an external store, WaveMaker adds <code>spring-session-data-redis</code> along with <code>lettuce-core</code> dependency. Similarly, for JDBC, we add a <code>spring-session-jdbc</code> dependency. WaveMaker internally adds these dependencies to scale applications and handle session management for the application.</p><p>With <a href="/learn/wavemaker-release-notes/v10-6-0">release 10.6</a>, all the WaveMaker applications provide an option to opt for Horizontal scaling by choosing from Redis, JDBC, along with <code>MapSessionRepository</code> as a Distributed Session Registry.</p><p><img loading="lazy" alt="Session Persistence with Horizontal Scaling" src="/learn/assets/images/session-persistence-horizontal-scaling-de44abdd413414fd702d94467e8ec789.png" width="1414" height="846" class="img_ev3q"></p><p><code>MapSessionRepository</code> is an <a href="/learn/app-development/app-security/session-persistence#in-memory">In-memory</a> type that does not scale the application horizontally, and it is the default settings when you create a WaveMaker application. To enable Horizontal scaling, simply select an option from the dropdown, and follow the on-screen instructions. To learn how to use this feature, see <a href="/learn/app-development/app-security/session-persistence#in-memory">Horizontal Scaling using Session Persistence</a>.</p>]]></content>
        <author>
            <name>Swetha Kundaram</name>
        </author>
    </entry>
    <entry>
        <title type="html"><![CDATA[Automatically Import your Website Branding Styles into a Theme]]></title>
        <id>https://www.wavemaker.com/learn/blog/2020/12/18/generate-color-palette-from-url</id>
        <link href="https://www.wavemaker.com/learn/blog/2020/12/18/generate-color-palette-from-url"/>
        <updated>2020-12-18T00:00:00.000Z</updated>
        <summary type="html"><![CDATA[Theme Builder app has introduced a new feature for recognizing a website color palette by inserting the website URL. With this, you can discover the colors used in a website and use them to build a theme. It will essentially make the theme-building process much easier by allowing you to choose the discovered colors, fonts, and more from an existing website. Furthermore, you can preview and design WaveMaker components by assigning colors, and download the theme when ready. For more information about creating a theme without any coding, see Creating a Theme using Theme Builder.]]></summary>
        <content type="html"><![CDATA[<p><a href="https://apps.wavemakeronline.com/Theme_Builder/#/Dashboard" target="_blank" rel="noopener noreferrer">Theme Builder</a> app has introduced a new feature for recognizing a website color palette by inserting the website URL. With this, you can discover the colors used in a website and use them to build a theme. It will essentially make the theme-building process much easier by allowing you to choose the discovered colors, fonts, and more from an existing website. Furthermore, you can preview and design WaveMaker components by assigning colors, and download the theme when ready. For more information about creating a theme without any coding, see <a href="/learn/app-development/ui-design/theme-builder">Creating a Theme using Theme Builder</a>.</p><p>With WaveMaker 10.6 release, we have fixed a few bugs. <a href="/learn/wavemaker-release-notes/v10-6-0">Know more details here</a>.</p><h2 class="anchor anchorWithStickyNavbar_LWe7" id="input-url">Input URL<a href="#input-url" class="hash-link" aria-label="Direct link to Input URL" title="Direct link to Input URL">​</a></h2><p><strong><em>New feature Step-2 unlocked for Generating Theme Colors</em></strong></p><p>Introduced a new flow to identify the colors of a website using the <strong>Input URL</strong> option. Follow the steps below to use this feature.</p><ol><li>Go to the Dashboard page of the <a href="https://apps.wavemakeronline.com/Theme_Builder/#/Dashboard" target="_blank" rel="noopener noreferrer">Theme builder</a> app.</li><li>Click <strong>*Input URL</strong> and generate*.</li></ol><p><img loading="lazy" alt="theme builder dashboard tile2" src="/learn/assets/images/theme-builder-dashboard-tile2-7812f39f3ac17497af6fa85dd525a50e.png" width="1280" height="639" class="img_ev3q"></p><ol start="3"><li>Enter a website URL. For example, <code>https://www.google.com/</code>, and click <strong>Search URL</strong> to generate the color palette of the website.</li></ol><p><img loading="lazy" alt="theme builder import theme" src="/learn/assets/images/theme-builder-import-theme-47604357fd1fc31636954e3cd1b8aed5.png" width="1280" height="637" class="img_ev3q"></p><ol start="4"><li>A prompting message displays on the <strong>Editor</strong> page with the generated colors with a maximum of six colors that are highlighted. However, the preview application continues to use the default colors of the existing Material theme.</li></ol><p><img loading="lazy" alt="theme builder color list" src="/learn/assets/images/theme-builder-dynamic-color-list-c60a68b9e77fe514270b5229e5cb2ac5.png" width="1279" height="637" class="img_ev3q"></p><ol start="5"><li>You can design WaveMaker components with the new colors and preview them right away.</li></ol><div class="theme-admonition theme-admonition-note alert alert--secondary admonition_WoCw"><div class="admonitionHeading_TMsN"><span class="admonitionIcon_Ibzs"><svg viewBox="0 0 14 16"><path fill-rule="evenodd" d="M6.3 5.69a.942.942 0 0 1-.28-.7c0-.28.09-.52.28-.7.19-.18.42-.28.7-.28.28 0 .52.09.7.28.18.19.28.42.28.7 0 .28-.09.52-.28.7a1 1 0 0 1-.7.3c-.28 0-.52-.11-.7-.3zM8 7.99c-.02-.25-.11-.48-.31-.69-.2-.19-.42-.3-.69-.31H6c-.27.02-.48.13-.69.31-.2.2-.3.44-.31.69h1v3c.02.27.11.5.31.69.2.2.42.31.69.31h1c.27 0 .48-.11.69-.31.2-.19.3-.42.31-.69H8V7.98v.01zM7 2.3c-3.14 0-5.7 2.54-5.7 5.68 0 3.14 2.56 5.7 5.7 5.7s5.7-2.55 5.7-5.7c0-3.15-2.56-5.69-5.7-5.69v.01zM7 .98c3.86 0 7 3.14 7 7s-3.14 7-7 7-7-3.12-7-7 3.14-7 7-7z"></path></svg></span>note</div><div class="admonitionContent_vXIg"><p>The generated colors are available for all the input fields. Choose the colors from the dropdown as per your branding needs.</p></div></div><ol start="6"><li>When ready, download the theme.</li></ol><div class="theme-admonition theme-admonition-note alert alert--secondary admonition_WoCw"><div class="admonitionHeading_TMsN"><span class="admonitionIcon_Ibzs"><svg viewBox="0 0 14 16"><path fill-rule="evenodd" d="M6.3 5.69a.942.942 0 0 1-.28-.7c0-.28.09-.52.28-.7.19-.18.42-.28.7-.28.28 0 .52.09.7.28.18.19.28.42.28.7 0 .28-.09.52-.28.7a1 1 0 0 1-.7.3c-.28 0-.52-.11-.7-.3zM8 7.99c-.02-.25-.11-.48-.31-.69-.2-.19-.42-.3-.69-.31H6c-.27.02-.48.13-.69.31-.2.2-.3.44-.31.69h1v3c.02.27.11.5.31.69.2.2.42.31.69.31h1c.27 0 .48-.11.69-.31.2-.19.3-.42.31-.69H8V7.98v.01zM7 2.3c-3.14 0-5.7 2.54-5.7 5.68 0 3.14 2.56 5.7 5.7 5.7s5.7-2.55 5.7-5.7c0-3.15-2.56-5.69-5.7-5.69v.01zM7 .98c3.86 0 7 3.14 7 7s-3.14 7-7 7-7-3.12-7-7 3.14-7 7-7z"></path></svg></span>note</div><div class="admonitionContent_vXIg"><p>For information on how to import a theme, see <a href="/learn/app-development/ui-design/themes#import-theme">Importing Theme</a>.</p></div></div><h2 class="anchor anchorWithStickyNavbar_LWe7" id="bug-fixes">Bug Fixes<a href="#bug-fixes" class="hash-link" aria-label="Direct link to Bug Fixes" title="Direct link to Bug Fixes">​</a></h2><ol><li>The list widget data is now replaced with the real data in the preview application.</li><li>A new page template called <code>Dashboard1</code> is newly included for the preview application. You can navigate it from the left navbar.</li><li>Added <strong>Panel Secondary</strong> to the preview application to check the color changes for the secondary theme color.</li><li>Fixed issue related to gradient background that was not consistent for widgets when previewing the application switching to gradient theme for UI elements, including Nav, List, Panel backgrounds, Checkboxes, and Radio buttons.</li><li>Changed the default option for the <strong>Spacing</strong> property in <strong>General Settings</strong> from <code>default</code> to <code>comfortable</code> to match the default Material-2.0 theme.</li><li>Fixed issue related to Border radius panels that were not consistent when changing from none, less, and more.</li><li>Fixed the list item active state that did not match the color selected for the gradient theme in the left navigation.</li><li>Fixed the state colors that did not reflect the tiles widget.</li></ol><p>That's all for now. See you soon with more updates.</p>]]></content>
        <author>
            <name>Lovin Ahmed</name>
        </author>
    </entry>
    <entry>
        <title type="html"><![CDATA[Certificate Pinning Case Study]]></title>
        <id>https://www.wavemaker.com/learn/blog/2020/12/15/certificate-pinning</id>
        <link href="https://www.wavemaker.com/learn/blog/2020/12/15/certificate-pinning"/>
        <updated>2020-12-15T00:00:00.000Z</updated>
        <summary type="html"><![CDATA[A case study on Certificate Pinning.]]></summary>
        <content type="html"><![CDATA[<p>A case study on Certificate Pinning.</p><h3 class="anchor anchorWithStickyNavbar_LWe7" id="introduction">Introduction<a href="#introduction" class="hash-link" aria-label="Direct link to Introduction" title="Direct link to Introduction">​</a></h3><p>In HTTPS handshake, the server responds with a public certificate issued by Certificate Authority (CA) to establish a connection. If CA, or Root certificate was compromised and issues a certificate without the domain owner's consent, the client may face the Man-in-the-middle (MTM) attack. To protect users from this vulnerability, an app can employ SSL pinning.</p><p><img loading="lazy" alt="MITM" src="/learn/assets/images/mitmdiagram-fc881ac5ae362f6d1663c1beb698d160.png" width="960" height="540" class="img_ev3q"></p><p>Certificate Pinning is an additional layer of security that protects communication between client and server. The Standard HTTPS verifies whether the connection is secure but it cannot verify whether you are communicating with the actual server or an intercepted server.</p><h2 class="anchor anchorWithStickyNavbar_LWe7" id="what-certificate-pinning-offers">What Certificate Pinning offers<a href="#what-certificate-pinning-offers" class="hash-link" aria-label="Direct link to What Certificate Pinning offers" title="Direct link to What Certificate Pinning offers">​</a></h2><p>Standard HTTPS establishes a secure connection and checks whether the server certificate was issued by a trusted CA. Certificate Pinning additionally forces the client app to validate the server certificate with a known copy of the certificate.</p><p>The client application contains the pinned certificates which are pre-defined "known" certificates. During the time of communication between the client and server, the client expects the server certificate to match with any one of the pinned certificates. If it does not match, the client will terminate the connection.</p><p><img loading="lazy" alt="Certificate Pinning" src="/learn/assets/images/nomitmdiagram-580fb2df3358b47f66f171f2f507da56.png" width="960" height="540" class="img_ev3q"></p><h3 class="anchor anchorWithStickyNavbar_LWe7" id="web-certificate-pinning">Web Certificate Pinning<a href="#web-certificate-pinning" class="hash-link" aria-label="Direct link to Web Certificate Pinning" title="Direct link to Web Certificate Pinning">​</a></h3><p>Web Certificate Pinning is dynamic pinning. Certificates are pinned during the initial connection establishment. It was <a href="https://developer.mozilla.org/en-US/docs/Web/HTTP/Public_Key_Pinning" target="_blank" rel="noopener noreferrer">introduced</a> in 2015 but was deprecated in 2018 due problems it created than resolving the actual <a href="https://scotthelme.co.uk/using-security-features-to-do-bad-things/" target="_blank" rel="noopener noreferrer">problem</a>.</p><h3 class="anchor anchorWithStickyNavbar_LWe7" id="mobile-certificate-pinning">Mobile Certificate Pinning<a href="#mobile-certificate-pinning" class="hash-link" aria-label="Direct link to Mobile Certificate Pinning" title="Direct link to Mobile Certificate Pinning">​</a></h3><p>Mobile Certificate Pinning is static pinning, in which the certificate is bundled with the app. This means new app has to be installed on the certificate expiry.</p><h2 class="anchor anchorWithStickyNavbar_LWe7" id="advantages-of-certificate-pinning">Advantages of Certificate Pinning<a href="#advantages-of-certificate-pinning" class="hash-link" aria-label="Direct link to Advantages of Certificate Pinning" title="Direct link to Advantages of Certificate Pinning">​</a></h2><ul><li>Certificate Pinning protects data tampering even if the user installs a malicious CA with or without knowing.</li><li>If a trusted certificate authority gets compromised due to security <a href="https://en.wikipedia.org/wiki/Certificate_authority#CA_compromise" target="_blank" rel="noopener noreferrer">vulnerability</a>, the application will not get affected.</li></ul><h2 class="anchor anchorWithStickyNavbar_LWe7" id="problem-associated-with-certificate-pinning">Problem Associated with Certificate Pinning<a href="#problem-associated-with-certificate-pinning" class="hash-link" aria-label="Direct link to Problem Associated with Certificate Pinning" title="Direct link to Problem Associated with Certificate Pinning">​</a></h2><p>A security researcher has <a href="https://scotthelme.co.uk/im-giving-up-on-hpkp/" target="_blank" rel="noopener noreferrer">warned</a> the risk associated with using HTTP Certificate Pinning.</p><ul><li>If the key was accidentally deleted, stolen, hacked, you may face serious application <a href="https://www.smashingmagazine.com/be-afraid-of-public-key-pinning/" target="_blank" rel="noopener noreferrer">downtime issues</a>.</li><li>Domain hijacking - on Domain-hijacking, you can lose control of certificates, and hijackers can mishandle your certificates.</li></ul><div class="theme-admonition theme-admonition-warning alert alert--danger admonition_WoCw"><div class="admonitionHeading_TMsN"><span class="admonitionIcon_Ibzs"><svg viewBox="0 0 12 16"><path fill-rule="evenodd" d="M5.05.31c.81 2.17.41 3.38-.52 4.31C3.55 5.67 1.98 6.45.9 7.98c-1.45 2.05-1.7 6.53 3.53 7.7-2.2-1.16-2.67-4.52-.3-6.61-.61 2.03.53 3.33 1.94 2.86 1.39-.47 2.3.53 2.27 1.67-.02.78-.31 1.44-1.13 1.81 3.42-.59 4.78-3.42 4.78-5.56 0-2.84-2.53-3.22-1.25-5.61-1.52.13-2.03 1.13-1.89 2.75.09 1.08-1.02 1.8-1.86 1.33-.67-.41-.66-1.19-.06-1.78C8.18 5.31 8.68 2.45 5.05.32L5.03.3l.02.01z"></path></svg></span>danger</div><div class="admonitionContent_vXIg"><p>After carefully evaluating, very few sites and apps use Certificate Pinning. The developer should be very careful in evaluating and using this feature. However, at this point, we have not yet implemented support for Certificate Pinning for applications build using WaveMaker.</p></div></div><h2 class="anchor anchorWithStickyNavbar_LWe7" id="what-next">What next?<a href="#what-next" class="hash-link" aria-label="Direct link to What next?" title="Direct link to What next?">​</a></h2><p><a href="http://www.certificate-transparency.org/what-is-ct" target="_blank" rel="noopener noreferrer">Certificate Transparency (CT)</a> was introduced in 2018 after deprecation of Web Certificate Pinning. CT is an open-source framework for monitoring and auditing certificates. This standard creates a public logger that records all the certificates issued by the trusted CA. You can monitor these loggers to detect mistakenly-issued certificates, compromised CAs, and CAs dishonesty.</p><p>CT in <a href="http://www.certificate-transparency.org/certificate-transparency-in-openssl" target="_blank" rel="noopener noreferrer">OpenSSL</a>, whenever a connection is initiated, SSL certificates' timestamp will be used to fetch the certificate from the CT log and compared to establish the connection.</p><h2 class="anchor anchorWithStickyNavbar_LWe7" id="conclusion">Conclusion<a href="#conclusion" class="hash-link" aria-label="Direct link to Conclusion" title="Direct link to Conclusion">​</a></h2><p>Though CT is different from Certificate Pinning, it will effectively replace the Certificate Pinning without compromising the quality of service.</p><p>Have a great idea for what you'd like to see next? Let us know <a href="mailto:info@wavemaker.com" target="_blank" rel="noopener noreferrer">here</a>.</p>]]></content>
        <author>
            <name>Radhakrishnan Asokan</name>
        </author>
    </entry>
    <entry>
        <title type="html"><![CDATA[Cordova 10.0.0 Upgrade ]]></title>
        <id>https://www.wavemaker.com/learn/blog/2020/12/09/cordova-10-0-0-upgrade</id>
        <link href="https://www.wavemaker.com/learn/blog/2020/12/09/cordova-10-0-0-upgrade"/>
        <updated>2020-12-09T00:00:00.000Z</updated>
        <summary type="html"><![CDATA[In 10.6.0 release, WaveMaker platform is upgraded to use cordova@10.0.0 and cordova-ios@6.1.0.]]></summary>
        <content type="html"><![CDATA[<p>In 10.6.0 release, WaveMaker platform is upgraded to use <a href="mailto:cordova@10.0.0" target="_blank" rel="noopener noreferrer">cordova@10.0.0</a> and <a href="mailto:cordova-ios@6.1.0" target="_blank" rel="noopener noreferrer">cordova-ios@6.1.0</a>.</p><p>Following plugins are not required for WaveMaker10.6 platform. During the upgradation process, these plugins are removed from config.xml.</p><p>1) cordova-plugin-file-transfer
2) <a href="/learn/blog/2020/04/20/wavemaker-wkwebview-upgrade">cordova-plugin-local-webserver</a>
3) cordova-plugin-transport-security
4) <a href="/learn/blog/2020/04/20/wavemaker-wkwebview-upgrade">cordova-plugin-wkwebview-engine</a>
5) cordova-plugin-telerik-imagepicker</p><p>With <a href="mailto:cordova-ios@6.1.0" target="_blank" rel="noopener noreferrer">cordova-ios@6.1.0</a> upgradation, WaveMaker supports from iOS-12.0 (and above). <a href="https://cordova.apache.org/docs/en/latest/reference/cordova-plugin-splashscreen/#designing-launch-storyboard-images" target="_blank" rel="noopener noreferrer">As recommended by cordova</a>, WaveMaker supports Launch story boards in iOS. Due to that, minimum number of splash images in iOS got reduced to 8.</p>]]></content>
        <author>
            <name>Srinivasa Rao Boyina</name>
        </author>
    </entry>
    <entry>
        <title type="html"><![CDATA[WaveMaker Releases 10.6 Version]]></title>
        <id>https://www.wavemaker.com/learn/blog/2020/12/08/wavemaker-release-10-6-version</id>
        <link href="https://www.wavemaker.com/learn/blog/2020/12/08/wavemaker-release-10-6-version"/>
        <updated>2020-12-08T00:00:00.000Z</updated>
        <summary type="html"><![CDATA[With WaveMaker 10.6.0 Release on 08 December, 2020, see what’s new, and features that were requested, and reported bugs. To learn about our detailed list of features and fixes, see WaveMaker Release Notes 10.6.0.]]></summary>
        <content type="html"><![CDATA[<p>With WaveMaker 10.6.0 Release on 08 December, 2020, see what’s new, and features that were requested, and reported bugs. To learn about our detailed list of features and fixes, see <a href="/learn/wavemaker-release-notes/v10-6-0">WaveMaker Release Notes 10.6.0</a>.</p><p>Here are some highlights of what's in this release.</p><h2 class="anchor anchorWithStickyNavbar_LWe7" id="whats-new">What's new<a href="#whats-new" class="hash-link" aria-label="Direct link to What's new" title="Direct link to What's new">​</a></h2><ol><li><p><a href="/learn/wavemaker-release-notes/v10-6-0#upgraded-to-angular-9">Upgraded to Angular 9</a></p></li><li><p><a href="/learn/wavemaker-release-notes/v10-6-0#spring-session-persistence">Spring Session Persistence - uses the spring-session-core library for session management</a></p></li><li><p><a href="/learn/wavemaker-release-notes/v10-6-0#page-cache">Page Cache - a new flag called Cache is introduced on the Page tag</a></p></li><li><p><a href="/learn/wavemaker-release-notes/v10-6-0#retain-state-for-widgets">Retain State for Widgets - to efficiently save and restore UI state</a></p></li><li><p><a href="/learn/wavemaker-release-notes/v10-6-0#command-line-for-building-cordova-zip">Command-Line for Building Cordova Zip - generate Cordova Zip outside WaveMaker Studio</a></p></li><li><p><a href="/learn/wavemaker-release-notes/v10-6-0#alternative-to-phonegap">Alternative to PhoneGap -  WM-Cordova-CLI</a></p></li><li><p><a href="/learn/wavemaker-release-notes/v10-6-0#appchef">AppChef App for generating APK and IPA</a></p></li><li><p><a href="/learn/wavemaker-release-notes/v10-6-0#npm-registry">Public npm Registry</a></p></li><li><p><a href="/learn/wavemaker-release-notes/v10-6-0#maven-repositories">Central Maven Repositories</a></p></li><li><p><a href="/learn/wavemaker-release-notes/v10-6-0#up-to-date-libraries">Up-to-date Libraries</a></p></li><li><p><a href="/learn/wavemaker-release-notes/v10-6-0#docker-upgrade">Docker Upgrade</a></p></li></ol><h3 class="anchor anchorWithStickyNavbar_LWe7" id="bug-fixes">Bug Fixes<a href="#bug-fixes" class="hash-link" aria-label="Direct link to Bug Fixes" title="Direct link to Bug Fixes">​</a></h3><p>Some of the critical bugs have been fixed in the release. See the list of <a href="/learn/wavemaker-release-notes/v10-6-0/#bug-fixes">bug fixes of WaveMaker 10.6</a>.</p><p>As a modern development team, we are adapting to the latest technology trends. If there is anything you feel WaveMaker should have, do let us know <a href="mailto:info@wavemaker.com" target="_blank" rel="noopener noreferrer">here</a>.</p><h2 class="anchor anchorWithStickyNavbar_LWe7" id="see-also">See Also<a href="#see-also" class="hash-link" aria-label="Direct link to See Also" title="Direct link to See Also">​</a></h2><p><a href="/learn/wavemaker-release-notes/v10-5-0/">Release Notes 10.5</a><br>
<a href="/learn/wavemaker-release-notes/v10-4-0/">Release Notes 10.4</a></p>]]></content>
        <author>
            <name>Swetha Kundaram</name>
        </author>
    </entry>
    <entry>
        <title type="html"><![CDATA[Retain UI State in WaveMaker Apps]]></title>
        <id>https://www.wavemaker.com/learn/blog/2020/11/09/Retain-UI-State-on-Wavemaker-Apps</id>
        <link href="https://www.wavemaker.com/learn/blog/2020/11/09/Retain-UI-State-on-Wavemaker-Apps"/>
        <updated>2020-11-09T00:00:00.000Z</updated>
        <summary type="html"><![CDATA[A Wavemaker Application typically comprises of many pages, and each page consists of various widgets. When certain actions are performed on the page, it results in changes to the state of the application. Some of the examples are:]]></summary>
        <content type="html"><![CDATA[<p>A Wavemaker Application typically comprises of many pages, and each page consists of various widgets. When certain actions are performed on the page, it results in changes to the state of the application. Some of the examples are:</p><ul><li>Switching between different tab panes in a Tabs widget.</li><li>Switching between different accordion panes in an Accordion widget.</li><li>Selecting items in a List widget and navigating between different pages of the List(pagination).</li><li>Searching, Sorting, Row Selection, and Pagination in a Data Table widget.</li></ul><h2 class="anchor anchorWithStickyNavbar_LWe7" id="problem">Problem<a href="#problem" class="hash-link" aria-label="Direct link to Problem" title="Direct link to Problem">​</a></h2><p>When any of the the above actions are performed in a page and the User navigates to another page, on navigating back to the previous page using Browser back button, the previous state is lost. All widgets of the page go back to their initial states. There should be a way to retain the state such that even when the user refreshes the page or shares the URL with someone else, they land on the page at a particular state.</p><h2 class="anchor anchorWithStickyNavbar_LWe7" id="solution">Solution<a href="#solution" class="hash-link" aria-label="Direct link to Solution" title="Direct link to Solution">​</a></h2><p>Retain State feature is coming to the rescue in Wavemaker 10.6 release! The actions performed above can be retained in the URL, Local Storage or Session Storage. A <strong>Behavior</strong> property called <strong>Retain State</strong> has been exposed for the supported widgets. This gives us the flexibility to be able to choose different State retention mechanisms for different widgets as and when required.</p><p>A sample URL with state information(provided that URL was chosen as Retain state mechanism) is shown below.</p><div class="codeBlockContainer_Ckt0 theme-code-block" style="--prism-color:#bfc7d5;--prism-background-color:#292d3e"><div class="codeBlockContent_biex"><pre tabindex="0" class="prism-code language-text codeBlock_bY9V thin-scrollbar"><code class="codeBlockLines_e6Vv"><span class="token-line" style="color:#bfc7d5"><span class="token plain">https://local-studio.wavemaker.com/run-jm4351st8w/StatePersistenceApp_master/#/Main?wm_state=('ws'~('RepsTable1'~('search'~!('field'~'city'_'value'~'New'_'matchMode'~'anywhereignorecase'_'type'~'string')*_'sort'~('direction'~'asc'_'field'~'name'))))</span><br></span></code></pre><div class="buttonGroup__atx"><button type="button" aria-label="Copy code to clipboard" title="Copy" class="clean-btn"><span class="copyButtonIcons_eSgA" aria-hidden="true"><svg viewBox="0 0 24 24" class="copyButtonIcon_y97N"><path fill="currentColor" d="M19,21H8V7H19M19,5H8A2,2 0 0,0 6,7V21A2,2 0 0,0 8,23H19A2,2 0 0,0 21,21V7A2,2 0 0,0 19,5M16,1H4A2,2 0 0,0 2,3V17H4V3H16V1Z"></path></svg><svg viewBox="0 0 24 24" class="copyButtonSuccessIcon_LjdS"><path fill="currentColor" d="M21,7L9,19L3.5,13.5L4.91,12.09L9,16.17L19.59,5.59L21,7Z"></path></svg></span></button></div></div></div><p>A reserved query param called <strong>wm_state</strong> is appended to the URL which contains the state information.</p><h2 class="anchor anchorWithStickyNavbar_LWe7" id="supported-widgets">Supported Widgets<a href="#supported-widgets" class="hash-link" aria-label="Direct link to Supported Widgets" title="Direct link to Supported Widgets">​</a></h2><p>As of 10.6 release, out of the box support has been provided for Tabs, Accordions, Lists and Data Tables. Support for other widgets will be incrementally added in the future releases. However, the below methods have been provided so that Users can retain state for other Widgets/Variables as well.</p><h2 class="anchor anchorWithStickyNavbar_LWe7" id="dsl-api">DSL API<a href="#dsl-api" class="hash-link" aria-label="Direct link to DSL API" title="Direct link to DSL API">​</a></h2><p>The below DSL methods have been exposed to cater to the custom use cases which a User can have.
Mode is an optional parameter which can be passed for Widgets which don't support state retention by default. If no value is passed then mode will be defaulted to 'URL'.</p><ol><li><h3 class="anchor anchorWithStickyNavbar_LWe7" id="setwidgetstatewidget-value-mode">setWidgetState(widget, value, mode?)<a href="#setwidgetstatewidget-value-mode" class="hash-link" aria-label="Direct link to setWidgetState(widget, value, mode?)" title="Direct link to setWidgetState(widget, value, mode?)">​</a></h3>Sets the passed value to the state information by using the passed widget instance.
Example:</li></ol><p>On changing a text box value, we want to add a state param in the url.</p><div class="codeBlockContainer_Ckt0 theme-code-block" style="--prism-color:#bfc7d5;--prism-background-color:#292d3e"><div class="codeBlockContent_biex"><pre tabindex="0" class="prism-code language-text codeBlock_bY9V thin-scrollbar"><code class="codeBlockLines_e6Vv"><span class="token-line" style="color:#bfc7d5"><span class="token plain">Page.text1Change = function($event, widget, newVal, oldVal) {</span><br></span><span class="token-line" style="color:#bfc7d5"><span class="token plain">    var stateService = App.getDependency('StatePersistenceService');</span><br></span><span class="token-line" style="color:#bfc7d5"><span class="token plain">    stateService.setWidgetState(Page.Widgets.text1, {</span><br></span><span class="token-line" style="color:#bfc7d5"><span class="token plain">        textValue: newVal</span><br></span><span class="token-line" style="color:#bfc7d5"><span class="token plain">    });</span><br></span><span class="token-line" style="color:#bfc7d5"><span class="token plain">};</span><br></span></code></pre><div class="buttonGroup__atx"><button type="button" aria-label="Copy code to clipboard" title="Copy" class="clean-btn"><span class="copyButtonIcons_eSgA" aria-hidden="true"><svg viewBox="0 0 24 24" class="copyButtonIcon_y97N"><path fill="currentColor" d="M19,21H8V7H19M19,5H8A2,2 0 0,0 6,7V21A2,2 0 0,0 8,23H19A2,2 0 0,0 21,21V7A2,2 0 0,0 19,5M16,1H4A2,2 0 0,0 2,3V17H4V3H16V1Z"></path></svg><svg viewBox="0 0 24 24" class="copyButtonSuccessIcon_LjdS"><path fill="currentColor" d="M21,7L9,19L3.5,13.5L4.91,12.09L9,16.17L19.59,5.59L21,7Z"></path></svg></span></button></div></div></div><ol start="2"><li><h3 class="anchor anchorWithStickyNavbar_LWe7" id="getwidgetstatewidget-mode">getWidgetState(widget, mode?)<a href="#getwidgetstatewidget-mode" class="hash-link" aria-label="Direct link to getWidgetState(widget, mode?)" title="Direct link to getWidgetState(widget, mode?)">​</a></h3>Will return the value set against the passed widget. This will be called on page load (typically in onPageReady). Based on the value returned, operations can be performed.</li></ol><p>Example:</p><div class="codeBlockContainer_Ckt0 theme-code-block" style="--prism-color:#bfc7d5;--prism-background-color:#292d3e"><div class="codeBlockContent_biex"><pre tabindex="0" class="prism-code language-text codeBlock_bY9V thin-scrollbar"><code class="codeBlockLines_e6Vv"><span class="token-line" style="color:#bfc7d5"><span class="token plain">Page.onReady = function() {</span><br></span><span class="token-line" style="color:#bfc7d5"><span class="token plain">    var stateService = App.getDependency('StatePersistenceService');</span><br></span><span class="token-line" style="color:#bfc7d5"><span class="token plain">    var widgetState = stateService.getWidgetState(Page.Widgets.text1);</span><br></span><span class="token-line" style="color:#bfc7d5"><span class="token plain">    if (widgetState &amp;&amp; widgetState.textValue) {</span><br></span><span class="token-line" style="color:#bfc7d5"><span class="token plain">        Page.Widgets.text1.datavalue = widgetState.textValue;</span><br></span><span class="token-line" style="color:#bfc7d5"><span class="token plain">    }</span><br></span><span class="token-line" style="color:#bfc7d5"><span class="token plain">};</span><br></span></code></pre><div class="buttonGroup__atx"><button type="button" aria-label="Copy code to clipboard" title="Copy" class="clean-btn"><span class="copyButtonIcons_eSgA" aria-hidden="true"><svg viewBox="0 0 24 24" class="copyButtonIcon_y97N"><path fill="currentColor" d="M19,21H8V7H19M19,5H8A2,2 0 0,0 6,7V21A2,2 0 0,0 8,23H19A2,2 0 0,0 21,21V7A2,2 0 0,0 19,5M16,1H4A2,2 0 0,0 2,3V17H4V3H16V1Z"></path></svg><svg viewBox="0 0 24 24" class="copyButtonSuccessIcon_LjdS"><path fill="currentColor" d="M21,7L9,19L3.5,13.5L4.91,12.09L9,16.17L19.59,5.59L21,7Z"></path></svg></span></button></div></div></div><ol start="3"><li><h3 class="anchor anchorWithStickyNavbar_LWe7" id="removewidgetstatewidget-key-mode">removeWidgetState(widget, key?, mode?)<a href="#removewidgetstatewidget-key-mode" class="hash-link" aria-label="Direct link to removeWidgetState(widget, key?, mode?)" title="Direct link to removeWidgetState(widget, key?, mode?)">​</a></h3>Removes the passed widget’s state information from the State Object. If a key is passed, then only that particular entry will be removed, not any other entries for that widget.</li></ol><p>Example:</p><div class="codeBlockContainer_Ckt0 theme-code-block" style="--prism-color:#bfc7d5;--prism-background-color:#292d3e"><div class="codeBlockContent_biex"><pre tabindex="0" class="prism-code language-text codeBlock_bY9V thin-scrollbar"><code class="codeBlockLines_e6Vv"><span class="token-line" style="color:#bfc7d5"><span class="token plain">//Initial State: widget_state = {“TextBox1”: {“textValue”: “Hi”, “numberOfKeypresses”: “5” }};</span><br></span><span class="token-line" style="color:#bfc7d5"><span class="token plain">stateService.removeWidgetState(Page.Widgets.text1);</span><br></span><span class="token-line" style="color:#bfc7d5"><span class="token plain">//Updated State: widget_state = {};</span><br></span></code></pre><div class="buttonGroup__atx"><button type="button" aria-label="Copy code to clipboard" title="Copy" class="clean-btn"><span class="copyButtonIcons_eSgA" aria-hidden="true"><svg viewBox="0 0 24 24" class="copyButtonIcon_y97N"><path fill="currentColor" d="M19,21H8V7H19M19,5H8A2,2 0 0,0 6,7V21A2,2 0 0,0 8,23H19A2,2 0 0,0 21,21V7A2,2 0 0,0 19,5M16,1H4A2,2 0 0,0 2,3V17H4V3H16V1Z"></path></svg><svg viewBox="0 0 24 24" class="copyButtonSuccessIcon_LjdS"><path fill="currentColor" d="M21,7L9,19L3.5,13.5L4.91,12.09L9,16.17L19.59,5.59L21,7Z"></path></svg></span></button></div></div></div><ol start="4"><li><h3 class="anchor anchorWithStickyNavbar_LWe7" id="setstatevariablevariablename-value-mode">setStateVariable(variableName, value, mode?)<a href="#setstatevariablevariablename-value-mode" class="hash-link" aria-label="Direct link to setStateVariable(variableName, value, mode?)" title="Direct link to setStateVariable(variableName, value, mode?)">​</a></h3>Sets the passed value to the state information by using the passed variable name as key.</li></ol><p>Example:</p><div class="codeBlockContainer_Ckt0 theme-code-block" style="--prism-color:#bfc7d5;--prism-background-color:#292d3e"><div class="codeBlockContent_biex"><pre tabindex="0" class="prism-code language-text codeBlock_bY9V thin-scrollbar"><code class="codeBlockLines_e6Vv"><span class="token-line" style="color:#bfc7d5"><span class="token plain">stateService.setStateVariable('Variable1', {</span><br></span><span class="token-line" style="color:#bfc7d5"><span class="token plain">    numberOfTimesInvoked': 2</span><br></span><span class="token-line" style="color:#bfc7d5"><span class="token plain">});</span><br></span></code></pre><div class="buttonGroup__atx"><button type="button" aria-label="Copy code to clipboard" title="Copy" class="clean-btn"><span class="copyButtonIcons_eSgA" aria-hidden="true"><svg viewBox="0 0 24 24" class="copyButtonIcon_y97N"><path fill="currentColor" d="M19,21H8V7H19M19,5H8A2,2 0 0,0 6,7V21A2,2 0 0,0 8,23H19A2,2 0 0,0 21,21V7A2,2 0 0,0 19,5M16,1H4A2,2 0 0,0 2,3V17H4V3H16V1Z"></path></svg><svg viewBox="0 0 24 24" class="copyButtonSuccessIcon_LjdS"><path fill="currentColor" d="M21,7L9,19L3.5,13.5L4.91,12.09L9,16.17L19.59,5.59L21,7Z"></path></svg></span></button></div></div></div><ol start="5"><li><h3 class="anchor anchorWithStickyNavbar_LWe7" id="getstatevariablevariablename-mode">getStateVariable(variableName, mode?)<a href="#getstatevariablevariablename-mode" class="hash-link" aria-label="Direct link to getStateVariable(variableName, mode?)" title="Direct link to getStateVariable(variableName, mode?)">​</a></h3>Checks if the passed variable name has any state information available in the url or not.</li></ol><p>Example:</p><div class="codeBlockContainer_Ckt0 theme-code-block" style="--prism-color:#bfc7d5;--prism-background-color:#292d3e"><div class="codeBlockContent_biex"><pre tabindex="0" class="prism-code language-text codeBlock_bY9V thin-scrollbar"><code class="codeBlockLines_e6Vv"><span class="token-line" style="color:#bfc7d5"><span class="token plain">stateService.getStateVariable('Variable1');</span><br></span></code></pre><div class="buttonGroup__atx"><button type="button" aria-label="Copy code to clipboard" title="Copy" class="clean-btn"><span class="copyButtonIcons_eSgA" aria-hidden="true"><svg viewBox="0 0 24 24" class="copyButtonIcon_y97N"><path fill="currentColor" d="M19,21H8V7H19M19,5H8A2,2 0 0,0 6,7V21A2,2 0 0,0 8,23H19A2,2 0 0,0 21,21V7A2,2 0 0,0 19,5M16,1H4A2,2 0 0,0 2,3V17H4V3H16V1Z"></path></svg><svg viewBox="0 0 24 24" class="copyButtonSuccessIcon_LjdS"><path fill="currentColor" d="M21,7L9,19L3.5,13.5L4.91,12.09L9,16.17L19.59,5.59L21,7Z"></path></svg></span></button></div></div></div><ol start="6"><li><h3 class="anchor anchorWithStickyNavbar_LWe7" id="removestatevariablevariablename-mode">removeStateVariable(variableName, mode?)<a href="#removestatevariablevariablename-mode" class="hash-link" aria-label="Direct link to removeStateVariable(variableName, mode?)" title="Direct link to removeStateVariable(variableName, mode?)">​</a></h3>Removes the passed variable’s state information from the URL.</li></ol><p>Example:</p><div class="codeBlockContainer_Ckt0 theme-code-block" style="--prism-color:#bfc7d5;--prism-background-color:#292d3e"><div class="codeBlockContent_biex"><pre tabindex="0" class="prism-code language-text codeBlock_bY9V thin-scrollbar"><code class="codeBlockLines_e6Vv"><span class="token-line" style="color:#bfc7d5"><span class="token plain">//Initial State: variable_state = {“Variable1”: {“textValue”: “Hi”, “numberOfKeypresses”: “5” }};</span><br></span><span class="token-line" style="color:#bfc7d5"><span class="token plain">stateService.removeStateVariable(“Variable1”);</span><br></span><span class="token-line" style="color:#bfc7d5"><span class="token plain">//Updated State: widget_state = {};</span><br></span></code></pre><div class="buttonGroup__atx"><button type="button" aria-label="Copy code to clipboard" title="Copy" class="clean-btn"><span class="copyButtonIcons_eSgA" aria-hidden="true"><svg viewBox="0 0 24 24" class="copyButtonIcon_y97N"><path fill="currentColor" d="M19,21H8V7H19M19,5H8A2,2 0 0,0 6,7V21A2,2 0 0,0 8,23H19A2,2 0 0,0 21,21V7A2,2 0 0,0 19,5M16,1H4A2,2 0 0,0 2,3V17H4V3H16V1Z"></path></svg><svg viewBox="0 0 24 24" class="copyButtonSuccessIcon_LjdS"><path fill="currentColor" d="M21,7L9,19L3.5,13.5L4.91,12.09L9,16.17L19.59,5.59L21,7Z"></path></svg></span></button></div></div></div>]]></content>
        <author>
            <name>Nikhilesh K V</name>
        </author>
    </entry>
    <entry>
        <title type="html"><![CDATA[Theme builder is ready with a new update]]></title>
        <id>https://www.wavemaker.com/learn/blog/2020/07/03/Another-update-to-theme-builder</id>
        <link href="https://www.wavemaker.com/learn/blog/2020/07/03/Another-update-to-theme-builder"/>
        <updated>2020-07-03T00:00:00.000Z</updated>
        <summary type="html"><![CDATA[Here is another update on the Theme builder app. After the first release of theme builder, we thought of adding few more features and enhancements to enable our users to create great themes to get their web, mobile applications looking well finished.]]></summary>
        <content type="html"><![CDATA[<p>Here is another update on the <a href="https://apps.wavemakeronline.com/Theme_Builder/#/Dashboard" target="_blank" rel="noopener noreferrer">Theme builder</a> app. After the <a href="/learn/blog/2020/06/01/build-themes-without-any-coding">first release</a> of theme builder, we thought of adding few more features and enhancements to enable our users to create great themes to get their web, mobile applications looking well finished.  </p><h2 class="anchor anchorWithStickyNavbar_LWe7" id="new-features">New Features<a href="#new-features" class="hash-link" aria-label="Direct link to New Features" title="Direct link to New Features">​</a></h2><h3 class="anchor anchorWithStickyNavbar_LWe7" id="adding-new-fonts">Adding new fonts<a href="#adding-new-fonts" class="hash-link" aria-label="Direct link to Adding new fonts" title="Direct link to Adding new fonts">​</a></h3><p>Our new additions to the list of font-family will allow the users to select from trendy fonts for their application.</p><p><img loading="lazy" alt="theme builder font list" src="/learn/assets/images/theme-builder-font-list-26497fd665cdb0194a0bcbd530f0205a.png" width="359" height="511" class="img_ev3q"></p><h3 class="anchor anchorWithStickyNavbar_LWe7" id="modified-the-preview-app">Modified the preview app<a href="#modified-the-preview-app" class="hash-link" aria-label="Direct link to Modified the preview app" title="Direct link to Modified the preview app">​</a></h3><ul><li>Added a new layout for the Dashboard page. On change of the state colors (primary, info, warning, danger) the same will reflect for the icons used to show the overview details (tile blocks)</li></ul><p><img loading="lazy" alt="theme builder dashboard" src="/learn/assets/images/theme-builder-dashboard-page-dc915e93b96a385952d69fdd057e056c.png" width="300" height="200" class="img_ev3q">,  <img loading="lazy" alt="theme builder leftnav" src="/learn/assets/images/theme-builder-left-navigation-5bc3ea12d8f9265edef1c89c64014bb8.png" width="300" height="200" class="img_ev3q"></p><ul><li>Components like Headings, Labels, and notification alerts can be viewed in the "Others" link of the left navigation. Labels can be either with background color or only text color change as per the class selected.</li></ul><p><img loading="lazy" alt="theme builder headings" src="/learn/assets/images/theme-builder-headings-c027bd2fda52becfaef66f4c7d55ac47.png" width="437" height="301" class="img_ev3q"></p><ul><li>Modified the user profile menu</li></ul><p><img loading="lazy" alt="theme builder popover menu" src="/learn/assets/images/theme-builder-popover-menu-fb6ca410559c07fceaf3fb464020dd9a.png" width="437" height="299" class="img_ev3q"></p><ul><li>Added new components to the preview application for the users to get a better idea while creating their theme. These elements can give a brief idea of how the theme will look like. Hence added Buttons, Dropdown, Panels, Panel subheadings, Tree, Badges, Nav list, Breadcrumb, Accordions, and Top navigation list.</li></ul><p><img loading="lazy" alt="theme builder buttons and dropdowns" src="/learn/assets/images/theme-builder-buttons-1abb40909a19df3effa86e2c3965828a.png" width="300" height="205" class="img_ev3q">
<img loading="lazy" alt="theme builder nav list" src="/learn/assets/images/theme-builder-navlist-30f8f3a0589f15fd3b2da2d5b7b2ef4b.png" width="300" height="206" class="img_ev3q">
<img loading="lazy" alt="theme builder panels" src="/learn/assets/images/theme-builder-panels-33bae8b67a89fc33863096a94a8122b5.png" width="300" height="207" class="img_ev3q">
<img loading="lazy" alt="theme builder accordions " src="/learn/assets/images/theme-builder-accordions-9ce1bd2a1865ed5f18e71198ad7791a3.png" width="300" height="207" class="img_ev3q">
<img loading="lazy" alt="theme builder topnav and subheadings" src="/learn/assets/images/theme-builder-topnav-d279887fa500cf8502dbb12aaa372d6a.png" width="300" height="160" class="img_ev3q"></p><h3 class="anchor anchorWithStickyNavbar_LWe7" id="feedback-dialog">Feedback dialog<a href="#feedback-dialog" class="hash-link" aria-label="Direct link to Feedback dialog" title="Direct link to Feedback dialog">​</a></h3><p>Introduced the new feedback dialog for users to share their experience using the app. We will be looking at the feedback received to carve next set of updates to the app.</p><p><img loading="lazy" alt="theme preview" src="/learn/assets/images/theme-builder-feedback-8208b0e2c022fcb2f3b6f6d17703d5a7.png" width="717" height="332" class="img_ev3q"></p><h3 class="anchor anchorWithStickyNavbar_LWe7" id="google-analytics">Google analytics<a href="#google-analytics" class="hash-link" aria-label="Direct link to Google analytics" title="Direct link to Google analytics">​</a></h3><p>Integrated google analytics to track and report the traffic visit to the theme builder site.</p><h2 class="anchor anchorWithStickyNavbar_LWe7" id="bug-fixes">Bug Fixes<a href="#bug-fixes" class="hash-link" aria-label="Direct link to Bug Fixes" title="Direct link to Bug Fixes">​</a></h2><ol><li>Alignment issues when layout selection includes a right nav on the page. This works fine now</li><li>Redirection changes from #main to #Dashboard page to support google analytics. Working now</li><li>Fixes to support the instant changes of the color and theme style of newly added components in the preview application. Works now</li><li>On change of the primary color to a darker shade like #333, the hover/selected state of data table rows was effected. This is fixed now and the hover state will always apply a lighter shade of the primary color selected. </li><li>Font selection for heading tags (h3 to h6) was not working. This is fixed now.</li></ol><p>See you again with more updates.</p>]]></content>
        <author>
            <name>Lovin Ahmed</name>
        </author>
    </entry>
    <entry>
        <title type="html"><![CDATA[PostgREST OpenAPI support in WaveMaker]]></title>
        <id>https://www.wavemaker.com/learn/blog/2020/07/01/wavemaker-openapi-postgrest-support</id>
        <link href="https://www.wavemaker.com/learn/blog/2020/07/01/wavemaker-openapi-postgrest-support"/>
        <updated>2020-07-01T00:00:00.000Z</updated>
        <summary type="html"><![CDATA[WaveMaker has added support for importing API that are documented using OpenAPIs, Swagger specification in 10.4. However building a robust OpenAPI support is very important as different API while using OpenAPI/Swagger document their endpoints in subtly different ways. We tried importing OpenAPI documents from different API sources. One such example is when we tested an OpenAPI document generated through PostgREST. In this blog we'll discuss what changes we have made in 10.5 in order to support OpenAPI documents generated from such sources.]]></summary>
        <content type="html"><![CDATA[<p>WaveMaker has added support for importing API that are documented using <a href="/learn/blog/2020/04/21/wavemaker-openapi-import">OpenAPIs, Swagger</a> specification in 10.4. However building a <a href="https://en.wikipedia.org/wiki/Robustness_principle" target="_blank" rel="noopener noreferrer">robust</a> OpenAPI support is very important as different API while using OpenAPI/Swagger document their endpoints in subtly different ways. We tried importing OpenAPI documents from different API sources. One such example is when we tested an OpenAPI document generated through <a href="http://postgrest.org/en/v7.0.0/" target="_blank" rel="noopener noreferrer">PostgREST</a>. In this blog we'll discuss what changes we have made in 10.5 in order to support OpenAPI documents generated from such sources.</p><p><img loading="lazy" alt="OpenApi" src="/learn/assets/images/postGRESTlogo-66cf9f1594e54425ee712b9127356657.png" width="1500" height="500" class="img_ev3q"></p><h2 class="anchor anchorWithStickyNavbar_LWe7" id="introduction-to-postgrest">Introduction to PostgREST<a href="#introduction-to-postgrest" class="hash-link" aria-label="Direct link to Introduction to PostgREST" title="Direct link to Introduction to PostgREST">​</a></h2><p>PostgREST is a standalone web server that turns your PostgreSQL database directly into a RESTful API. The structural constraints and permissions in the database determine the API endpoints and operations.</p><h2 class="anchor anchorWithStickyNavbar_LWe7" id="structure-of-postgrest-generated-openapi-documents">Structure of PostgREST generated OpenAPI Documents<a href="#structure-of-postgrest-generated-openapi-documents" class="hash-link" aria-label="Direct link to Structure of PostgREST generated OpenAPI Documents" title="Direct link to Structure of PostgREST generated OpenAPI Documents">​</a></h2><p>Generally, the structure of an OpenAPI document generated out of a Spring/Node etc app looks like this.</p><div class="codeBlockContainer_Ckt0 theme-code-block" style="--prism-color:#bfc7d5;--prism-background-color:#292d3e"><div class="codeBlockContent_biex"><pre tabindex="0" class="prism-code language-text codeBlock_bY9V thin-scrollbar"><code class="codeBlockLines_e6Vv"><span class="token-line" style="color:#bfc7d5"><span class="token plain">   {</span><br></span><span class="token-line" style="color:#bfc7d5"><span class="token plain">       "paths":{</span><br></span><span class="token-line" style="color:#bfc7d5"><span class="token plain">           "/employees":{</span><br></span><span class="token-line" style="color:#bfc7d5"><span class="token plain">               "post":{</span><br></span><span class="token-line" style="color:#bfc7d5"><span class="token plain">                   "parameters":[</span><br></span><span class="token-line" style="color:#bfc7d5"><span class="token plain">                       {</span><br></span><span class="token-line" style="color:#bfc7d5"><span class="token plain">                           "in":"body",</span><br></span><span class="token-line" style="color:#bfc7d5"><span class="token plain">                           "name":"employee",</span><br></span><span class="token-line" style="color:#bfc7d5"><span class="token plain">                           "description":"employee",</span><br></span><span class="token-line" style="color:#bfc7d5"><span class="token plain">                           "required":true,</span><br></span><span class="token-line" style="color:#bfc7d5"><span class="token plain">                           "schema":{</span><br></span><span class="token-line" style="color:#bfc7d5"><span class="token plain">                                "$ref":"#/definitions/Employee"</span><br></span><span class="token-line" style="color:#bfc7d5"><span class="token plain">                           }</span><br></span><span class="token-line" style="color:#bfc7d5"><span class="token plain">                       },</span><br></span><span class="token-line" style="color:#bfc7d5"><span class="token plain">                       {</span><br></span><span class="token-line" style="color:#bfc7d5"><span class="token plain">                           "in":"header",</span><br></span><span class="token-line" style="color:#bfc7d5"><span class="token plain">                           "name":"Prefer",</span><br></span><span class="token-line" style="color:#bfc7d5"><span class="token plain">                           "description":"Preference",</span><br></span><span class="token-line" style="color:#bfc7d5"><span class="token plain">                           "required":false,                           </span><br></span><span class="token-line" style="color:#bfc7d5"><span class="token plain">                           "type":"string"</span><br></span><span class="token-line" style="color:#bfc7d5"><span class="token plain">                       }</span><br></span><span class="token-line" style="color:#bfc7d5"><span class="token plain">                   ]</span><br></span><span class="token-line" style="color:#bfc7d5"><span class="token plain" style="display:inline-block"></span><br></span><span class="token-line" style="color:#bfc7d5"><span class="token plain">               }</span><br></span><span class="token-line" style="color:#bfc7d5"><span class="token plain">           }</span><br></span><span class="token-line" style="color:#bfc7d5"><span class="token plain">       },</span><br></span><span class="token-line" style="color:#bfc7d5"><span class="token plain">       "definitions":{</span><br></span><span class="token-line" style="color:#bfc7d5"><span class="token plain">           "Employee":{</span><br></span><span class="token-line" style="color:#bfc7d5"><span class="token plain">               "type":"object",</span><br></span><span class="token-line" style="color:#bfc7d5"><span class="token plain">               "properties":{</span><br></span><span class="token-line" style="color:#bfc7d5"><span class="token plain">                   "empId":{</span><br></span><span class="token-line" style="color:#bfc7d5"><span class="token plain">                        "type":"string"</span><br></span><span class="token-line" style="color:#bfc7d5"><span class="token plain">                   },</span><br></span><span class="token-line" style="color:#bfc7d5"><span class="token plain">                   "empName":{</span><br></span><span class="token-line" style="color:#bfc7d5"><span class="token plain">                        "type":"string"</span><br></span><span class="token-line" style="color:#bfc7d5"><span class="token plain">                   }</span><br></span><span class="token-line" style="color:#bfc7d5"><span class="token plain">               },</span><br></span><span class="token-line" style="color:#bfc7d5"><span class="token plain">               "title":"Employee"</span><br></span><span class="token-line" style="color:#bfc7d5"><span class="token plain">           }</span><br></span><span class="token-line" style="color:#bfc7d5"><span class="token plain">       }</span><br></span><span class="token-line" style="color:#bfc7d5"><span class="token plain">   }</span><br></span></code></pre><div class="buttonGroup__atx"><button type="button" aria-label="Copy code to clipboard" title="Copy" class="clean-btn"><span class="copyButtonIcons_eSgA" aria-hidden="true"><svg viewBox="0 0 24 24" class="copyButtonIcon_y97N"><path fill="currentColor" d="M19,21H8V7H19M19,5H8A2,2 0 0,0 6,7V21A2,2 0 0,0 8,23H19A2,2 0 0,0 21,21V7A2,2 0 0,0 19,5M16,1H4A2,2 0 0,0 2,3V17H4V3H16V1Z"></path></svg><svg viewBox="0 0 24 24" class="copyButtonSuccessIcon_LjdS"><path fill="currentColor" d="M21,7L9,19L3.5,13.5L4.91,12.09L9,16.17L19.59,5.59L21,7Z"></path></svg></span></button></div></div></div><p>The above document indicates that the POST API expects an <strong>employee</strong> parameter of the type <strong>Employee</strong> in body and a <strong>Prefer</strong> parameter in header, therefore expecting the below parameters:</p><ul><li>Prefer in header</li><li>empId and empName in Request Body</li></ul><p>Now let us see an OpenAPI document generated out of PostgREST.</p><div class="codeBlockContainer_Ckt0 theme-code-block" style="--prism-color:#bfc7d5;--prism-background-color:#292d3e"><div class="codeBlockContent_biex"><pre tabindex="0" class="prism-code language-text codeBlock_bY9V thin-scrollbar"><code class="codeBlockLines_e6Vv"><span class="token-line" style="color:#bfc7d5"><span class="token plain">{</span><br></span><span class="token-line" style="color:#bfc7d5"><span class="token plain">    "paths":{</span><br></span><span class="token-line" style="color:#bfc7d5"><span class="token plain">        "/employees":{</span><br></span><span class="token-line" style="color:#bfc7d5"><span class="token plain">            "post":{</span><br></span><span class="token-line" style="color:#bfc7d5"><span class="token plain">                "parameters":[</span><br></span><span class="token-line" style="color:#bfc7d5"><span class="token plain">                    {</span><br></span><span class="token-line" style="color:#bfc7d5"><span class="token plain">                        "$ref":"#/parameters/body.employee"</span><br></span><span class="token-line" style="color:#bfc7d5"><span class="token plain">                    },</span><br></span><span class="token-line" style="color:#bfc7d5"><span class="token plain">                    {</span><br></span><span class="token-line" style="color:#bfc7d5"><span class="token plain">                        "$ref":"#/parameters/preferReturn"</span><br></span><span class="token-line" style="color:#bfc7d5"><span class="token plain">                    }</span><br></span><span class="token-line" style="color:#bfc7d5"><span class="token plain">                ]</span><br></span><span class="token-line" style="color:#bfc7d5"><span class="token plain">            }</span><br></span><span class="token-line" style="color:#bfc7d5"><span class="token plain">        }</span><br></span><span class="token-line" style="color:#bfc7d5"><span class="token plain">    },</span><br></span><span class="token-line" style="color:#bfc7d5"><span class="token plain">    "definitions":{</span><br></span><span class="token-line" style="color:#bfc7d5"><span class="token plain">        "Employee": {</span><br></span><span class="token-line" style="color:#bfc7d5"><span class="token plain">            "type": "object",</span><br></span><span class="token-line" style="color:#bfc7d5"><span class="token plain">            "properties": {</span><br></span><span class="token-line" style="color:#bfc7d5"><span class="token plain">                "empId":{</span><br></span><span class="token-line" style="color:#bfc7d5"><span class="token plain">                    "type":"string"</span><br></span><span class="token-line" style="color:#bfc7d5"><span class="token plain">                },</span><br></span><span class="token-line" style="color:#bfc7d5"><span class="token plain">                "empName":{</span><br></span><span class="token-line" style="color:#bfc7d5"><span class="token plain">                    "type":"string"</span><br></span><span class="token-line" style="color:#bfc7d5"><span class="token plain">                }</span><br></span><span class="token-line" style="color:#bfc7d5"><span class="token plain">            }            </span><br></span><span class="token-line" style="color:#bfc7d5"><span class="token plain">        }</span><br></span><span class="token-line" style="color:#bfc7d5"><span class="token plain">    },</span><br></span><span class="token-line" style="color:#bfc7d5"><span class="token plain">    "parameters":{</span><br></span><span class="token-line" style="color:#bfc7d5"><span class="token plain">        "preferReturn":{</span><br></span><span class="token-line" style="color:#bfc7d5"><span class="token plain">            "in":"header",</span><br></span><span class="token-line" style="color:#bfc7d5"><span class="token plain">            "name":"Prefer",</span><br></span><span class="token-line" style="color:#bfc7d5"><span class="token plain">            "description":"Preference",</span><br></span><span class="token-line" style="color:#bfc7d5"><span class="token plain">            "required":false,</span><br></span><span class="token-line" style="color:#bfc7d5"><span class="token plain">            "type":"string"</span><br></span><span class="token-line" style="color:#bfc7d5"><span class="token plain">        },</span><br></span><span class="token-line" style="color:#bfc7d5"><span class="token plain">        "body.employee":{</span><br></span><span class="token-line" style="color:#bfc7d5"><span class="token plain">            "in":"body",</span><br></span><span class="token-line" style="color:#bfc7d5"><span class="token plain">            "name":"employee",</span><br></span><span class="token-line" style="color:#bfc7d5"><span class="token plain">            "description":"employee",</span><br></span><span class="token-line" style="color:#bfc7d5"><span class="token plain">            "required":true,</span><br></span><span class="token-line" style="color:#bfc7d5"><span class="token plain">            "schema":{</span><br></span><span class="token-line" style="color:#bfc7d5"><span class="token plain">                "$ref":"#/definitions/employee"</span><br></span><span class="token-line" style="color:#bfc7d5"><span class="token plain">            }            </span><br></span><span class="token-line" style="color:#bfc7d5"><span class="token plain">        }</span><br></span><span class="token-line" style="color:#bfc7d5"><span class="token plain">    }</span><br></span><span class="token-line" style="color:#bfc7d5"><span class="token plain">}</span><br></span></code></pre><div class="buttonGroup__atx"><button type="button" aria-label="Copy code to clipboard" title="Copy" class="clean-btn"><span class="copyButtonIcons_eSgA" aria-hidden="true"><svg viewBox="0 0 24 24" class="copyButtonIcon_y97N"><path fill="currentColor" d="M19,21H8V7H19M19,5H8A2,2 0 0,0 6,7V21A2,2 0 0,0 8,23H19A2,2 0 0,0 21,21V7A2,2 0 0,0 19,5M16,1H4A2,2 0 0,0 2,3V17H4V3H16V1Z"></path></svg><svg viewBox="0 0 24 24" class="copyButtonSuccessIcon_LjdS"><path fill="currentColor" d="M21,7L9,19L3.5,13.5L4.91,12.09L9,16.17L19.59,5.59L21,7Z"></path></svg></span></button></div></div></div><p>Not only does WaveMaker allow importing of the REST API, but by parsing the entity definitions we generate user interface that handles create, read, update, delete of the entities. WaveMaker form generates form fields corresponding to the entity definition in the OpenAPI documentation. </p><p>If you have a look at the request parameters for the POST API, you can see that they are references to a different object in the document. So we will have to parse these parameters from the root level <strong>parameters</strong> object. On having a closer look at the <strong>body.employee</strong> parameter, we see that it is of the type <strong>Employee</strong>. We will have to parse its properties from the root level <strong>definitions</strong> object. By parsing these, we identify that the API expects the below parameters:</p><ul><li>Prefer in header</li><li>empId and empName in Request Body</li></ul><p>Since we did not have this kind of parsing logic in 10.4, we were unable to extract the form fields on dragging a Form widget for <strong>Employee</strong> Entity.</p><blockquote><p>This feature is part of WaveMaker 10.5 release. <a href="/learn/blog/2020/07/01/learn/wavemaker-release-notes/v10-5-0">Checkout more details on what is included in this release</a>.</p></blockquote><h2 class="anchor anchorWithStickyNavbar_LWe7" id="conclusion">Conclusion<a href="#conclusion" class="hash-link" aria-label="Direct link to Conclusion" title="Direct link to Conclusion">​</a></h2><p>The OpenAPI support in WaveMaker has been around for few months now and with this release we are making this more robust. Our target is to be able to import API from varied sources so that our users can quickly build out web, mobile applications. We would love to hear from you, if you have tried this feature out. Write to us at <a href="mailto:info@wavemaker.com" target="_blank" rel="noopener noreferrer">info@wavemaker.com</a>.</p>]]></content>
        <author>
            <name>Nikhilesh K V</name>
        </author>
    </entry>
    <entry>
        <title type="html"><![CDATA[Fully automated and scalable test execution using k8s]]></title>
        <id>https://www.wavemaker.com/learn/blog/2020/06/30/run-zalenium-tests-on-kubernetes-blog</id>
        <link href="https://www.wavemaker.com/learn/blog/2020/06/30/run-zalenium-tests-on-kubernetes-blog"/>
        <updated>2020-06-30T00:00:00.000Z</updated>
        <summary type="html"><![CDATA[WaveMaker product team is able to make weekly patch releases and, feature packed releases every alternate months. Typically product releases involve testing of several micro services, API’s and User interface, functionality etc. WaveMaker platform is composed of several such services, and functional testing can be only done by building apps using visual drag-n-drop studio. To ensure the best product quality for releases, our QA process involves building automation tests for APIs as well as UI functionality using Selenium.]]></summary>
        <content type="html"><![CDATA[<p>WaveMaker product team is able to make <a href="/learn/wavemaker-release-notes">weekly patch releases and, feature packed releases</a> every alternate months. Typically product releases involve testing of several micro services, API’s and User interface, functionality etc. WaveMaker platform is composed of several such services, and functional testing can be only done by building apps using visual drag-n-drop studio. To ensure the best product quality for releases, our QA process involves building automation tests for APIs as well as UI functionality using Selenium.  </p><ol><li>UI Tests based on Selenium</li><li>API Tests based on RestTemplate</li></ol><p>We have multiple environments i.e., Development, Staging and Production for WMO and several on-premise WME environment setups for enterprise customer releases. Our development team uses feature branches and when they merge these branches onto the master branch, we have to make sure all the existing automation tests pass. On a regular basis when each feature team performs a merge, we run a full set of automation tests at their beck and call.</p><p>If a new build is promoted to Production from Stage,  and at the same time if a merge is performed onto master or a build request is raised to trigger tests in the development environment, multiple test automation setups are needed simultaneously. Imagine, the amount of Devops automation needed to provision, de-provision the infrastructure needed for these test setups and delays caused in the process.</p><p>Previously, we used to have a handful of server machines where automation tests for one product environment can be run as a Job on a single machine. To complete the tests it takes a definite amount of time and to parallelize, multiple threads can be configured with each thread running a browser with UI functional tests using Selenium. If the threads are increased, browsers crash due to lack of sufficient memory needed for running selenium tests.</p><p>Due to this, We wanted to build a scalable architecture which efficiently utilizes the infrastructure capacity and doesn’t require a lot of Devops effort to scale up and down our automation test setups.</p><h2 class="anchor anchorWithStickyNavbar_LWe7" id="solution">Solution<a href="#solution" class="hash-link" aria-label="Direct link to Solution" title="Direct link to Solution">​</a></h2><p>We explored Kubernetes (k8s) Jobs for test execution and wanted to completely automate the process of automation test setups, No beck and call!</p><p>First let us familiarize a few terms used in the Kubernetes world.</p><p><strong>Cluster:</strong> A cluster is a set of nodes or machines for running containerized applications.</p><p><strong>Node:</strong> A Node is a worker machine in Kubernetes and may be either a virtual or a physical machine, depending on the cluster. Each Node is managed by the Master. </p><p><strong>Pod:</strong>  A Kubernetes pod is a group of containers that are deployed together on the same host. Pods can be horizontally scale, which represent services in the micro services world.</p><p><strong>Job:</strong> The main function of a job is to create one or more pods and track the success of pods. </p><p><strong>Namespace:</strong> Namespaces help pod-to-pod communication using the same namespace. Typically used for application or environment grouping.</p><h2 class="anchor anchorWithStickyNavbar_LWe7" id="test-environment-provisioning-with-k8s">Test environment provisioning with k8s<a href="#test-environment-provisioning-with-k8s" class="hash-link" aria-label="Direct link to Test environment provisioning with k8s" title="Direct link to Test environment provisioning with k8s">​</a></h2><p>Provisioning separate test setups for different product environments is done by creating separate namespaces for API and UI Tests in a k8s cluster for each environment. For every request to run test automation, a Jenkins task is started that generates a k8s spec file and launches a k8s job.</p><p>As the test repo keeps updated frequently by the QA team with new automation tests, we compile and create an image and push it to the kubernetes registry.</p><p>Once k8s Job has started, a Pod will be created to execute commands in the k8s spec file given below</p><ul><li>Maven command to execute tests</li><li>Upload test results to s3.</li></ul><p>On completion of above commands, respective Job status will be changed to complete. </p><p>Automation tests for multiple product environments i.e stage or prod, will be executed in a k8s cluster as shown in the below picture. </p><p><a target="_blank" href="/learn/assets/files/test_execution_k8s_cluster_infrastructure-b300696e7c8ffb259a8d497cc5265a24.png"><img loading="lazy" alt="test_execution_k8s_cluster_infrastructure" src="/learn/assets/images/test_execution_k8s_cluster_infrastructure-b300696e7c8ffb259a8d497cc5265a24.png" width="1262" height="720" class="img_ev3q"></a></p><p>For each product environment, there will be an API namespace where a k8s job is run to execute all the API tests. For running UI tests, Zalenium is used which requires a separate k8s namespace for running the remote driver and the browser container. K8s job for UI tests communicates to Zalenium’s remote driver and based on the configured threads the browser containers are scaled up to run these UI tests simultaneously.</p><p>In the case of test execution for multiple product environments, If resource/memory is not sufficient to create a browser container then k8s cluster can be configured to scale up on demand. After the pod execution is done k8s will perform a health check and close the nodes if no resources are being utilized.</p><h2 class="anchor anchorWithStickyNavbar_LWe7" id="conclusion">Conclusion<a href="#conclusion" class="hash-link" aria-label="Direct link to Conclusion" title="Direct link to Conclusion">​</a></h2><p>With this approach, our automation test setup provisioning for multiple product environments has been completely automated, we can scale up and down nodes to speed up test execution times due to scalable infrastructure. Since, we have enabled parallel execution of selenium tests using multiple browser instances, we have achieved significant time reduction for running the tests.</p><table><thead><tr><th>Job</th><th>K8s Setup Execution Time reduction</th></tr></thead><tbody><tr><td>Sanity Tests Execution</td><td>55%</td></tr><tr><td>Regression Tests Execution</td><td>60% (10 hours -&gt; 4 hours)</td></tr><tr><td>Sanity and Regression as parallel Jobs</td><td>60%</td></tr></tbody></table><blockquote><p>Checkout what is in our latest release <a href="/learn/wavemaker-release-notes/v10-5-0">WaveMaker 10.5 here</a>.</p></blockquote>]]></content>
        <author>
            <name>Tejaswi Maryala, Harish Vanama</name>
        </author>
    </entry>
    <entry>
        <title type="html"><![CDATA[New file picker for mobile apps - Improvements in UI to select files in mobile]]></title>
        <id>https://www.wavemaker.com/learn/blog/2020/06/24/wavemaker-mobile-filepicker</id>
        <link href="https://www.wavemaker.com/learn/blog/2020/06/24/wavemaker-mobile-filepicker"/>
        <updated>2020-06-24T00:00:00.000Z</updated>
        <summary type="html"><![CDATA[Uploading files from a mobile phone is a common use case that every mobile app has. Until last release, WaveMaker UI to select files had the following problems.]]></summary>
        <content type="html"><![CDATA[<p>Uploading files from a mobile phone is a common use case that every mobile app has. Until last release, WaveMaker UI to select files had the following problems.</p><ol><li>Failing to honor multiple/single flag in some of the cases.</li><li>UI for selecting images and UI for selecting videos are completely different.</li><li>There is no option to select files from Google drive or Cloud drive.</li><li>UI to select files (filetype: file) is very basic and doesn't provide much file information (thumbnails, last modified time etc.,).</li></ol><blockquote><p>WaveMaker allows creation of mobile applications by a simple drag and drop approach. <a href="/learn/hybrid-mobile/first-mobile-app">Click here to know more</a>.</p></blockquote><h2 class="anchor anchorWithStickyNavbar_LWe7" id="solution">Solution<a href="#solution" class="hash-link" aria-label="Direct link to Solution" title="Direct link to Solution">​</a></h2><p>A Cordova plugin was created (with open source license) by WaveMaker team to address the above problems. Please visit <a href="https://github.com/wavemaker/wm-filepicker-plugin" target="_blank" rel="noopener noreferrer">github repo of the plugin</a> to know more about the plugin. </p><p>This plugin requires Swift 4.2 runtime, which was released in 2018. Since iOS13, Swift 4.2 runtime is part of the iOS. For earlier versions of iOS (10-12), Swift 4.2 runtime is added to <a href="/learn/blog/2020/06/24/learn/wavemaker-release-notes/v10-5-0">IPA bundle by the XCode</a>. Due to that addition, the size of IPA will increase (~70 MB). If your app doesn't need to support iOS version 12 and lesser, changing deployment-target preference in config.xml to iOS 13 will reduce the IPA size.</p><h4 class="anchor anchorWithStickyNavbar_LWe7" id="wavamaker-mobile-apps-automatically-upgraded-to-use-this-file-picker">WavaMaker mobile apps automatically upgraded to use this file picker<a href="#wavamaker-mobile-apps-automatically-upgraded-to-use-this-file-picker" class="hash-link" aria-label="Direct link to WavaMaker mobile apps automatically upgraded to use this file picker" title="Direct link to WavaMaker mobile apps automatically upgraded to use this file picker">​</a></h4><p>Like always, with WaveMaker product updates, we also migrate applications that are already implemented. So if your WaveMaker mobile app was using file picker plugin then you simply get the new &amp; better functionality without taking any action.</p><h2 class="anchor anchorWithStickyNavbar_LWe7" id="known-issues">Known Issues<a href="#known-issues" class="hash-link" aria-label="Direct link to Known Issues" title="Direct link to Known Issues">​</a></h2><ol><li><p><del>In iOS, selection of multiple videos from local Photo Library is not supported.</del> This issue is addressed in WaveMaker 10.6.0 release.</p><blockquote><p>This feature is part of WaveMaker 10.5 release. <a href="/learn/blog/2020/06/24/learn/wavemaker-release-notes/v10-5-0">Checkout more details on what is included in this release</a>.</p></blockquote></li></ol>]]></content>
        <author>
            <name>Srinivasa Rao Boyina</name>
        </author>
    </entry>
    <entry>
        <title type="html"><![CDATA[Deliver faster applications with WaveMaker!]]></title>
        <id>https://www.wavemaker.com/learn/blog/2020/06/23/deliver-faster-applications-with-wavemaker</id>
        <link href="https://www.wavemaker.com/learn/blog/2020/06/23/deliver-faster-applications-with-wavemaker"/>
        <updated>2020-06-23T00:00:00.000Z</updated>
        <summary type="html"><![CDATA[Performance is key to the success of any application. Even though an app is feature-rich if it's not responsive to user actions it might lose its userbase. WaveMaker is a platform enables our users to develop web, mobile applications. We strive to enable top notch performance of these apps. Towards this goal, with each release, WaveMaker introduces changes aiding in optimization of generated apps in terms of code, build outputs & serving of the apps. The optimizations are made available to the customers out of the box. It requires minimal or no changes to be done by low code developers while building an app in WaveMaker, thus easing the process of building faster apps.]]></summary>
        <content type="html"><![CDATA[<p>Performance is <a href="https://developers.google.com/web/fundamentals/performance/why-performance-matters" target="_blank" rel="noopener noreferrer">key to the success</a> of any application. Even though an app is feature-rich if it's not responsive to user actions it might lose its userbase. WaveMaker is a platform enables our users to develop web, mobile applications. We strive to enable top notch performance of these apps. Towards this goal, with each release, WaveMaker introduces changes aiding in optimization of generated apps in terms of code, build outputs &amp; serving of the apps. The optimizations are made available to the customers out of the box. It requires minimal or no changes to be done by low code developers while building an app in WaveMaker, thus easing the process of building faster apps.</p><blockquote><p>This feature is part of WaveMaker 10.5 release. <a href="/learn/blog/2020/06/23/learn/wavemaker-release-notes/v10-5-0">Checkout more details on what is included this release</a>. </p></blockquote><p>As per the Google stats link shared above, BBC lost 10% of its users with each additional second the site took to load &amp; Pinterest gained 15% users signup when the perceived load times were reduced to 40%. So, performance is one of the important factors to consider in app development. An app with good performance can help businesses in better signups, enhanced user engagement &amp; result in improved sales.</p><h3 class="anchor anchorWithStickyNavbar_LWe7" id="performance-in-wavemaker">Performance in WaveMaker<a href="#performance-in-wavemaker" class="hash-link" aria-label="Direct link to Performance in WaveMaker" title="Direct link to Performance in WaveMaker">​</a></h3><p>WaveMaker is a low code platform that continuously works on performance optimizations so that it helps customers to not only build quickly but deliver application that load fast. WaveMaker adopts the best practices that are evolving in the world of web applications and brings those to its customers &amp; applications.</p><p>When a user accesses an app, the speed with which it loads &amp; becomes responsive is a testimony to its performance. Each page in the application infact needs multiple resources to be loaded. The loading speed is a function of below-listed factors,</p><ul><li>Size of the resources loaded by the page</li><li>Network Speed</li><li>Number of HTTP Resource Requests required to build the page</li><li>Time spend on the server in crafting the response</li><li>User perception of app readiness</li></ul><p>WaveMaker generates Angular code for the applications. Thus has the flexibility to leverage Angular build tools to optimize the application for better load times. Besides, if third party dependencies are required, modular libraries are preferred. WaveMaker component library of 100+ rich widgets. Still, the application build is only composed of components used. Below is the summary of optimizations that are delivered over past releases,</p><ul><li>Treeshaking/Dead Code Elimination, with the help of Angular Production Build &amp; modular component library</li><li>Lazy Loading of Routes &amp; Components, so that user is served with just the required code as they navigate pages of the app</li><li>Enable modern compression algorithms such as <a href="https://www.wavemaker.com/faster-page-load-times-using-brotli-compression/" target="_blank" rel="noopener noreferrer">gzip &amp; brotli</a> for all the requests reducing the network load &amp; time.</li></ul><p>With the current release i.e., version 10.5, WaveMaker team is pleased to announce support for deployment of frontend artifacts onto a Content Delivery Network, which can help in reducing the download time of static resources by ~30%.</p><h3 class="anchor anchorWithStickyNavbar_LWe7" id="content-delivery-network">Content Delivery Network<a href="#content-delivery-network" class="hash-link" aria-label="Direct link to Content Delivery Network" title="Direct link to Content Delivery Network">​</a></h3><p>A Content Delivery Network(CDN) is a set of the geographically distributed servers which together enable fast, reliable &amp; secure delivery of internet content including HTML, Javascript, Stylesheets, Images, etc., </p><p>With CDN, the content is served from the CDN-edge server closest to the user location helping in faster load times. With caching &amp; other optimizations CDN also reduces the amount of data origin servers must provide, thus reducing hosting costs. With its distributed nature CDN can ensure better availability and can handle failures better than any origin servers. With all these benefits CDN ensures consistent user experience for an app across the geographical locations. </p><p>To enable an application to make its artifacts served over CDN, the developer needs to handle additional operations such as,</p><ul><li>Configure the Origin source &amp; Content Delivery Network</li><li>Managing build artifacts with each release</li><li>Cache invalidations to ensure the user is served latest response</li><li>Additional operations based on CDN provider &amp; more</li></ul><p>But we wanted our low code developer to have access to all the CDN goodness very easily. So WaveMaker has made it available on click of a button, literally. With the current release, when the user deploys the WaveMaker app by clicking the "Deploy" button, it is deployed on AWS with CDN support without any additional configuration. This convenience is only available in the first phase of the deployment pipelines of the application. Note that, applications are deployed to this phase so that the app can be tested by the team &amp; only last for limited period of time. <a href="/learn/app-development/deployment/manage-deployed-apps#configure-live-phase">See deploying to live phase</a>.</p><h3 class="anchor anchorWithStickyNavbar_LWe7" id="cdn-intergration-with-wavemaker">CDN intergration with WaveMaker<a href="#cdn-intergration-with-wavemaker" class="hash-link" aria-label="Direct link to CDN intergration with WaveMaker" title="Direct link to CDN intergration with WaveMaker">​</a></h3><p>Under the hood, WaveMaker handles all operations required for CDN deployment of apps as listed below,</p><ul><li>Build process is updated with artifacts generation for front-end only static assets such as javascript, CSS, etc.,</li><li>Upload the static assets of the project to Amazon S3</li><li>CloudFront which is AWS-CDN service provider configured with all the required properties.</li><li>Updates the deployed project to serve static assets from Cloudfront CDN.</li></ul><p>Thus ensuring the customers benefit from CDN advantages for every app developed with no additional effort.</p><p>However, for deploying onto production, the customers may prefer their cloud service provider with the help of CI, CD pipelines. <a href="/learn/app-development/deployment/app-integration-with-aws-cdn">Here is the documentation</a> on how to configure your CI,CD pipeline to deploy to CDN. In the subsequent releases, we will also support one-click deployment to deploy on customer cloud providers. </p><h3 class="anchor anchorWithStickyNavbar_LWe7" id="results">Results<a href="#results" class="hash-link" aria-label="Direct link to Results" title="Direct link to Results">​</a></h3><p>Below are the stats from WaveMaker testing with CDN integration comparing the download times of static assets for some of the standard sized applications,</p><table><thead><tr><th>Application</th><th>Reduced Download Time</th></tr></thead><tbody><tr><td>Starter App</td><td>~39%</td></tr><tr><td>WaveKart</td><td>~29%</td></tr><tr><td><a href="https://www.wavemaker.com/showcase/docs/salesVision" target="_blank" rel="noopener noreferrer">SalesVision</a></td><td>~30%</td></tr></tbody></table><p>As stated, improving performance is a continuous endeavor for WaveMaker &amp; more optimizations will be delivered to the customers with each release. So, stay tuned for more.  Also please share your thoughts or feedback on the optimizations achieved or other approaches to improve the performance of WaveMaker apps to <a href="mailto:info@wavemaker.com" target="_blank" rel="noopener noreferrer">info@wavemaker.com</a></p>]]></content>
        <author>
            <name>Subodh Kumar</name>
        </author>
    </entry>
    <entry>
        <title type="html"><![CDATA[WaveMaker releases 10.5 version]]></title>
        <id>https://www.wavemaker.com/learn/blog/2020/06/23/product-update-10-5-whats-new</id>
        <link href="https://www.wavemaker.com/learn/blog/2020/06/23/product-update-10-5-whats-new"/>
        <updated>2020-06-23T00:00:00.000Z</updated>
        <summary type="html"><![CDATA[With working from home as a new normal, we have released yet another major update with some of the most interesting features in it. To learn about our detailed list of features and fixes, see WaveMaker Release Notes 10.5.]]></summary>
        <content type="html"><![CDATA[<p>With working from home as a new normal, we have released yet another major update with some of the most interesting features in it. To learn about our detailed list of features and fixes, see <a href="/learn/wavemaker-release-notes/v10-5-0">WaveMaker Release Notes 10.5</a>.</p><p>As a modern development team, we are adapting to the latest technology trends. If there is something you feel WaveMaker should have, do let us know <a href="mailto:info@wavemaker.com" target="_blank" rel="noopener noreferrer">here</a>.</p><p>Now, let's jump straight to see what's new in this release!</p><h2 class="anchor anchorWithStickyNavbar_LWe7" id="deploying-to-cdn">Deploying to CDN<a href="#deploying-to-cdn" class="hash-link" aria-label="Direct link to Deploying to CDN" title="Direct link to Deploying to CDN">​</a></h2><p><strong><em>Well, speed matters!</em></strong></p><p>Ensuring a consistent user experience is important not just in terms of features and looks, but also in terms of speed. With our 10.5 update, we are all set to adapt CDN into WaveMaker. This allows WaveMaker apps to work together with geographically distributed servers that enable fast, reliable, and secure delivery of the content. Now, you can deploy your apps with CDN automatically. To read our developer blog, see <a href="/learn/blog/2020/06/23/deliver-faster-applications-with-wavemaker">delivering your apps faster with WaveMaker</a>.</p><h2 class="anchor anchorWithStickyNavbar_LWe7" id="custom-formatter">Custom Formatter<a href="#custom-formatter" class="hash-link" aria-label="Direct link to Custom Formatter" title="Direct link to Custom Formatter">​</a></h2><p><strong><em>Customize data more SPECIFIC to your audience!</em></strong></p><p>You can now write custom data formatter to convert data from services to a well-formatted data before showing it in the UI. You can control how you want to show data depending on the role, country, currency, and more. </p><p>For example, John is a card-holder, he can view his card details without any restrictions, whereas the bank admin cannot see his complete <strong>card number</strong>, which is masked with specific characters as shown below.</p><p><img loading="lazy" alt="custom formatter" src="/learn/assets/images/custom-formatter-68eab8457832e5c2b07c61a9eaa64ca1.png" width="1009" height="377" class="img_ev3q"></p><p>To learn about the usage of this feature, see <a href="/learn/how-tos/using-custom-formatter">Using Custom Formatter for masking sensitive data</a>.</p><h2 class="anchor anchorWithStickyNavbar_LWe7" id="data-table-widget-summary-row">Data Table Widget Summary Row<a href="#data-table-widget-summary-row" class="hash-link" aria-label="Direct link to Data Table Widget Summary Row" title="Direct link to Data Table Widget Summary Row">​</a></h2><p><strong><em>If Data Table is your widget, this is for you!</em></strong></p><p>A table is considered as the most preferred method to represent data that talk! And having to do more with the Data Table adds so much value to it. And we are thrilled to add a summary row function, which helps you to calculate the summary with in-built javascript functions like sum, minimum, maximum, percent, and more.</p><p><img loading="lazy" alt="summary row function" src="/learn/assets/images/datatable_summaryrow4-cee2e530198e67514cc89afe6dd9e0df.png" width="1014" height="459" class="img_ev3q"></p><p>To learn more about how it works, check out the <a href="/learn/app-development/widgets/datalive/datatable/summary-row">Data Table summary row documentation</a>.</p><h2 class="anchor anchorWithStickyNavbar_LWe7" id="smart-widget-templates">Smart Widget Templates<a href="#smart-widget-templates" class="hash-link" aria-label="Direct link to Smart Widget Templates" title="Direct link to Smart Widget Templates">​</a></h2><p><strong><em>Just pick, click and apply away!</em></strong></p><p>For <a href="/learn/app-development/widgets/datalive/cards">Cards</a>, <a href="/learn/app-development/widgets/datalive/list">List</a>, and <a href="/learn/app-development/widgets/container/wizard">Wizard</a> widgets, you can now quickly choose alternative UI representations while you can visually see the changes as you click on the template - just how the SmartArt works in PowerPoint. </p><p><img loading="lazy" alt="widget template" src="/learn/assets/images/widget-template-c41d56fced395549e898e0112071147c.gif" width="1910" height="910" class="img_ev3q"></p><p>For more information about applying a template as well as a layout from the canvas, see <a href="/learn/how-tos/widget-template-layout">Using Smart Template and Layout for Widgets</a>.</p><h2 class="anchor anchorWithStickyNavbar_LWe7" id="extended-micro-frontend-support">Extended Micro-frontend Support<a href="#extended-micro-frontend-support" class="hash-link" aria-label="Direct link to Extended Micro-frontend Support" title="Direct link to Extended Micro-frontend Support">​</a></h2><p><strong><em>Smaller apps are easy to develop, maintain and communicate with each other!</em></strong></p><p>In the last <a href="/learn/wavemaker-release-notes/v10-4-0">update 10.4</a>, we introduced support for building Micro-frontend applications. This architecture encourages the independent delivery of frontend applications with a Node-based CLI. A CLI helps to convert <strong><a href="https://www.wavemakeronline.com/login/login" target="_blank" rel="noopener noreferrer">WaveMaker</a></strong> apps to <strong><a href="https://single-spa.js.org/" target="_blank" rel="noopener noreferrer">Single-spa</a></strong> compatible app. This release includes the version update of <code>single-spa-angular</code> to 3.4  for better support of Angular 7 projects.</p><h2 class="anchor anchorWithStickyNavbar_LWe7" id="well-thats-not-it">Well, that's not it<a href="#well-thats-not-it" class="hash-link" aria-label="Direct link to Well, that's not it" title="Direct link to Well, that's not it">​</a></h2><p>Some of the critical bugs have been fixed in the release. See the list of <a href="/learn/wavemaker-release-notes/v10-5-0/">bug fixes here</a>.</p><p>And most importantly, <a href="https://www.wavemaker.com/delivering-major-product-update-from-home/" target="_blank" rel="noopener noreferrer">despite the lockdown, our team is staying agile and adapting</a> to be able to deliver product updates. Stay safe and go ahead and create that application to digitise and create new efficiencies.</p>]]></content>
        <author>
            <name>Swetha Kundaram</name>
        </author>
    </entry>
    <entry>
        <title type="html"><![CDATA[GraphQL in a Micro Services Architecture]]></title>
        <id>https://www.wavemaker.com/learn/blog/2020/06/11/graphql-microservice-architecture</id>
        <link href="https://www.wavemaker.com/learn/blog/2020/06/11/graphql-microservice-architecture"/>
        <updated>2020-06-11T00:00:00.000Z</updated>
        <summary type="html"><![CDATA[Today it is becoming more and more common to break down a monolithic architecture into micro services, thereby you get many small APIs that work independently. In micro services architecture, a bunch of services are broken down into independent smaller services which expose standard REST APIs to interact with.]]></summary>
        <content type="html"><![CDATA[<p>Today it is becoming more and more common to break down a monolithic architecture into micro services, thereby you get many small APIs that work independently. In micro services architecture, a bunch of services are broken down into independent smaller services which expose standard REST APIs to interact with.</p><p>They come with obvious advantages as these micro services are:</p><ul><li>Highly maintainable and testable</li><li>Loosely coupled</li><li>Independently deployable</li><li>Organized around business capabilities</li><li>Owned by a small team</li></ul><h2 class="anchor anchorWithStickyNavbar_LWe7" id="problems-in-a-micro-service-architecture">Problems in a micro service architecture<a href="#problems-in-a-micro-service-architecture" class="hash-link" aria-label="Direct link to Problems in a micro service architecture" title="Direct link to Problems in a micro service architecture">​</a></h2><p>Although micro services make it easy for the services to be micromanaged by individual owners, it poses a challenge to the consumer of these APIs. For example a front end app that wants data which may be served at different micro services, the client has to make an API call to each microservice and combine the data to finally consume it in the UI elements. There is also the problem of over fetching and under fetching with these APIs. There could be certain fields in the data from one API, which the UI client may not even need, but still a bloated data is fetched.</p><p>Let's consider a simple example of a bookstore app with just two entities, a <code>Book</code> and an <code>Author</code>. Each entity is maintained by an individual microservice.</p><p><img loading="lazy" alt="MicroServices_Architecture Example" src="/learn/assets/images/GraphQL_Example-56ebec8a50e4b589264f1f2d2289b4b9.png" width="1920" height="1080" class="img_ev3q"></p><p>In order to display details of a book, minimum two API calls are required to be made, one to get Book info and one to get the respective Author info.
Similarly, to display an Author details with all the Books written by them, two API calls are required to be made, one to get Author info and one to get the list of books for that author.</p><p>This approach has visible issues such as:</p><ul><li>multiple API calls required to be made to get relevant data, resulting into chattiness between client and server</li><li>this makes the app brittle and multiple calls slow down the app</li><li>since each micro service is now exposed to the client, all of them have to be made secure</li></ul><h2 class="anchor anchorWithStickyNavbar_LWe7" id="graphql-in-a-micro-service-architecture">GraphQL in a micro service architecture<a href="#graphql-in-a-micro-service-architecture" class="hash-link" aria-label="Direct link to GraphQL in a micro service architecture" title="Direct link to GraphQL in a micro service architecture">​</a></h2><p>In order to solve this problem, the framework that is being widely used these days is GraphQL. One way to look at it is that GraphQL can be leveraged as an API gateway for interacting with multiple micro services, each dedicated to a single resource type while living alongside standard REST routes.</p><p>GraphQL and micro services are a perfect fit, because GraphQL hides the fact that you have a microservice architecture from the clients. From a backend perspective, you want to split everything into micro services, but from a frontend perspective, you would like all your data to come from a single API. GraphQL lets you split up your backend into micro services, while still providing a single API to all your application, and allowing joins across data from different services.</p><p>If the bookstore scenario discussed above is implemented with a GraphQL middleware, the architecture would look something like below:
<img loading="lazy" alt="GraphQL_MicroServices_Architecture" src="/learn/assets/images/GraphQL_MicroServices_Architecture-0734c3d0eef1d4553e9756dab0d29d96.png" width="1280" height="800" class="img_ev3q"></p><h2 class="anchor anchorWithStickyNavbar_LWe7" id="what-is-graphql">What is GraphQL<a href="#what-is-graphql" class="hash-link" aria-label="Direct link to What is GraphQL" title="Direct link to What is GraphQL">​</a></h2><p>GraphQL is an API that was invented and open sourced by Facebook as a better replacement for REST. It can be understood as Query language for APIs, which enables declarative data fetching by exposing a single endpoint and responds to queries. In REST, there is always a dedicated endpoint for each type of request and can't be customized. In GraphQL, the client decides what data they need and that's the reason the client sends a query (payload) to the server and the server sends the data back as per the query request. There is where they get the name GraphQL GraphQL is, in many ways, one of the more powerful tools an API provider has in terms of providing singular endpoints to the consumer and controlling data flow.</p><p>Here is an example of a query to fetch an <code>Author</code> by <code>id</code>:</p><p><img loading="lazy" alt="Bookstore Query Example" src="/learn/assets/images/GraphQL_Query_Bookstore_Example-32a797c76cb3f23cf57abbe9b565e64b.png" width="854" height="466" class="img_ev3q"></p><h2 class="anchor anchorWithStickyNavbar_LWe7" id="type-system-in-graphql">Type system in GraphQL<a href="#type-system-in-graphql" class="hash-link" aria-label="Direct link to Type system in GraphQL" title="Direct link to Type system in GraphQL">​</a></h2><p>GraphQL’s powerful expressive ability mainly comes from its complete type system. Unlike REST, it regards all resources in the entire Web service as a connected graph, rather than a resource island, which can be accessed when accessing any resource. Access other resources through connections between resources.</p><p>The bookstore schema graph would look something like below:</p><p><img loading="lazy" alt="GraphQL Schema Example" src="/learn/assets/images/GraphQL_Schema_Example-416f148bc38c98989e18c9eb998f8914.png" width="1920" height="1080" class="img_ev3q"></p><h2 class="anchor anchorWithStickyNavbar_LWe7" id="wiring-data-with-a-graphql-query">Wiring data with a GraphQL query<a href="#wiring-data-with-a-graphql-query" class="hash-link" aria-label="Direct link to Wiring data with a GraphQL query" title="Direct link to Wiring data with a GraphQL query">​</a></h2><p>GraphQL can simply be treated as the middleware of a back end system. Hence, it is very easy to plug it in with existing systems. For example, in NodeJS implementation of GraphQL, data against a query can be fetched via a <code>resolve</code> function, that simply returns a promise. The logic to query the data (e.g. calling an existing REST API) can be written in this resolve function.</p><p>For our bookstore app, the NodeJS implementation to fetch <code>Author</code> details by id would look something like below. Note the <code>resolve</code> function. Data here is fetched from a MongoDB model.</p><div class="codeBlockContainer_Ckt0 theme-code-block" style="--prism-color:#bfc7d5;--prism-background-color:#292d3e"><div class="codeBlockContent_biex"><pre tabindex="0" class="prism-code language-text codeBlock_bY9V thin-scrollbar"><code class="codeBlockLines_e6Vv"><span class="token-line" style="color:#bfc7d5"><span class="token plain">    author: {</span><br></span><span class="token-line" style="color:#bfc7d5"><span class="token plain">        type: AuthorType,</span><br></span><span class="token-line" style="color:#bfc7d5"><span class="token plain">        args: {id: {type: GraphQLID}},</span><br></span><span class="token-line" style="color:#bfc7d5"><span class="token plain">        resolve(parent, args) {</span><br></span><span class="token-line" style="color:#bfc7d5"><span class="token plain">            // fetch author by id from MongoDB</span><br></span><span class="token-line" style="color:#bfc7d5"><span class="token plain">            return AuthorModel.findById(args.id);</span><br></span><span class="token-line" style="color:#bfc7d5"><span class="token plain">        }</span><br></span><span class="token-line" style="color:#bfc7d5"><span class="token plain">    }</span><br></span></code></pre><div class="buttonGroup__atx"><button type="button" aria-label="Copy code to clipboard" title="Copy" class="clean-btn"><span class="copyButtonIcons_eSgA" aria-hidden="true"><svg viewBox="0 0 24 24" class="copyButtonIcon_y97N"><path fill="currentColor" d="M19,21H8V7H19M19,5H8A2,2 0 0,0 6,7V21A2,2 0 0,0 8,23H19A2,2 0 0,0 21,21V7A2,2 0 0,0 19,5M16,1H4A2,2 0 0,0 2,3V17H4V3H16V1Z"></path></svg><svg viewBox="0 0 24 24" class="copyButtonSuccessIcon_LjdS"><path fill="currentColor" d="M21,7L9,19L3.5,13.5L4.91,12.09L9,16.17L19.59,5.59L21,7Z"></path></svg></span></button></div></div></div><p>Similarly, while defining the <code>Author</code> schema type object, the logic to fetch all <code>Books</code> under the author can be wired as below. Again, notice the resolve function.</p><div class="codeBlockContainer_Ckt0 theme-code-block" style="--prism-color:#bfc7d5;--prism-background-color:#292d3e"><div class="codeBlockContent_biex"><pre tabindex="0" class="prism-code language-text codeBlock_bY9V thin-scrollbar"><code class="codeBlockLines_e6Vv"><span class="token-line" style="color:#bfc7d5"><span class="token plain">const AuthorType = new GraphQLObjectType({</span><br></span><span class="token-line" style="color:#bfc7d5"><span class="token plain">    name: 'Author',</span><br></span><span class="token-line" style="color:#bfc7d5"><span class="token plain">    fields: () =&gt; ({</span><br></span><span class="token-line" style="color:#bfc7d5"><span class="token plain">        id      : {type: GraphQLID}, </span><br></span><span class="token-line" style="color:#bfc7d5"><span class="token plain">        name    : {type: GraphQLString},</span><br></span><span class="token-line" style="color:#bfc7d5"><span class="token plain">        age     : {type: GraphQLInt},</span><br></span><span class="token-line" style="color:#bfc7d5"><span class="token plain">        books   : {</span><br></span><span class="token-line" style="color:#bfc7d5"><span class="token plain">            type: new GraphQLList(BookType),</span><br></span><span class="token-line" style="color:#bfc7d5"><span class="token plain">            resolve(parent, args){</span><br></span><span class="token-line" style="color:#bfc7d5"><span class="token plain">                return BookModel.find({authorid: parent.id})</span><br></span><span class="token-line" style="color:#bfc7d5"><span class="token plain">            }</span><br></span><span class="token-line" style="color:#bfc7d5"><span class="token plain">        }</span><br></span><span class="token-line" style="color:#bfc7d5"><span class="token plain">    })</span><br></span><span class="token-line" style="color:#bfc7d5"><span class="token plain">})</span><br></span></code></pre><div class="buttonGroup__atx"><button type="button" aria-label="Copy code to clipboard" title="Copy" class="clean-btn"><span class="copyButtonIcons_eSgA" aria-hidden="true"><svg viewBox="0 0 24 24" class="copyButtonIcon_y97N"><path fill="currentColor" d="M19,21H8V7H19M19,5H8A2,2 0 0,0 6,7V21A2,2 0 0,0 8,23H19A2,2 0 0,0 21,21V7A2,2 0 0,0 19,5M16,1H4A2,2 0 0,0 2,3V17H4V3H16V1Z"></path></svg><svg viewBox="0 0 24 24" class="copyButtonSuccessIcon_LjdS"><path fill="currentColor" d="M21,7L9,19L3.5,13.5L4.91,12.09L9,16.17L19.59,5.59L21,7Z"></path></svg></span></button></div></div></div><h2 class="anchor anchorWithStickyNavbar_LWe7" id="authentication-and-authorization-with-graphql">Authentication and Authorization with GraphQL<a href="#authentication-and-authorization-with-graphql" class="hash-link" aria-label="Direct link to Authentication and Authorization with GraphQL" title="Direct link to Authentication and Authorization with GraphQL">​</a></h2><p>Authentication and authorization are other issues that need to be considered when using GraphQL. Do we process them before or after the GraphQL parsing process?
To answer this question, you can think of GraphQL as a DSL (Domain Specific Language) on top of your own backend data acquisition logic. We just need to think of it as an intermediate layer that can be placed between the client and our actual data service (or multiple services).
Then consider authentication and authorization as another layer. GraphQL is not useful in the actual implementation of authentication or authorization logic because it does not mean it. However, if we want to place these layers behind GraphQL, we can use GraphQL to pass the access token between the client and Auth API. This is very similar to the way we authenticate and authorize via the RESTful API.</p><h2 class="anchor anchorWithStickyNavbar_LWe7" id="integrating-with-a-wavemaker-app">Integrating with a WaveMaker App<a href="#integrating-with-a-wavemaker-app" class="hash-link" aria-label="Direct link to Integrating with a WaveMaker App" title="Direct link to Integrating with a WaveMaker App">​</a></h2><p>The GraphQL implementation (irrespective of the language implemented in) exposes a REST endpoint which is always a POST call with the query as request body. Now, this GraphQL endpoint can be imported into a WaveMaker app like any other REST API through the REST API import interface in WaveMaker studio. Once imported, UI can be built while binding to the GraphQL data in the form of a service variable without writing any code on the UI.
Follow the document on <a href="/learn/app-development/services/web-services/rest-services">working with REST APIs in a WaveMaker app</a>.</p><h2 class="anchor anchorWithStickyNavbar_LWe7" id="conclusion">Conclusion<a href="#conclusion" class="hash-link" aria-label="Direct link to Conclusion" title="Direct link to Conclusion">​</a></h2><p>GraphQL is really good at describing schemas but also stitch together different APIs and the end result is something that's really useful for someone building an app as querying for data will be very simple. Different APIs is exactly what we have when we have a micro services architecture. Using GraphQL on top of it all means we can reap the benefits from our chosen architecture at the same time as an App can get exactly the data it needs.</p>]]></content>
        <author>
            <name>Vibhu Singhal</name>
        </author>
    </entry>
    <entry>
        <title type="html"><![CDATA[Build Themes for WaveMaker Apps Without Any Coding]]></title>
        <id>https://www.wavemaker.com/learn/blog/2020/06/01/build-themes-without-any-coding</id>
        <link href="https://www.wavemaker.com/learn/blog/2020/06/01/build-themes-without-any-coding"/>
        <updated>2020-06-01T00:00:00.000Z</updated>
        <summary type="html"><![CDATA[Creating and customizing the look and feel of WaveMaker applications is just a few clicks away now. We have introduced a theme building tool for changing color schemes and creating branding specs. Theme-builder brings the benefit of codeless theme creation in a few simple steps. With a built-in code editor, one can make changes and see custom styles instantly applied to the web components.]]></summary>
        <content type="html"><![CDATA[<p>Creating and customizing the look and feel of WaveMaker applications is just a few clicks away now. We have introduced a theme building tool for changing color schemes and creating branding specs. Theme-builder brings the benefit of codeless theme creation in a few simple steps. With a built-in code editor, one can make changes and see custom styles instantly applied to the web components.  </p><p>A theme is a preset package containing graphical appearance details. It is often used to change the look and feel of multiple things at once, which makes the elements less granular than allowing the user to set each option individually. For example, you can specify your company's branding colors for your project.  </p><p>Link to the app: <a href="http://apps.wavemakeronline.com/Theme_Builder/#/Dashboard" target="_blank" rel="noopener noreferrer">http://apps.wavemakeronline.com/Theme_Builder/#/Dashboard</a></p><p><img loading="lazy" alt="theme builder" src="/learn/assets/images/theme-builder-88713ced6f6e0f0ddd4f68d5abd798c9.png" width="1267" height="603" class="img_ev3q"></p><h2 class="anchor anchorWithStickyNavbar_LWe7" id="customize-color-typography-and-style">Customize color, typography, and style<a href="#customize-color-typography-and-style" class="hash-link" aria-label="Direct link to Customize color, typography, and style" title="Direct link to Customize color, typography, and style">​</a></h2><p>To begin customizing a theme, one can modify values for color, typography, and style. By default, the preview application starts with the material theme applied. We can switch between different theme styles and instantly preview the changes.</p><p><img loading="lazy" alt="theme preview" src="/learn/assets/images/theme-builder-preview-cc01ab9ba919ddf4a752f12710e461c8.png" width="1273" height="602" class="img_ev3q"></p><h3 class="anchor anchorWithStickyNavbar_LWe7" id="color">Color<a href="#color" class="hash-link" aria-label="Direct link to Color" title="Direct link to Color">​</a></h3><p>To change your theme colors, replace the predefined #HEX color code with a custom color.</p><p>Primary color maps to all active components and elements like(primary buttons, selected tabs, nav items, etc), while secondary color accents the icon colors for date and time selection. Background color applies to the scrollable content, while the text color maps to the body text and captions used in the application. </p><p><strong>Header</strong> and <strong>Left nav</strong> colors define the coloring scheme for background, text, and active links. We also have <strong>More</strong> options to handle the notification and disable state colors.</p><p><img loading="lazy" alt="apply colors" src="/learn/assets/images/Theme-builder-step1-07ab4a811f280866f7a035b435c90439.png" width="300" height="423" class="img_ev3q"></p><h3 class="anchor anchorWithStickyNavbar_LWe7" id="typography">Typography<a href="#typography" class="hash-link" aria-label="Direct link to Typography" title="Direct link to Typography">​</a></h3><p>To change your theme's typography, choose the options from the dropdown, be it font-family, or the size of headings and body text.</p><p><img loading="lazy" alt="apply font" src="/learn/assets/images/Theme-builder-step2-033fab03454e97dfe1e38138f49878d5.png" width="300" height="423" class="img_ev3q"></p><h3 class="anchor anchorWithStickyNavbar_LWe7" id="style">Style<a href="#style" class="hash-link" aria-label="Direct link to Style" title="Direct link to Style">​</a></h3><p>Applying different styles like Flat, Material, and Gradient. This will help you understand how the components change. Each selection will override the existing behaviour of the elements displayed in the preview section.</p><p><strong>Flat</strong>: The flat-theme includes a solid background to the elements with active states. It also adds an outlined border for user inputs.</p><p><strong>Material</strong>: The material-theme has a sleek finish with elevated shadows to understand each element's relative importance and focus their attention.</p><p><strong>Gradient</strong>: The gradient theme fills the content blocks with a linear gradient shade starting from top to bottom.</p><p><img loading="lazy" alt="apply style" src="/learn/assets/images/Theme-builder-step3-ba71af58fb1c24308a923415f3e32472.png" width="300" height="425" class="img_ev3q"></p><h3 class="anchor anchorWithStickyNavbar_LWe7" id="how-to-build-a-theme">How to build a theme<a href="#how-to-build-a-theme" class="hash-link" aria-label="Direct link to How to build a theme" title="Direct link to How to build a theme">​</a></h3><ol><li>Go to <a href="https://apps.wavemakeronline.com/Theme_Builder/#/Dashboard" target="_blank" rel="noopener noreferrer">https://apps.wavemakeronline.com/Theme_Builder/#/Dashboard</a></li><li>Click on the Explore/Create themes</li><li>On the Editor page, customize the #HEX values with your brand colors.</li><li>Select applicable font-family and sizes for your content and heading texts.</li><li>Switch between styles types to suit your requirement accordingly.</li><li>Icons changes are in progress (coming soon)</li><li>Click done, and give a name to your newly created theme from the dialog.</li><li>Import and apply the downloaded theme into any of your WaveMaker applications.</li></ol><p>Modifying all the variables in your editor will create your new theme ready to download. Once provided a name, the theme will be downloaded as a .zip file. Import and apply to the WaveMaker built applications.  </p><p>Bingo! We are ready with the theme.</p><h2 class="anchor anchorWithStickyNavbar_LWe7" id="whats-next">What's next<a href="#whats-next" class="hash-link" aria-label="Direct link to What's next" title="Direct link to What's next">​</a></h2><p>In the next release version, we will feature the icons and more styling options.</p><blockquote><p>Update: Check out <a href="/learn/blog/2020/07/03/Another-update-to-theme-builder">additions we made in the second release</a> since this announcement.</p></blockquote><h2 class="anchor anchorWithStickyNavbar_LWe7" id="see-also">See Also<a href="#see-also" class="hash-link" aria-label="Direct link to See Also" title="Direct link to See Also">​</a></h2><p>For more information on developing themes, see <a href="/learn/app-development/ui-design/creating-themes">Creating themes</a>.</p>]]></content>
        <author>
            <name>Lovin Ahmed</name>
        </author>
    </entry>
    <entry>
        <title type="html"><![CDATA[COVID-19 Visualization using WaveMaker - Part 2]]></title>
        <id>https://www.wavemaker.com/learn/blog/2020/04/30/covid19-visualization-using-wavemaker-part-2</id>
        <link href="https://www.wavemaker.com/learn/blog/2020/04/30/covid19-visualization-using-wavemaker-part-2"/>
        <updated>2020-04-30T00:00:00.000Z</updated>
        <summary type="html"><![CDATA[In my last blog post, we saw how the Corona Tracker app works and we discussed how to build a dashboard using WaveMaker. I recommend you to read the part-1 of the blog first. In this post, we will see how to build visualization for charts and visualization for maps.]]></summary>
        <content type="html"><![CDATA[<p>In my last blog post, we saw how the Corona Tracker app works and we discussed how to build a dashboard using WaveMaker. I recommend you to read the <a href="/learn/blog/2020/04/27/covid19-visualization-using-wavemaker">part-1</a> of the blog first. In this post, we will see how to build <a href="#how-to-build-charts-visualization">visualization for charts</a> and <a href="/learn/blog/2020/04/30/covid19-visualization-using-wavemaker-part-2#how-to-build-maps-visualization">visualization for maps</a>.</p><h3 class="anchor anchorWithStickyNavbar_LWe7" id="quick-recap">Quick Recap<a href="#quick-recap" class="hash-link" aria-label="Direct link to Quick Recap" title="Direct link to Quick Recap">​</a></h3><p>Link to the app: <a href="http://apps.wavemakeronline.com/CoronaTracker/" target="_blank" rel="noopener noreferrer">http://apps.wavemakeronline.com/CoronaTracker/</a></p><p>Previously, we covered how to import REST API as datasource for the app and how to create a variable to access the REST API, and binding the widgets to the created variable.</p><p>For more information, see <a href="/learn/blog/2020/04/27/covid19-visualization-using-wavemaker#corona-tracker-app">Corona Tracker App</a>, <a href="/learn/blog/2020/04/27/covid19-visualization-using-wavemaker#quick-walkthrough-of-the-app">walkthrough of the app</a>, and <a href="/learn/blog/2020/04/27/covid19-visualization-using-wavemaker#how-to-build-the-dashboard">how to build the dashboard</a>.</p><h2 class="anchor anchorWithStickyNavbar_LWe7" id="how-to-build-charts-visualization">How to build Charts Visualization<a href="#how-to-build-charts-visualization" class="hash-link" aria-label="Direct link to How to build Charts Visualization" title="Direct link to How to build Charts Visualization">​</a></h2><p>WaveMaker has in-built nvd3 based charts which are used for building plots for visualization in this app. Drag-n-drop any chart widget to canvas and bind the dataset property to the Variable for plotting data as shown below.</p><p><a target="_blank" href="/learn/assets/files/wm-blog-covid19-18-charts-visualization-de1042debc166316ff32316ade5d856f.png"><img loading="lazy" alt="DnD Chart widget" src="/learn/assets/images/wm-blog-covid19-18-charts-visualization-de1042debc166316ff32316ade5d856f.png" width="1308" height="770" class="img_ev3q"></a></p><p><a target="_blank" href="/learn/assets/files/wm-blog-covid19-19-bind-chart-values-3faa8bd0e3fc37bba1b5cfe7645de28e.png"><img loading="lazy" alt="Bind values" src="/learn/assets/images/wm-blog-covid19-19-bind-chart-values-3faa8bd0e3fc37bba1b5cfe7645de28e.png" width="279" height="601" class="img_ev3q"></a>  </p><h3 class="anchor anchorWithStickyNavbar_LWe7" id="configuring-axes">Configuring axes<a href="#configuring-axes" class="hash-link" aria-label="Direct link to Configuring axes" title="Direct link to Configuring axes">​</a></h3><p>After binding the variable for the dataset, configure x-axis and y-axis from the attributes of the dataset. By just picking these attributes your chart will be ready for viewing.</p><p>In this particular case for the <a href="/learn/app-development/widgets/chart/chart-widget#4-bar-chart">bar chart</a>, we have picked <em>country</em> on x-axis and <em>confirmedCases</em> attribute from API, to be depicted for each country on y-axis.</p><h3 class="anchor anchorWithStickyNavbar_LWe7" id="configuring-titles">Configuring titles<a href="#configuring-titles" class="hash-link" aria-label="Direct link to Configuring titles" title="Direct link to Configuring titles">​</a></h3><p>In the advanced settings for chart widget, there are several configuration options provided for configuring the axis titles, values, bar spacing etc.</p><p><a target="_blank" href="/learn/assets/files/wm-blog-covid19-20-configuring-titles-9f76bb305c8036a3ccf835785868c765.png"><img loading="lazy" alt="Configuring titles" src="/learn/assets/images/wm-blog-covid19-20-configuring-titles-9f76bb305c8036a3ccf835785868c765.png" width="940" height="558" class="img_ev3q"></a></p><p><a target="_blank" href="/learn/assets/files/wm-blog-covid19-21-top-affected-countries-23fcc735dca33bf9585db7e0a37820db.png"><img loading="lazy" alt="Top affected countries" src="/learn/assets/images/wm-blog-covid19-21-top-affected-countries-23fcc735dca33bf9585db7e0a37820db.png" width="388" height="429" class="img_ev3q"></a></p><p>Top countries bar chart is ready!</p><p>Wait, How did we pick only 10 countries from the entire list of 180+ countries returned by the API?</p><p>Also, how did we calculate the metrics for “Rest of World”?</p><p>This is where low-code comes into play, you can write javascript code to customize your dataset. After fetching the API response, you can calculate any custom metrics and also create a separate dataset for top countries as shown.</p><p><a target="_blank" href="/learn/assets/files/wm-blog-covid19-22-low-code-js-81df4fa8bb15065dea0b5a7e89682e42.png"><img loading="lazy" alt="low code" src="/learn/assets/images/wm-blog-covid19-22-low-code-js-81df4fa8bb15065dea0b5a7e89682e42.png" width="855" height="518" class="img_ev3q"></a></p><h2 class="anchor anchorWithStickyNavbar_LWe7" id="how-to-build-maps-visualization">How to build Maps Visualization<a href="#how-to-build-maps-visualization" class="hash-link" aria-label="Direct link to How to build Maps Visualization" title="Direct link to How to build Maps Visualization">​</a></h2><p>Maps is not an in-built widget in WaveMaker, using datamaps javascript library a Prefab is created. Datamaps takes JSON input for countries with their code and a colormap to plot the visualization.</p><p>Prefabs are typically built by a javascript developer who knows the nuances of working with a javascript library and creates a widget or prefab out of it. The Prefab developer will provide attributes that are available to WaveMaker low-code developers when the widget is dropped onto the canvas.</p><h3 class="anchor anchorWithStickyNavbar_LWe7" id="creating-a-prefab">Creating a Prefab<a href="#creating-a-prefab" class="hash-link" aria-label="Direct link to Creating a Prefab" title="Direct link to Creating a Prefab">​</a></h3><div class="theme-admonition theme-admonition-tip alert alert--success admonition_WoCw"><div class="admonitionHeading_TMsN"><span class="admonitionIcon_Ibzs"><svg viewBox="0 0 12 16"><path fill-rule="evenodd" d="M6.5 0C3.48 0 1 2.19 1 5c0 .92.55 2.25 1 3 1.34 2.25 1.78 2.78 2 4v1h5v-1c.22-1.22.66-1.75 2-4 .45-.75 1-2.08 1-3 0-2.81-2.48-5-5.5-5zm3.64 7.48c-.25.44-.47.8-.67 1.11-.86 1.41-1.25 2.06-1.45 3.23-.02.05-.02.11-.02.17H5c0-.06 0-.13-.02-.17-.2-1.17-.59-1.83-1.45-3.23-.2-.31-.42-.67-.67-1.11C2.44 6.78 2 5.65 2 5c0-2.2 2.02-4 4.5-4 1.22 0 2.36.42 3.22 1.19C10.55 2.94 11 3.94 11 5c0 .66-.44 1.78-.86 2.48zM4 14h5c-.23 1.14-1.3 2-2.5 2s-2.27-.86-2.5-2z"></path></svg></span>tip</div><div class="admonitionContent_vXIg"><p>Download the <strong><a href="https://github.com/wavemaker/prefab-datamaps" target="_blank" rel="noopener noreferrer">D3Maps.zip</a></strong>, and import it the <strong>Prefabs</strong> section to use it straightaway. For more information about how to use it, see <a href="/learn/app-development/custom-widgets/custom-widgets#importing-prefabs">Importing Prefab</a>.</p></div></div><div class="theme-admonition theme-admonition-note alert alert--secondary admonition_WoCw"><div class="admonitionHeading_TMsN"><span class="admonitionIcon_Ibzs"><svg viewBox="0 0 14 16"><path fill-rule="evenodd" d="M6.3 5.69a.942.942 0 0 1-.28-.7c0-.28.09-.52.28-.7.19-.18.42-.28.7-.28.28 0 .52.09.7.28.18.19.28.42.28.7 0 .28-.09.52-.28.7a1 1 0 0 1-.7.3c-.28 0-.52-.11-.7-.3zM8 7.99c-.02-.25-.11-.48-.31-.69-.2-.19-.42-.3-.69-.31H6c-.27.02-.48.13-.69.31-.2.2-.3.44-.31.69h1v3c.02.27.11.5.31.69.2.2.42.31.69.31h1c.27 0 .48-.11.69-.31.2-.19.3-.42.31-.69H8V7.98v.01zM7 2.3c-3.14 0-5.7 2.54-5.7 5.68 0 3.14 2.56 5.7 5.7 5.7s5.7-2.55 5.7-5.7c0-3.15-2.56-5.69-5.7-5.69v.01zM7 .98c3.86 0 7 3.14 7 7s-3.14 7-7 7-7-3.12-7-7 3.14-7 7-7z"></path></svg></span>note</div><div class="admonitionContent_vXIg"><p>To create a Datamaps Prefab, see a detailed documentation of <a href="/learn/how-tos/create-prefab-using-d3-library-datamaps">How to Create a Prefab Using D3 Library DataMaps</a>.</p></div></div><p>The following are the attributes provided by the Datamaps prefab developer that will appear in the Studio properties panel for binding.</p><p><a target="_blank" href="/learn/assets/files/wm-blog-covid19-11-prefab-config-9a9340d6e9a4e62b261cd3fa759f00a1.png"><img loading="lazy" alt="Prefab config" src="/learn/assets/images/wm-blog-covid19-11-prefab-config-9a9340d6e9a4e62b261cd3fa759f00a1.png" width="927" height="555" class="img_ev3q"></a></p><h3 class="anchor anchorWithStickyNavbar_LWe7" id="testing-the-prefab-independently">Testing the prefab independently<a href="#testing-the-prefab-independently" class="hash-link" aria-label="Direct link to Testing the prefab independently" title="Direct link to Testing the prefab independently">​</a></h3><p>A Prefab project is another type of a project, where you can build a reusable component or widget and publish it to the workspace. Prefab developers will be able to test the prefab independent of the application by providing test data through an editor, as shown.</p><p><a target="_blank" href="/learn/assets/files/wm-blog-covid19-12-testing-prefab-e226f6395cae6341d3efec399f6e4469.png"><img loading="lazy" alt="Prefab config" src="/learn/assets/images/wm-blog-covid19-12-testing-prefab-e226f6395cae6341d3efec399f6e4469.png" width="1512" height="871" class="img_ev3q"></a></p><p><a target="_blank" href="/learn/assets/files/wm-blog-covid19-13-prefab-values-c66aea0d85ecdfa8e700d0575aefe885.png"><img loading="lazy" alt="Prefab config" src="/learn/assets/images/wm-blog-covid19-13-prefab-values-c66aea0d85ecdfa8e700d0575aefe885.png" width="1511" height="844" class="img_ev3q"></a></p><h3 class="anchor anchorWithStickyNavbar_LWe7" id="publishing-a-prefab">Publishing a Prefab<a href="#publishing-a-prefab" class="hash-link" aria-label="Direct link to Publishing a Prefab" title="Direct link to Publishing a Prefab">​</a></h3><p>After the prefab is tested independently, it can be published to the workspace so that WaveMaker developers can start using it as a widget in the Studio.</p><p><a target="_blank" href="/learn/assets/files/wm-blog-covid19-14-prefab-publish-cc338950730d8bfec38d2fe75c84a767.png"><img loading="lazy" alt="Prefab config" src="/learn/assets/images/wm-blog-covid19-14-prefab-publish-cc338950730d8bfec38d2fe75c84a767.png" width="868" height="318" class="img_ev3q"></a></p><h3 class="anchor anchorWithStickyNavbar_LWe7" id="using-maps-prefab-as-a-widget">Using Maps Prefab as a widget<a href="#using-maps-prefab-as-a-widget" class="hash-link" aria-label="Direct link to Using Maps Prefab as a widget" title="Direct link to Using Maps Prefab as a widget">​</a></h3><p>After the Prefab is published, under the prefabs section in Studio the maps prefab appears just like any other widget.</p><p><a target="_blank" href="/learn/assets/files/wm-blog-covid19-15-using-maps-prefab-c1a20d19dd5f1282cfafdbf2f0c50963.png"><img loading="lazy" alt="maps prefab" src="/learn/assets/images/wm-blog-covid19-15-using-maps-prefab-c1a20d19dd5f1282cfafdbf2f0c50963.png" width="1360" height="762" class="img_ev3q"></a></p><h3 class="anchor anchorWithStickyNavbar_LWe7" id="defining-color-map-and-dataset">Defining Color Map and Dataset<a href="#defining-color-map-and-dataset" class="hash-link" aria-label="Direct link to Defining Color Map and Dataset" title="Direct link to Defining Color Map and Dataset">​</a></h3><p>Color map needed for the maps prefab can be created as a variable, shown below.</p><p><a target="_blank" href="/learn/assets/files/wm-blog-covid19-16-color-map-dataset-b16709f82ccb6ecd0b305872da2ad76d.png"><img loading="lazy" alt="maps prefab" src="/learn/assets/images/wm-blog-covid19-16-color-map-dataset-b16709f82ccb6ecd0b305872da2ad76d.png" width="926" height="562" class="img_ev3q"></a></p><p>Using javascript, we have created a custom maps dataset from the REST API response, by calculating the color codes based on the confirmed cases in each country as shown.</p><p><a target="_blank" href="/learn/assets/files/wm-blog-covid19-17-custom-maps-dataset-4e3eeca710d9c61f4d22987ee6274570.png"><img loading="lazy" alt="maps prefab" src="/learn/assets/images/wm-blog-covid19-17-custom-maps-dataset-4e3eeca710d9c61f4d22987ee6274570.png" width="911" height="554" class="img_ev3q"></a></p><h2 class="anchor anchorWithStickyNavbar_LWe7" id="summary">Summary<a href="#summary" class="hash-link" aria-label="Direct link to Summary" title="Direct link to Summary">​</a></h2><p>Using single-click deployment from WaveMaker, the app is deployed on to containers and made available publicly. Entire application was built by a single developer in 1 week.</p><h2 class="anchor anchorWithStickyNavbar_LWe7" id="see-also">See Also<a href="#see-also" class="hash-link" aria-label="Direct link to See Also" title="Direct link to See Also">​</a></h2><p><a href="/learn/blog/2020/04/27/covid19-visualization-using-wavemaker">COVID-19 Visualization using WaveMaker - Part 1</a></p>]]></content>
        <author>
            <name>Deepak Anupalli</name>
        </author>
    </entry>
    <entry>
        <title type="html"><![CDATA[COVID-19 Visualization using WaveMaker - Part 1]]></title>
        <id>https://www.wavemaker.com/learn/blog/2020/04/27/covid19-visualization-using-wavemaker</id>
        <link href="https://www.wavemaker.com/learn/blog/2020/04/27/covid19-visualization-using-wavemaker"/>
        <updated>2020-04-27T00:00:00.000Z</updated>
        <summary type="html"><![CDATA[Alongside the crisis that COVID-19 had brought to the world, there has never been so much prominence for the numbers. Almost every household, governments, businesses, media etc. are contemplating these numbers, creating models for prediction, taking measures to flatten these curves. That’s when we immediately jumped on to create an application using our own low-code platform.]]></summary>
        <content type="html"><![CDATA[<p>Alongside the crisis that COVID-19 had brought to the world, there has never been so much prominence for the numbers. Almost every household, governments, businesses, media etc. are contemplating these numbers, creating models for prediction, taking measures to flatten these curves. That’s when we immediately jumped on to create an application using our own low-code platform.</p><p>Using WaveMaker, you can almost instantly create a chart or plot for visualization from any datasource. There are several API sources for COVID-19 data and with no code, using out-of-the-box widgets and charts the application has been built in just a few days.</p><p>In this series of blog post, we discuss <a href="/learn/blog/2020/04/27/covid19-visualization-using-wavemaker#how-to-build-the-dashboard">how to build a dashboard</a>, and in the next post, we will see <a href="/learn/blog/2020/04/30/covid19-visualization-using-wavemaker-part-2">how to build visualization for charts and maps</a>. But before, let's do a little walkthrough of the app.</p><h2 class="anchor anchorWithStickyNavbar_LWe7" id="corona-tracker-app">Corona Tracker App<a href="#corona-tracker-app" class="hash-link" aria-label="Direct link to Corona Tracker App" title="Direct link to Corona Tracker App">​</a></h2><p>Link to the app: <a href="http://apps.wavemakeronline.com/CoronaTracker/" target="_blank" rel="noopener noreferrer">http://apps.wavemakeronline.com/CoronaTracker/</a></p><p><img loading="lazy" alt="app" src="/learn/assets/images/wm-blog-covid-19-b4fd27ae2456c167048b282c74e381ad.gif" width="800" height="534" class="img_ev3q"></p><p><a target="_blank" href="/learn/assets/files/wm-blog-covid19-01-dashboard-942f09c24c28f496807580b14493c862.png"><img loading="lazy" alt="screenshot" src="/learn/assets/images/wm-blog-covid19-01-dashboard-942f09c24c28f496807580b14493c862.png" width="1345" height="763" class="img_ev3q"></a></p><p>Not only can you quickly build the dashboard, it is responsive automatically and one can access it on a mobile device as well as on a large screen.</p><p><img loading="lazy" alt="screenshot" src="/learn/assets/images/wm-blog-covid19-02-mobile-dashboard-65b83732fa63ea1853e9576b517c53be.png" width="329" height="632" class="img_ev3q"></p><h2 class="anchor anchorWithStickyNavbar_LWe7" id="quick-walkthrough-of-the-app">Quick walkthrough of the app<a href="#quick-walkthrough-of-the-app" class="hash-link" aria-label="Direct link to Quick walkthrough of the app" title="Direct link to Quick walkthrough of the app">​</a></h2><p>The Corona Tracker application has an extensive dashboard with key metrics globally, i.e. Confirmed cases across several countries, recovered, deaths reported etc. The dashboard provides visualization for top 10 affected countries, plotting their death rates against recovery percentages, number of affected people in 1 million population etc.</p><p>This app also features datamaps with data set published by John Hopkins University, to visualize the spread of COVID-19 across the globe over a timeline.</p><p><a target="_blank" href="/learn/assets/files/wm-blog-covid19-03-datamaps-cases-5287cabe018361db3667ef755a82dc2e.png"><img loading="lazy" alt="screenshot-data-maps-new-cases" src="/learn/assets/images/wm-blog-covid19-03-datamaps-cases-5287cabe018361db3667ef755a82dc2e.png" width="1336" height="953" class="img_ev3q"></a></p><h2 class="anchor anchorWithStickyNavbar_LWe7" id="how-to-build-the-dashboard">How to build the dashboard<a href="#how-to-build-the-dashboard" class="hash-link" aria-label="Direct link to How to build the dashboard" title="Direct link to How to build the dashboard">​</a></h2><p>Using WaveMaker, the elements of the dashboard can be built in just 4 steps without writing code.</p><ol><li>Import datasource, REST API in this case</li><li>Create variable to access the REST API</li><li>Visually drag-n-drop widgets onto the canvas or editor </li><li>Bind the widgets to Variable</li></ol><h3 class="anchor anchorWithStickyNavbar_LWe7" id="step-1-import-datasource-rest-api-in-this-case">Step 1: Import datasource, REST API in this case<a href="#step-1-import-datasource-rest-api-in-this-case" class="hash-link" aria-label="Direct link to Step 1: Import datasource, REST API in this case" title="Direct link to Step 1: Import datasource, REST API in this case">​</a></h3><p>The primary source of data for the dashboard are the following 2 REST APIs:</p><div class="codeBlockContainer_Ckt0 theme-code-block" style="--prism-color:#bfc7d5;--prism-background-color:#292d3e"><div class="codeBlockContent_biex"><pre tabindex="0" class="prism-code language-text codeBlock_bY9V thin-scrollbar"><code class="codeBlockLines_e6Vv"><span class="token-line" style="color:#bfc7d5"><span class="token plain">https://api.coronatracker.com/v3/stats/worldometer/country</span><br></span></code></pre><div class="buttonGroup__atx"><button type="button" aria-label="Copy code to clipboard" title="Copy" class="clean-btn"><span class="copyButtonIcons_eSgA" aria-hidden="true"><svg viewBox="0 0 24 24" class="copyButtonIcon_y97N"><path fill="currentColor" d="M19,21H8V7H19M19,5H8A2,2 0 0,0 6,7V21A2,2 0 0,0 8,23H19A2,2 0 0,0 21,21V7A2,2 0 0,0 19,5M16,1H4A2,2 0 0,0 2,3V17H4V3H16V1Z"></path></svg><svg viewBox="0 0 24 24" class="copyButtonSuccessIcon_LjdS"><path fill="currentColor" d="M21,7L9,19L3.5,13.5L4.91,12.09L9,16.17L19.59,5.59L21,7Z"></path></svg></span></button></div></div></div><div class="codeBlockContainer_Ckt0 theme-code-block" style="--prism-color:#bfc7d5;--prism-background-color:#292d3e"><div class="codeBlockContent_biex"><pre tabindex="0" class="prism-code language-text codeBlock_bY9V thin-scrollbar"><code class="codeBlockLines_e6Vv"><span class="token-line" style="color:#bfc7d5"><span class="token plain">https://api.coronatracker.com/v3/stats/worldometer/global</span><br></span></code></pre><div class="buttonGroup__atx"><button type="button" aria-label="Copy code to clipboard" title="Copy" class="clean-btn"><span class="copyButtonIcons_eSgA" aria-hidden="true"><svg viewBox="0 0 24 24" class="copyButtonIcon_y97N"><path fill="currentColor" d="M19,21H8V7H19M19,5H8A2,2 0 0,0 6,7V21A2,2 0 0,0 8,23H19A2,2 0 0,0 21,21V7A2,2 0 0,0 19,5M16,1H4A2,2 0 0,0 2,3V17H4V3H16V1Z"></path></svg><svg viewBox="0 0 24 24" class="copyButtonSuccessIcon_LjdS"><path fill="currentColor" d="M21,7L9,19L3.5,13.5L4.91,12.09L9,16.17L19.59,5.59L21,7Z"></path></svg></span></button></div></div></div><p>Import the REST APIs using Web Services import editor, as shown below</p><p><a target="_blank" href="/learn/assets/files/wm-blog-covid19-04-studio-wsimport-245a58f08acd97b87ac31a06292220e8.png"><img loading="lazy" alt="screenshot-import-rest" src="/learn/assets/images/wm-blog-covid19-04-studio-wsimport-245a58f08acd97b87ac31a06292220e8.png" width="1363" height="766" class="img_ev3q"></a></p><h3 class="anchor anchorWithStickyNavbar_LWe7" id="step-2-create-variable-to-access-rest-api">Step 2: Create Variable to access REST API<a href="#step-2-create-variable-to-access-rest-api" class="hash-link" aria-label="Direct link to Step 2: Create Variable to access REST API" title="Direct link to Step 2: Create Variable to access REST API">​</a></h3><p>Create a Page for the dashboard, and create a Variable within this page for the imported REST API, which enables invocation of the API whenever the page is accessed. </p><p><a target="_blank" href="/learn/assets/files/wm-blog-covid19-05-studio-variables-7f42baa8efc892d604418aadce82d867.png"><img loading="lazy" alt="screenshot-bind-variables" src="/learn/assets/images/wm-blog-covid19-05-studio-variables-7f42baa8efc892d604418aadce82d867.png" width="1078" height="672" class="img_ev3q"></a></p><h3 class="anchor anchorWithStickyNavbar_LWe7" id="step-3-drag-n-drop-widgets-on-to-canvas">Step 3: Drag-n-drop widgets on to Canvas<a href="#step-3-drag-n-drop-widgets-on-to-canvas" class="hash-link" aria-label="Direct link to Step 3: Drag-n-drop widgets on to Canvas" title="Direct link to Step 3: Drag-n-drop widgets on to Canvas">​</a></h3><p>Key metrics for confirmed cases, recovery &amp; deaths are built as tiles as shown. Each tile is further divided into sections using a Grid Layout which can be further customized to represent the data.
Grid Layout is used to define the arrangement of various widgets on the page, by dividing the page into several responsive blocks. The size of each block can be configured and new columns and rows can be inserted as needed.</p><p><a target="_blank" href="/learn/assets/files/wm-blog-covid19-06-studio-canvas-fb9b433a313fc71c353462757ece1ae3.png"><img loading="lazy" alt="screenshot" src="/learn/assets/images/wm-blog-covid19-06-studio-canvas-fb9b433a313fc71c353462757ece1ae3.png" width="1363" height="765" class="img_ev3q"></a></p><h3 class="anchor anchorWithStickyNavbar_LWe7" id="step-4-bind-widgets-to-the-variable-for-data">Step 4: Bind widgets to the Variable for data<a href="#step-4-bind-widgets-to-the-variable-for-data" class="hash-link" aria-label="Direct link to Step 4: Bind widgets to the Variable for data" title="Direct link to Step 4: Bind widgets to the Variable for data">​</a></h3><p>After arranging the widgets on the canvas, we can bind data to these widgets from the created variable using the Properties panel.
WaveMaker automatically identifies the JSON response structure from the imported REST API and makes it available for binding through variables.</p><p><a target="_blank" href="/learn/assets/files/wm-blog-covid19-07-studio-binding-9a3629e1d998f8e65afe37c028c8e7a8.png"><img loading="lazy" alt="screenshot" src="/learn/assets/images/wm-blog-covid19-07-studio-binding-9a3629e1d998f8e65afe37c028c8e7a8.png" width="1364" height="766" class="img_ev3q"></a></p><p><a target="_blank" href="/learn/assets/files/wm-blog-covid19-08-studio-binding-dialog-304791c3ae481e3b4915acd1fd915db5.png"><img loading="lazy" alt="screenshot" src="/learn/assets/images/wm-blog-covid19-08-studio-binding-dialog-304791c3ae481e3b4915acd1fd915db5.png" width="1051" height="653" class="img_ev3q"></a></p><p><img loading="lazy" alt="screenshot" src="/learn/assets/images/wm-blog-covid19-09-dashboard-snippet-037f09fa85db9c866ec1190d590e244d.png" width="397" height="155" class="img_ev3q"></p><p>Bingo! We have the metrics from the REST API in our dashboard page.</p><p>Wait!, how did we get the other metric for % of recovered people?</p><p>Apart from just binding the data to API response, WaveMaker enables writing simple expressions as shown below to compute data. <code>f(n) = (totalRecovered * 100) / totalConfirmed</code> gives the % recovery, alongside using other data formatting rules.</p><p><a target="_blank" href="/learn/assets/files/wm-blog-covid19-10-studio-expression-6c824905174caa42780d24662be2fd75.png"><img loading="lazy" alt="screenshot" src="/learn/assets/images/wm-blog-covid19-10-studio-expression-6c824905174caa42780d24662be2fd75.png" width="1045" height="663" class="img_ev3q"></a></p><h3 class="anchor anchorWithStickyNavbar_LWe7" id="step-5-deploy-to-the-cloud-and-we-are-done">Step 5: Deploy to the cloud and we are done!<a href="#step-5-deploy-to-the-cloud-and-we-are-done" class="hash-link" aria-label="Direct link to Step 5: Deploy to the cloud and we are done!" title="Direct link to Step 5: Deploy to the cloud and we are done!">​</a></h3><p>For more information, see how to deploy an app with <a href="/learn/app-development/deployment/one-click-deployment/">One-Click Deployment</a>.</p><h2 class="anchor anchorWithStickyNavbar_LWe7" id="whats-next">What's next?<a href="#whats-next" class="hash-link" aria-label="Direct link to What's next?" title="Direct link to What's next?">​</a></h2><p>In the next series of the blog post for developing a Covid-19 visualization using WaveMaker, see how to build <a href="#how-to-build-charts-visualization">visualization for charts</a> and <a href="/learn/blog/2020/04/30/covid19-visualization-using-wavemaker-part-2#how-to-build-maps-visualization">visualization for maps</a>.</p><h2 class="anchor anchorWithStickyNavbar_LWe7" id="see-also">See Also<a href="#see-also" class="hash-link" aria-label="Direct link to See Also" title="Direct link to See Also">​</a></h2><p><a href="/learn/blog/2020/04/30/covid19-visualization-using-wavemaker-part-2">COVID-19 Visualization using WaveMaker - Part 2</a></p>]]></content>
        <author>
            <name>Deepak Anupalli</name>
        </author>
    </entry>
    <entry>
        <title type="html"><![CDATA[WaveMaker Integrates with DigitalOcean Kubernetes for App Deployments]]></title>
        <id>https://www.wavemaker.com/learn/blog/2020/04/23/deployment-to-digital-ocean</id>
        <link href="https://www.wavemaker.com/learn/blog/2020/04/23/deployment-to-digital-ocean"/>
        <updated>2020-04-23T00:00:00.000Z</updated>
        <summary type="html"><![CDATA[WaveMaker platform's one-click deploy feature now enables applications to be deployed to Kubernetes clusters on Digital Ocean cloud.]]></summary>
        <content type="html"><![CDATA[<p>WaveMaker platform's one-click deploy feature now enables applications to be deployed to Kubernetes clusters on Digital Ocean cloud. </p><p>You can configure the deployment topology as per your requirement and then with a single  button click, WaveMaker platform's deploy feature generates the docker files needed to build images, generates the K8S YAML files needed for deployment and triggers the K8S APIs for deployment.
Customer's don't have to write even a single line of K8S YAML file!!</p><p>WaveMaker offers a pre-defined set of delivery phases which enables team a progression through Demo, Stage and Live phase. This let's you thoroughly verify your apps before taking them to the live environment.</p><p>Demo phase uses WaveMaker's internal cloud. But the Stage and Live phases need to be configured to use your own AWS, Azure or GCP accounts. To this list of cloud providers to choose from, we are now adding Digital Ocean. This is the first Kubernetes based cloud provider supported by the WaveMaker Platform.</p><p>Let us introduce you to the DigitalOcean Kubernetes cluster and walk you through the benefits of a Kubernetes based cloud provider and its deployments. </p><h3 class="anchor anchorWithStickyNavbar_LWe7" id="introduction-to-digitalocean-kubernetes">Introduction to DigitalOcean Kubernetes<a href="#introduction-to-digitalocean-kubernetes" class="hash-link" aria-label="Direct link to Introduction to DigitalOcean Kubernetes" title="Direct link to Introduction to DigitalOcean Kubernetes">​</a></h3><p><a href="https://www.digitalocean.com/docs/kubernetes/" target="_blank" rel="noopener noreferrer">DigitalOcean Kubernetes (DOKS)</a> is a managed Kubernetes service that lets you deploy Kubernetes clusters without the complexities of handling the control plane and containerized infrastructure. Clusters are compatible with standard Kubernetes toolchains and integrate natively with DigitalOcean Load Balancers and block storage volumes.</p><h3 class="anchor anchorWithStickyNavbar_LWe7" id="why-to-choose-kubernetes-based-deployments">Why to choose Kubernetes based deployments?<a href="#why-to-choose-kubernetes-based-deployments" class="hash-link" aria-label="Direct link to Why to choose Kubernetes based deployments?" title="Direct link to Why to choose Kubernetes based deployments?">​</a></h3><p>Before getting to the "why", let's understand first what basically is a kubernetes based deployment?
To understand the scope of this, let us first go through and compare the different era's of app deployments:</p><p><strong>Traditional deployment era</strong>: Every application was run on a physical server. Since no boundaries were defined for the applications in the physical server, there were instances when one application would take up all the resources resulting in all other applications to underpeform. Scaling of applications was difficult as resources were underutilized.</p><p><strong>Virtualized deployment era</strong>: Virtualization being the solution for shortcomings of the traditional deployments, also provided security of application's information as the applications were isolated between the VMs.</p><p><strong>Container deployment era</strong>: Containers, as we all know, are considered as lightweight systems as they are decoupled from the underlying infrastructure and at the same time have their own fileSystem, CPU, memory, process space etc. to maintain isolation between applications running.
Containerized based deployments became popular due to multiple benefits like resource isolation, resource utilization etc. </p><p><a target="_blank" href="/learn/assets/files/Containerized_Deployment_DO_blog-c8f9220b629fa93d2b4962367eda1ee6.png"><img loading="lazy" alt="screenshot" src="/learn/assets/images/Containerized_Deployment_DO_blog-c8f9220b629fa93d2b4962367eda1ee6.png" width="952" height="618" class="img_ev3q"></a></p><p>So then why do you need Kubernetes and what can be done with it?</p><p>Kubernetes deployments, you can say, are nothing but containerized deployments only, with Kubernetes providing you with a framework to manage container resources, scaling and failover for your application.
For ex: if a container goes down, another container needs to start. Wouldn’t it be easier if this behavior was handled by a system?
Kubernetes helps us with this process and many other features that are good for the infrastructures!</p><ul><li>Auto Scaling, </li><li>Self healing,</li><li>Service Discovery,</li><li>Storage orchestration
are few among the <a href="https://kubernetes.io/docs/concepts/overview/what-is-kubernetes/#why-you-need-kubernetes-and-what-can-it-do" target="_blank" rel="noopener noreferrer">features</a> that the application developer receives on adapting to Kubernetes based cloud provider deployments.</li></ul><p>Now that we understand the benefits of a Kubernetes based deployment, let us understand how WaveMaker platform simplifies the deployment process.</p><h3 class="anchor anchorWithStickyNavbar_LWe7" id="what-does-an-application-developer-need-to-deploy-his-app-on-digitalocean-cloud">What does an application developer need to deploy his app on DigitalOcean Cloud?<a href="#what-does-an-application-developer-need-to-deploy-his-app-on-digitalocean-cloud" class="hash-link" aria-label="Direct link to What does an application developer need to deploy his app on DigitalOcean Cloud?" title="Direct link to What does an application developer need to deploy his app on DigitalOcean Cloud?">​</a></h3><p>To deploy your application on DigitalOcean cloud, all you would need is a <a href="https://www.digitalocean.com/" target="_blank" rel="noopener noreferrer">DigitalOcean account</a>.</p><p>There are two stages involved for setting up the live/stage phase of the release pipeline with the DigitalOcean cloud provider:</p><ul><li>Configuration of DigitalOcean cluster</li><li>Deployment of application to DigitalOcean cluster</li></ul><p><a target="_blank" href="/learn/assets/files/Supported_Cloud_Provider_DO-e05d2b81c0cc5ab4ad32bbe9e09980e8.png"><img loading="lazy" alt="screenshot" src="/learn/assets/images/Supported_Cloud_Provider_DO-e05d2b81c0cc5ab4ad32bbe9e09980e8.png" width="571" height="461" class="img_ev3q"></a></p><h3 class="anchor anchorWithStickyNavbar_LWe7" id="configuration-of-digitalocean-cluster">Configuration of DigitalOcean cluster<a href="#configuration-of-digitalocean-cluster" class="hash-link" aria-label="Direct link to Configuration of DigitalOcean cluster" title="Direct link to Configuration of DigitalOcean cluster">​</a></h3><p>After choosing DigitalOcean Provider from the list of providers, an <a href="https://www.digitalocean.com/docs/apis-clis/api/create-personal-access-token/" target="_blank" rel="noopener noreferrer">access token</a> needs to be provided. </p><p>To spin up a new cluster in your account some configuration details need to be provided as well:</p><ul><li>cluster region, </li><li>cluster name and </li><li>cluster capacity. </li></ul><p><a target="_blank" href="/learn/assets/files/deploy_do_new_cluster-8ac7043665fa13242b1f16911ccbc2e6.png"><img loading="lazy" alt="screenshot" src="/learn/assets/images/deploy_do_new_cluster-8ac7043665fa13242b1f16911ccbc2e6.png" width="664" height="533" class="img_ev3q"></a></p><p>After providing these details WaveMaker spins up a new cluster in your Digital Ocean account. </p><p>Alternatively, you may well choose to use an existing cluster already present in your account.
<a target="_blank" href="/learn/assets/files/deploy_do_existing_cluster-8598151d637f68dd63b02ef28e61b9e7.png"><img loading="lazy" alt="screenshot" src="/learn/assets/images/deploy_do_existing_cluster-8598151d637f68dd63b02ef28e61b9e7.png" width="659" height="529" class="img_ev3q"></a></p><p>This cluster is then associated with the live/stage phase of the release pipeline.</p><h3 class="anchor anchorWithStickyNavbar_LWe7" id="deployment-of-application-to-digitalocean-cluster">Deployment of application to DigitalOcean cluster<a href="#deployment-of-application-to-digitalocean-cluster" class="hash-link" aria-label="Direct link to Deployment of application to DigitalOcean cluster" title="Direct link to Deployment of application to DigitalOcean cluster">​</a></h3><p>Once the live/stage phase of the release pipeline is associated with a cluster in DigitalOcean account, you are now ready to deploy.</p><p><a target="_blank" href="/learn/assets/files/Push_To_DO-19fe56f863dc482b2da1d22116455675.png"><img loading="lazy" alt="screenshot" src="/learn/assets/images/Push_To_DO-19fe56f863dc482b2da1d22116455675.png" width="596" height="203" class="img_ev3q"></a></p><p>There is no need to write K8S specific yaml files or build any app images!</p><p>WaveMaker automatically generates dockerfiles, builds a docker image, generates the K8S manifest files and deploys the application to cluster using K8S API's.</p><p>Also, the app memory and number of pod replicas are completely configurable from UI.</p><p><a target="_blank" href="/learn/assets/files/deploy_do_app_configuration-fc84085ec42689c81649d5b18b123907.png"><img loading="lazy" alt="screenshot" src="/learn/assets/images/deploy_do_app_configuration-fc84085ec42689c81649d5b18b123907.png" width="666" height="537" class="img_ev3q"></a></p><p>The cluster creation process and the app deployment process are executed as jobs and run in the background, allowing you to continue with your development while the cluster creates or the application deploys.</p><h3 class="anchor anchorWithStickyNavbar_LWe7" id="what-happens-post-the-app-is-deployed">What happens post the app is deployed?<a href="#what-happens-post-the-app-is-deployed" class="hash-link" aria-label="Direct link to What happens post the app is deployed?" title="Direct link to What happens post the app is deployed?">​</a></h3><p>Now post deployment, the app developer is returned with a Service URL which is the URL of the deployed application.</p><p><a target="_blank" href="/learn/assets/files/deploy_do_deployment-c77b7a7c7806e22884bc49e708c24d33.png"><img loading="lazy" alt="screenshot" src="/learn/assets/images/deploy_do_deployment-c77b7a7c7806e22884bc49e708c24d33.png" width="604" height="197" class="img_ev3q"></a></p><p>Not only is the application deployed on a kubernetes cluster, but the platform also returns deployment specific information like</p><ul><li>namespace at which the application has been deployed, </li><li>the image used for the deployment process, </li><li>the cluster version and </li><li>worker node size being used etc. </li></ul><p>You can use the kubectl commands with the associated kubernetes cluster or debug the image in the associated registry.</p><p><a target="_blank" href="/learn/assets/files/deploy_do_providerinfo1-b04c2d2fbb4d4a699c5b87dc72501d25.png"><img loading="lazy" alt="screenshot" src="/learn/assets/images/deploy_do_providerinfo1-b04c2d2fbb4d4a699c5b87dc72501d25.png" width="800" height="523" class="img_ev3q"></a></p><p><a target="_blank" href="/learn/assets/files/deploy_do_providerinfo2-d13c865fe5da09317a30b150a0714b9e.png"><img loading="lazy" alt="screenshot" src="/learn/assets/images/deploy_do_providerinfo2-d13c865fe5da09317a30b150a0714b9e.png" width="798" height="528" class="img_ev3q"></a></p><p>Go ahead and try out your app's first ever kubernetes deployment and let us know your experience!!</p><h3 class="anchor anchorWithStickyNavbar_LWe7" id="references">References<a href="#references" class="hash-link" aria-label="Direct link to References" title="Direct link to References">​</a></h3><ul><li>To know more about Kubernetes, see <a href="https://kubernetes.io/docs/concepts/overview/what-is-kubernetes/" target="_blank" rel="noopener noreferrer">here</a></li><li>To know more about DigitalOcean Kubernetes, see <a href="https://www.digitalocean.com/docs/kubernetes/" target="_blank" rel="noopener noreferrer">here</a></li><li><a href="/learn/app-development/deployment/deployment-to-digital-ocean">Detailed process for deploying a WaveMaker application on DigitalOcean cluster</a></li></ul>]]></content>
        <author>
            <name>Sanjana Raheja</name>
        </author>
    </entry>
    <entry>
        <title type="html"><![CDATA[Deployment Experience made better!]]></title>
        <id>https://www.wavemaker.com/learn/blog/2020/04/22/deployments-made-better</id>
        <link href="https://www.wavemaker.com/learn/blog/2020/04/22/deployments-made-better"/>
        <updated>2020-04-22T00:00:00.000Z</updated>
        <summary type="html"><![CDATA[Deployment is a process which enables the developers to serve the apps to users.]]></summary>
        <content type="html"><![CDATA[<p>Deployment is a process which enables the developers to serve the apps to users.
With the latest release, WaveMaker has made the discovery of deployment failures in the application fast &amp; easy.</p><h3 class="anchor anchorWithStickyNavbar_LWe7" id="deployment">Deployment<a href="#deployment" class="hash-link" aria-label="Direct link to Deployment" title="Direct link to Deployment">​</a></h3><p>When user invokes Deploy operation, WaveMaker executes the maven command to build the project and generate artefacts for deployment.
Build steps includes angular production build  to generate optimized &amp; compressed javascript &amp; other front end assets. </p><p>WaveMaker's One-click deploy feature allows developers deploy their application to AWS, Azure, Google Cloud or Kubernetes cluster.</p><p>During the build process there can be failures if any of the markup, styles or scripts has issues. if the deployment of an application fails, it required some effort from the user to discover &amp; resolve the issue in the last release as</p><ul><li>The developer is informed about the errors post the deployment failure which usually takes couple of minutes since the deployment is triggered.</li><li>The user needs to analyse <code>build.log</code> file to find the exact error &amp; its causes. The log file include framework specific messages which might be relatively hard for low code developers to comprehend &amp; fix.</li><li>The build step of deployment fails for the first error it encounters. So the failure log did not include the complete list of errors in the application. This might cost the user multiple deployment operations to discover all issues &amp; their fixes.</li></ul><p>Inorder to ensure a better deployment experience, WaveMaker leveraged its Observability platform to analyse the most common deployment issues in the past releases which are listed below, </p><ul><li>Invalid Page references</li><li>Invalid Partial references</li><li>Deleted Partial references</li><li>Delete Page elements such as styles, scripts</li><li>Referring to Invalid fonts in the styles.</li></ul><p>and developed pre-deployment validation for each. With these checks enabled prior to deployment, users can experience significantly reduced error discovery &amp; fix timeline.</p><h3 class="anchor anchorWithStickyNavbar_LWe7" id="quick-discovery-of-errors">Quick discovery of Errors<a href="#quick-discovery-of-errors" class="hash-link" aria-label="Direct link to Quick discovery of Errors" title="Direct link to Quick discovery of Errors">​</a></h3><ul><li><p>The validations are run as pre-deployment step, the errors are found quickly in the order of seconds.</p></li><li><p>New Deployment flow with the validation state. </p></li></ul><p><a target="_blank" href="/learn/assets/files/wm-blog-deploy-01-check-2873df150a22aa37c6ceaac961e48750.png"><img loading="lazy" alt="screenshot" src="/learn/assets/images/wm-blog-deploy-01-check-2873df150a22aa37c6ceaac961e48750.png" width="1280" height="715" class="img_ev3q"></a></p><ul><li>Error state where the user is presented with the link to check the errors which caused failure as shown below.</li></ul><p><a target="_blank" href="/learn/assets/files/wm-blog-deploy-02-error-415b3419293e9e44939a8bbe4d8cd1f0.png"><img loading="lazy" alt="screenshot" src="/learn/assets/images/wm-blog-deploy-02-error-415b3419293e9e44939a8bbe4d8cd1f0.png" width="1280" height="720" class="img_ev3q"></a></p><h3 class="anchor anchorWithStickyNavbar_LWe7" id="complete-list-of-errors">Complete list of Errors<a href="#complete-list-of-errors" class="hash-link" aria-label="Direct link to Complete list of Errors" title="Direct link to Complete list of Errors">​</a></h3><ul><li>The validation works with the existing Inspection framework to present the errors with details. </li><li>The validation scans complete application code &amp; lists all the possible issues in one interation.</li><li>The results list the errors grouped by files which covers markups, script &amp; styles. </li></ul><p><a target="_blank" href="/learn/assets/files/wm-blog-deploy-03-list-ce4a80b7c6258bda0fde360daffb373d.png"><img loading="lazy" alt="screenshot" src="/learn/assets/images/wm-blog-deploy-03-list-ce4a80b7c6258bda0fde360daffb373d.png" width="1280" height="723" class="img_ev3q"></a></p><h3 class="anchor anchorWithStickyNavbar_LWe7" id="clear-description-of-errors">Clear description of Errors<a href="#clear-description-of-errors" class="hash-link" aria-label="Direct link to Clear description of Errors" title="Direct link to Clear description of Errors">​</a></h3><ul><li>Each error includes details such as filename &amp; exact line number which can cause deployment failure.</li><li>It also includes the <a href="/learn/app-development/dev-integration/inspection-framework#__docusaurus">documentation</a> link, to help the developer understand the issue better &amp; help in looking for solutions.</li></ul><p><a target="_blank" href="/learn/assets/files/wm-blog-deploy-04-detail-7b41f54e10d28d3eb76fa85c12d94b9c.png"><img loading="lazy" alt="screenshot" src="/learn/assets/images/wm-blog-deploy-04-detail-7b41f54e10d28d3eb76fa85c12d94b9c.png" width="1280" height="720" class="img_ev3q"></a></p><h3 class="anchor anchorWithStickyNavbar_LWe7" id="convenience">Convenience<a href="#convenience" class="hash-link" aria-label="Direct link to Convenience" title="Direct link to Convenience">​</a></h3><ul><li>The validations are added as a part of Inspection framework, the user need not trigger Deployment to find out the issues in the project.
The user can also trigger Inspection check in the studio to find out application issues &amp; fix them before making a deployment request.</li></ul><ul><li>The Inspection framework in WaveMaker is a custom static code analyzer developed with popular open source frameworks<ul><li><a href="https://eslint.org/" target="_blank" rel="noopener noreferrer"><strong>ESLint</strong></a> </li><li><a href="https://stylelint.io/" target="_blank" rel="noopener noreferrer"><strong>Stylelint</strong></a></li></ul></li><li>The Inspection framework analyse the markup, script &amp; styles for any structure or usage which can cause deployment failure &amp; logs it with additional metadata such as filename, line-column number, documentation links etc.</li><li>The Inspection framework will be equipped with more validations with each release to help users develop &amp; debug application easily ensuring a great developer &amp; deployment experience.</li></ul>]]></content>
        <author>
            <name>Subodh Kumar</name>
        </author>
    </entry>
    <entry>
        <title type="html"><![CDATA[OpenAPI support in WaveMaker]]></title>
        <id>https://www.wavemaker.com/learn/blog/2020/04/21/wavemaker-openapi-import</id>
        <link href="https://www.wavemaker.com/learn/blog/2020/04/21/wavemaker-openapi-import"/>
        <updated>2020-04-21T00:00:00.000Z</updated>
        <summary type="html"><![CDATA[WaveMaker now supports integration with OpenAPIs. If you have an OpenAPI definition document for your REST APIs, it can be easily integrated with a WaveMaker app. The OpenAPI Specification, originally known as the Swagger Specification, is a specification for machine-readable interface files for describing, producing, consuming, and visualizing RESTful web services.]]></summary>
        <content type="html"><![CDATA[<p>WaveMaker now supports integration with OpenAPIs. If you have an OpenAPI definition document for your REST APIs, it can be easily integrated with a WaveMaker app. The OpenAPI Specification, originally known as the Swagger Specification, is a specification for machine-readable interface files for describing, producing, consuming, and visualizing RESTful web services.</p><p><img loading="lazy" alt="OpenApi" src="/learn/assets/images/OpenAPI_Logo-4ab0f02c62c257c0eb4b0c3b07c145a8.png" width="450" height="136" class="img_ev3q"></p><h2 class="anchor anchorWithStickyNavbar_LWe7" id="introduction-to-openapis">Introduction to OpenAPIs<a href="#introduction-to-openapis" class="hash-link" aria-label="Direct link to Introduction to OpenAPIs" title="Direct link to Introduction to OpenAPIs">​</a></h2><p>OpenAPI is a broadly adopted industry standard for describing modern APIs. The development of the specification is fostered by the <a href="https://www.openapis.org/" target="_blank" rel="noopener noreferrer">OpenAPI initiative</a>. It's important that you are clear with the <a href="https://swagger.io/blog/api-strategy/difference-between-swagger-and-openapi/" target="_blank" rel="noopener noreferrer">difference between OpenApi and swagger</a>.</p><p>The OpenAPI Specification (OAS) defines a standard, programming language-agnostic interface description for REST APIs, which allows both humans and computers to discover and understand the capabilities of a service without requiring access to source code, additional documentation, or inspection of network traffic. A document (or set of documents) that defines or describes an API in called the OpenAPI definition document. An OpenAPI definition uses and conforms to the OpenAPI Specification. The specification can be found <a href="http://spec.openapis.org/oas/v3.0.3" target="_blank" rel="noopener noreferrer">here</a>.</p><div class="theme-admonition theme-admonition-note alert alert--secondary admonition_WoCw"><div class="admonitionHeading_TMsN"><span class="admonitionIcon_Ibzs"><svg viewBox="0 0 14 16"><path fill-rule="evenodd" d="M6.3 5.69a.942.942 0 0 1-.28-.7c0-.28.09-.52.28-.7.19-.18.42-.28.7-.28.28 0 .52.09.7.28.18.19.28.42.28.7 0 .28-.09.52-.28.7a1 1 0 0 1-.7.3c-.28 0-.52-.11-.7-.3zM8 7.99c-.02-.25-.11-.48-.31-.69-.2-.19-.42-.3-.69-.31H6c-.27.02-.48.13-.69.31-.2.2-.3.44-.31.69h1v3c.02.27.11.5.31.69.2.2.42.31.69.31h1c.27 0 .48-.11.69-.31.2-.19.3-.42.31-.69H8V7.98v.01zM7 2.3c-3.14 0-5.7 2.54-5.7 5.68 0 3.14 2.56 5.7 5.7 5.7s5.7-2.55 5.7-5.7c0-3.15-2.56-5.69-5.7-5.69v.01zM7 .98c3.86 0 7 3.14 7 7s-3.14 7-7 7-7-3.12-7-7 3.14-7 7-7z"></path></svg></span>note</div><div class="admonitionContent_vXIg"><p>As of release 10.4, WaveMaker supports OAS 2.0. Support for OAS 3.0 is being worked upon. We made the OpenAPI support <a href="/learn/blog/2020/07/01/wavemaker-openapi-postgrest-support">more robust in 10.5</a>. Keep an eye on this space for more updates.</p></div></div><h2 class="anchor anchorWithStickyNavbar_LWe7" id="advantages-of-working-with-openapis">Advantages of working with OpenAPIs<a href="#advantages-of-working-with-openapis" class="hash-link" aria-label="Direct link to Advantages of working with OpenAPIs" title="Direct link to Advantages of working with OpenAPIs">​</a></h2><p>Since an OpenAPI definition document follows a standard OpenAPI specification, the document can be used by documentation generation tools to display the API, code generation tools to generate servers and clients in various programming languages, testing tools, and many other use cases.</p><p>WaveMaker extends this advantage to integrate REST endpoints in a Web/Mobile application. <strong>WaveMaker generates UI for Create, List, Update and Delete operations (CRUD) for REST APIs that confirm to OpenAPI specification</strong>. Integrating a REST endpoint with any of the 100+ UI widgets offered by WaveMaker is also simple and straightforward without writing a single line of code.</p><p>Since an OpenAPI document contains a number of APIs, WaveMaker identifies and groups a set of APIs under respective <strong>“entities”</strong>. For example, in an OpenAPI document, there can be multiple REST endpoints for an Employee entity. There could be respective endpoints to perform CRUD operations on this entity. While importing the OpenAPI document in WaveMaker, the platform performs a best guess algorithm to identify and map the endpoints against the respective CRUD operation. Once this is done, the app developer can make use of the Data widget combinations like Table/List with a Form and perform CRUD operations from the UI by simple drag and drop configuration without writing a single line of code.</p><p>This opens a wide range of possibilities for the platform to integrate with 3rd party REST APIs. To name a few:</p><ul><li>supporting various server side pagination/fragmentation/sorting techniques</li><li>identifying relationships among various “entities”</li><li>performing complex filter operations on an entity</li><li>supporting various authentication/authorization mechanisms</li></ul><p>We at WaveMaker are working to identify all such patterns and integrating it with the platform to provide a seamless experience. Keep an eye on this space for more updates.</p><h2 class="anchor anchorWithStickyNavbar_LWe7" id="importing-openapi-document-in-wavemaker">Importing OpenAPI document in WaveMaker<a href="#importing-openapi-document-in-wavemaker" class="hash-link" aria-label="Direct link to Importing OpenAPI document in WaveMaker" title="Direct link to Importing OpenAPI document in WaveMaker">​</a></h2><p>If you already have an API document that is in accordance with OpenAPI spec 2.0, it can be imported into your WaveMaker app project and integrated with the UI widgets. Refer the following document on how to do so:<br>
<a href="/learn/app-development/services/api-designer/import-rest-apis-swagger">Importing REST APIs via OpenAPI/Swagger</a></p><h2 class="anchor anchorWithStickyNavbar_LWe7" id="importing-an-existing-wavemaker-apps-apis-into-another-app">Importing an existing WaveMaker app’s APIs into another app<a href="#importing-an-existing-wavemaker-apps-apis-into-another-app" class="hash-link" aria-label="Direct link to Importing an existing WaveMaker app’s APIs into another app" title="Direct link to Importing an existing WaveMaker app’s APIs into another app">​</a></h2><p>The good news is all the APIs generated by a WaveMaker app follow OpenAPI 2.0 specification. Hence, <strong>a WaveMaker app's APIs are readily available for integration into another app</strong>. All you need to do is, take the OpenAPI/swagger json file from the existing app and import it into the other app where you want to consume the APIs. You don’t need to import each API individually anymore, which is a major time save.</p><p>Also, as mentioned above, the platform will identify “entities” from the OpenAPI document and group endpoints under these. So you can now perform the CRUD operations on a DB entity just the way you could do it through a DB CRUD (live) variable without creating individual Service Variables against each endpoint and writing custom logic to hook these operations. Here is a pictorial representation of the use case:<br>
<img loading="lazy" alt="Open API Import Use Case" src="/learn/assets/images/OpenAPI_Scenario-5a0f4938b225bd772b19196a5274be2f.png" width="1011" height="590" class="img_ev3q"></p><h2 class="anchor anchorWithStickyNavbar_LWe7" id="generating-openapi-document-for-existing-apis">Generating OpenAPI document for existing APIs<a href="#generating-openapi-document-for-existing-apis" class="hash-link" aria-label="Direct link to Generating OpenAPI document for existing APIs" title="Direct link to Generating OpenAPI document for existing APIs">​</a></h2><p>If you chose a RAD platform like WaveMaker to build/modernize an app, chances are you already have a set of APIs to consume and plug the UI with. These endpoints can be on various back-end technologies, but the advantage with an OpenAPI document is that it is language agnostic.</p><p>Due to its open source nature, wide variety of frameworks support automatic generation of the OpenAPI document through code. Here is a list of <strong>language-specific tools</strong> you can use to generate OpenAPI document for your APIs.</p><h3 class="anchor anchorWithStickyNavbar_LWe7" id="java">Java<a href="#java" class="hash-link" aria-label="Direct link to Java" title="Direct link to Java">​</a></h3><p>Spring developers can use <a href="https://github.com/springfox/springfox" target="_blank" rel="noopener noreferrer">springfox</a>, while JAX-RS developers can leverage <a href="https://github.com/swagger-api/swagger-core" target="_blank" rel="noopener noreferrer">swagger-core</a>. The Swagger Maven Plugin even works with both.</p><h3 class="anchor anchorWithStickyNavbar_LWe7" id="aspnet">ASP.NET<a href="#aspnet" class="hash-link" aria-label="Direct link to ASP.NET" title="Direct link to ASP.NET">​</a></h3><p>The Microsoft world supports OpenAPI, too. ASP.NET developers can install the <a href="https://github.com/domaindrivendev/Swashbuckle" target="_blank" rel="noopener noreferrer">Swashbuckle</a> package and easily generate a specification for their APIs.</p><h3 class="anchor anchorWithStickyNavbar_LWe7" id="python">Python<a href="#python" class="hash-link" aria-label="Direct link to Python" title="Direct link to Python">​</a></h3><p>Django developers can add the <a href="https://github.com/marcgibbons/django-rest-swagger" target="_blank" rel="noopener noreferrer">django-rest-swagger</a> module via pip, whereas <a href="https://github.com/noirbizarre/flask-restplus" target="_blank" rel="noopener noreferrer">Flask-RESTPLUS</a> has Swagger support built in.</p><h3 class="anchor anchorWithStickyNavbar_LWe7" id="javascriptnode">Javascript/Node<a href="#javascriptnode" class="hash-link" aria-label="Direct link to Javascript/Node" title="Direct link to Javascript/Node">​</a></h3><p>Applications built in Node frequently use Express or HAPI as their framework. Third-party modules called <a href="https://www.npmjs.com/package/swagger-express" target="_blank" rel="noopener noreferrer">swagger-express</a> and <a href="https://www.npmjs.com/package/hapi-swagger" target="_blank" rel="noopener noreferrer">hapi-swagger</a> are available for those.</p><h3 class="anchor anchorWithStickyNavbar_LWe7" id="ruby">Ruby<a href="#ruby" class="hash-link" aria-label="Direct link to Ruby" title="Direct link to Ruby">​</a></h3><p>The <a href="https://github.com/ruby-grape/grape-swagger" target="_blank" rel="noopener noreferrer">grape-swagger</a> gem provides full OpenAPI support and works well with other gems, such as <a href="https://github.com/ruby-grape/grape-entity" target="_blank" rel="noopener noreferrer">grape-entity</a>. With the latter, it is possible to define models and use them in the specification as well as for input validation.</p><h3 class="anchor anchorWithStickyNavbar_LWe7" id="go">Go<a href="#go" class="hash-link" aria-label="Direct link to Go" title="Direct link to Go">​</a></h3><p><a href="https://goswagger.io/" target="_blank" rel="noopener noreferrer">Goswagger</a> is available for all the Go developers out there. It is a large package that is not limited to the use-case of self-documenting APIs but allows all kinds of work with Swagger and OpenAPI definitions in Go.</p><h2 class="anchor anchorWithStickyNavbar_LWe7" id="references">References<a href="#references" class="hash-link" aria-label="Direct link to References" title="Direct link to References">​</a></h2><ul><li>OpenAPI initiative official space: <a href="https://www.openapis.org/" target="_blank" rel="noopener noreferrer">https://www.openapis.org</a></li><li>Swagger official space: <a href="https://swagger.io/" target="_blank" rel="noopener noreferrer">https://swagger.io</a></li><li>How to generate OpenAPI definition from code: <a href="https://www.blazemeter.com/blog/how-to-generate-openapi-definitions-from-code" target="_blank" rel="noopener noreferrer">https://www.blazemeter.com/blog/how-to-generate-openapi-definitions-from-code</a></li><li><a href="/learn/app-development/services/api-designer/import-rest-apis-swagger">Importing REST APIs via OpenAPI/Swagger</a></li></ul>]]></content>
        <author>
            <name>Vibhu Singhal</name>
        </author>
    </entry>
    <entry>
        <title type="html"><![CDATA[ WaveMaker platform is updated to use WKWebView.]]></title>
        <id>https://www.wavemaker.com/learn/blog/2020/04/20/wavemaker-wkwebview-upgrade</id>
        <link href="https://www.wavemaker.com/learn/blog/2020/04/20/wavemaker-wkwebview-upgrade"/>
        <updated>2020-04-20T00:00:00.000Z</updated>
        <summary type="html"><![CDATA[Problem]]></summary>
        <content type="html"><![CDATA[<h2 class="anchor anchorWithStickyNavbar_LWe7" id="problem">Problem<a href="#problem" class="hash-link" aria-label="Direct link to Problem" title="Direct link to Problem">​</a></h2><p>Apple deprecated UIWebView and introduced WKWebView. Starting from April 1st, 2020, Apple stopped accepting all new apps that have references to UIWebView. From December 2020, Apple will stop accepting app updates that have references to UIWebView. The current version Cordova that is used in WaveMaker, uses UIWebView by default.</p><blockquote><p>WaveMaker allows creation of mobile applications by a simple drag and drop approach. <a href="/learn/hybrid-mobile/first-mobile-app">Click here to know more</a>.</p></blockquote><h2 class="anchor anchorWithStickyNavbar_LWe7" id="solution">Solution<a href="#solution" class="hash-link" aria-label="Direct link to Solution" title="Direct link to Solution">​</a></h2><p>Cordova created a plugin called <a href="https://github.com/apache/cordova-plugin-wkwebview-engine" target="_blank" rel="noopener noreferrer">cordova-plugin-wkwebview-engine</a>. This plugin brings WKWebView of iOS into cordova. Due to its restrictions imposed by WKWebview, two problems araised.</p><ol><li>Cordova by default loads index.html using file:// scheme. WKWebView is blocking access from html page (loaded via file://) to files outside of application directory.</li><li>UIWebView allowed CORS requests even if CORS is not enabled in the server. But, WKWebView blocks cross-origin requests unless CORS allowed by server. In WaveMaker, CORS is optional.</li><li>It doesnot store cookies from third party domains (domains other than the domain that html file is loaded). WaveMaker uses Cookie based authentication.</li></ol><p><a href="https://github.com/wavemaker/cordova-plugin-local-webserver" target="_blank" rel="noopener noreferrer">cordova-plugin-local-webserver</a> is a cordova plugin that serves the app files over http by hosting a server with in the app. This helps in resolving problem1.</p><p><a href="https://github.com/wavemaker/cordova-plugin-advanced-http" target="_blank" rel="noopener noreferrer">cordova-plugin-advanced-http</a> is a cordova plugin that provides API (instead of xhr) to make http calls to the remote server. Using this plugin API, a wrapper is created to replace XHR so that all existing XHR calls work as earlier. This plugin routes all requests through native layer that doesnot block cross-origin requests. This plugin also persist cookies from all domains and send them in appropriate requests. This plugin helps in resolving problem 2 and 3.</p><p>In addition to the above, Cordova framework and plugins may have references to UIWebView. Cordova team addressed these framework level changes in <a href="mailto:cordova-ios@5.1.0." target="_blank" rel="noopener noreferrer">cordova-ios@5.1.0.</a> They added a preference called 'WKWebViewOnly'. If this preference is set to 'true', then UIWebView references in the cordova framework are replaced with WKWebView. Out of all the plugins that are supported by WaveMaker, cordova-plugin-inappbrowser has UIWebView reference. cordova-plugin-inappbrowser removed those references in version 3.2.0. So, that plugin is upgraded to 3.2.0.</p><h4 class="anchor anchorWithStickyNavbar_LWe7" id="developer-action-required">Developer Action Required<a href="#developer-action-required" class="hash-link" aria-label="Direct link to Developer Action Required" title="Direct link to Developer Action Required">​</a></h4><p>With WaveMaker 10.4 release, platform has no references to UIWebView. Developer has to make sure that all third party plugins (if any) also have no references to UIWebView in their code. If references are present, contact respective plugin-developer for a newer version of the plugin. </p><h2 class="anchor anchorWithStickyNavbar_LWe7" id="known-issues">Known Issues<a href="#known-issues" class="hash-link" aria-label="Direct link to Known Issues" title="Direct link to Known Issues">​</a></h2><ol><li><a href="mailto:cordova-ios@5.1.0" target="_blank" rel="noopener noreferrer">cordova-ios@5.1.0</a> is not supported by build.phonegap.com. When publishing <strong>new app</strong>, ipa has to be created <a href="/learn/hybrid-mobile/mobile-build-manual">manually</a>. For all development builds (even for new) and distribution builds for app updates, phonegap service can still be used.</li><li>While uploading a file, there is no pogress event avaiable in cordova-plugin-advanced-http plugin. Currently, a synthetic progress event is created which just mimics but doesnot corelate with the actual progress of operation.</li></ol><h2 class="anchor anchorWithStickyNavbar_LWe7" id="references">References<a href="#references" class="hash-link" aria-label="Direct link to References" title="Direct link to References">​</a></h2><ol><li>Apache Cordova blog about using WKWebView. <a href="https://cordova.apache.org/howto/2020/03/18/wkwebviewonly.html" target="_blank" rel="noopener noreferrer">https://cordova.apache.org/howto/2020/03/18/wkwebviewonly.html</a></li><li>Issue with WKWebView. <a href="https://github.com/apache/cordova-plugin-wkwebview-engine/issues/56" target="_blank" rel="noopener noreferrer">https://github.com/apache/cordova-plugin-wkwebview-engine/issues/56</a></li><li>Cookie Issue with WKWebView. <a href="https://bugs.webkit.org/show_bug.cgi?id=140205" target="_blank" rel="noopener noreferrer">https://bugs.webkit.org/show_bug.cgi?id=140205</a></li><li>Progress issue in cordova-plugin-advanced-http. <a href="https://github.com/silkimen/cordova-plugin-advanced-http/issues/88" target="_blank" rel="noopener noreferrer">https://github.com/silkimen/cordova-plugin-advanced-http/issues/88</a></li></ol>]]></content>
        <author>
            <name>Srinivasa Rao Boyina</name>
        </author>
    </entry>
    <entry>
        <title type="html"><![CDATA[Deliver WaveMaker Apps as Micro Frontend Modules]]></title>
        <id>https://www.wavemaker.com/learn/blog/2020/02/25/wavemaker-micro-front-end-support</id>
        <link href="https://www.wavemaker.com/learn/blog/2020/02/25/wavemaker-micro-front-end-support"/>
        <updated>2020-02-25T00:00:00.000Z</updated>
        <summary type="html"><![CDATA[A real-world application is composed of multiple modules. Changes or upgrades to a given module can impact other modules and add more testing effort to the development timeline. Including a new technology into the existing app might be challenging as the existing app might not include all support, such as the build process.]]></summary>
        <content type="html"><![CDATA[<p>A real-world application is composed of multiple modules. Changes or upgrades to a given module can impact other modules and add more testing effort to the development timeline. Including a new technology into the existing app might be challenging as the existing app might not include all support, such as the build process. </p><div class="theme-admonition theme-admonition-note alert alert--secondary admonition_WoCw"><div class="admonitionHeading_TMsN"><span class="admonitionIcon_Ibzs"><svg viewBox="0 0 14 16"><path fill-rule="evenodd" d="M6.3 5.69a.942.942 0 0 1-.28-.7c0-.28.09-.52.28-.7.19-.18.42-.28.7-.28.28 0 .52.09.7.28.18.19.28.42.28.7 0 .28-.09.52-.28.7a1 1 0 0 1-.7.3c-.28 0-.52-.11-.7-.3zM8 7.99c-.02-.25-.11-.48-.31-.69-.2-.19-.42-.3-.69-.31H6c-.27.02-.48.13-.69.31-.2.2-.3.44-.31.69h1v3c.02.27.11.5.31.69.2.2.42.31.69.31h1c.27 0 .48-.11.69-.31.2-.19.3-.42.31-.69H8V7.98v.01zM7 2.3c-3.14 0-5.7 2.54-5.7 5.68 0 3.14 2.56 5.7 5.7 5.7s5.7-2.55 5.7-5.7c0-3.15-2.56-5.69-5.7-5.69v.01zM7 .98c3.86 0 7 3.14 7 7s-3.14 7-7 7-7-3.12-7-7 3.14-7 7-7z"></path></svg></span>note</div><div class="admonitionContent_vXIg"><p>For more information about developing Micro Frontend modules, see <a href="/learn/app-development/sspa/micro-frontend">Developing Micro Frontend Modules in WaveMaker</a>.</p></div></div><h2 class="anchor anchorWithStickyNavbar_LWe7" id="what-are-micro-frontends">What are Micro Frontends<a href="#what-are-micro-frontends" class="hash-link" aria-label="Direct link to What are Micro Frontends" title="Direct link to What are Micro Frontends">​</a></h2><p>One of the practices which simplify the development and maintenance of such apps is to decompose the application into modules that can be independently developed, tested, and deployed. This is known as the <strong>MicroServices</strong> pattern. </p><p>Adapting these practices to frontend systems enables us to generate independent, composable application modules. Such modules are called <a href="https://www.martinfowler.com/articles/micro-frontends.html" target="_blank" rel="noopener noreferrer"><strong>Micro Frontends</strong></a>. </p><p>This practice helps teams develop modules in parallel, deliver customer-facing solutions quickly, learn directly from customer feedback and improve the module for better adoption. Organizing teams this way to have a direct customer visible deliverable is a key ingredient in setting smaller teams for success by letting their customers connect with the teacher. Adopting or validating new technology for a new feature or replacing an existing feature can be progressively achieved without affecting other app entities.</p><p>For enterprises that want to modernize their applications by adopting micro frontend, the architecture gives them a delivery model where they can start deploying modernized modules into their existing application. </p><p>As the modules are independent of each other, below are the key gains. </p><ul><li>Reduced development time and testing effort</li><li>Parallel and Incremental addition of features</li><li>Enables using different technology, frameworks for development and delivery</li><li>Ease of integration of new modules into existing systems</li></ul><h2 class="anchor anchorWithStickyNavbar_LWe7" id="implementation-approaches">Implementation approaches<a href="#implementation-approaches" class="hash-link" aria-label="Direct link to Implementation approaches" title="Direct link to Implementation approaches">​</a></h2><p>There are many approaches to implementing the <strong>Micro Frontend</strong> pattern to an existing or new application. Let's take an example of an 'e-cart' app to explain the approaches to implementing Micro Frontends to an existing monolith app.</p><p>A typical 'e-cart' app can be grouped into below listed main modules.</p><p><strong>Catalogue</strong>: The available items are managed.
<strong>User Profile</strong>: The user-related operations are handled, such as his info
<strong>Orders</strong>: The order related info such as history, status are managed
<strong>Payments</strong>: The payment-related info such as mode, status is managed</p><p>Each of the above can be built into a deployable module bundle. Below are some of the approaches that can be adopted to compose them and serve as an application using the Micro Frontends pattern.</p><h3 class="anchor anchorWithStickyNavbar_LWe7" id="container-application">Container Application<a href="#container-application" class="hash-link" aria-label="Direct link to Container Application" title="Direct link to Container Application">​</a></h3><p>With this model, there can be one container module that can </p><ul><li>House common UI elements such as Headers, Footers, etc. </li><li>Handles common operations such as authentication and navigation. </li><li>Loads and unloads each 'Micro Frontend' module based on the user action.</li></ul><h3 class="anchor anchorWithStickyNavbar_LWe7" id="server-side-composition">Server Side Composition<a href="#server-side-composition" class="hash-link" aria-label="Direct link to Server Side Composition" title="Direct link to Server Side Composition">​</a></h3><p>With this model, </p><ul><li>The app is served through an HTML page rendered on the server-side. </li><li>The page is composed of common elements and placeholders.</li><li>The page uses server-specific plugins to render MicroFront modules in the placeholders of the HTML as per the need.</li></ul><h3 class="anchor anchorWithStickyNavbar_LWe7" id="build-time-composition">Build Time Composition<a href="#build-time-composition" class="hash-link" aria-label="Direct link to Build Time Composition" title="Direct link to Build Time Composition">​</a></h3><p>With this model, </p><ul><li>Each Micro Frontend module is published as an independent package.</li><li>The container app will include the packages as library dependency and produce a single deployable Bundle on building</li><li>However, a change in any module will require rebuilding the container bundle (in turn, rebuilds all the dependent modules) to be served, making it not a good approach to adopt.</li></ul><h3 class="anchor anchorWithStickyNavbar_LWe7" id="run-time-composition">Run Time Composition<a href="#run-time-composition" class="hash-link" aria-label="Direct link to Run Time Composition" title="Direct link to Run Time Composition">​</a></h3><p>With this model, </p><ul><li>Each Micro Frontend module is built as an independent script and exposes a global function as its entry point.</li><li>Each Module can also be built as Web Components.</li><li>The container application will have the logic to load required modules on demand and render them into the required DOM node.</li></ul><p>With all the approaches and advantages described above, this pattern does come with some costs listed below,</p><ul><li>The approach might cause an increase in Payload size if the modules share dependencies as the modules are built separately with dependencies.</li><li>Increase operational cost as each module might involve a different build and delivery approach.</li></ul><h2 class="anchor anchorWithStickyNavbar_LWe7" id="single-spa-framework-in-wavemaker">Single-spa framework in WaveMaker<a href="#single-spa-framework-in-wavemaker" class="hash-link" aria-label="Direct link to Single-spa framework in WaveMaker" title="Direct link to Single-spa framework in WaveMaker">​</a></h2><div class="theme-admonition theme-admonition-note alert alert--secondary admonition_WoCw"><div class="admonitionHeading_TMsN"><span class="admonitionIcon_Ibzs"><svg viewBox="0 0 14 16"><path fill-rule="evenodd" d="M6.3 5.69a.942.942 0 0 1-.28-.7c0-.28.09-.52.28-.7.19-.18.42-.28.7-.28.28 0 .52.09.7.28.18.19.28.42.28.7 0 .28-.09.52-.28.7a1 1 0 0 1-.7.3c-.28 0-.52-.11-.7-.3zM8 7.99c-.02-.25-.11-.48-.31-.69-.2-.19-.42-.3-.69-.31H6c-.27.02-.48.13-.69.31-.2.2-.3.44-.31.69h1v3c.02.27.11.5.31.69.2.2.42.31.69.31h1c.27 0 .48-.11.69-.31.2-.19.3-.42.31-.69H8V7.98v.01zM7 2.3c-3.14 0-5.7 2.54-5.7 5.68 0 3.14 2.56 5.7 5.7 5.7s5.7-2.55 5.7-5.7c0-3.15-2.56-5.69-5.7-5.69v.01zM7 .98c3.86 0 7 3.14 7 7s-3.14 7-7 7-7-3.12-7-7 3.14-7 7-7z"></path></svg></span>note</div><div class="admonitionContent_vXIg"><p>For more information about developing Micro Frontend modules, see <a href="/learn/app-development/sspa/micro-frontend">Delivering WaveMaker Apps as Micro Frontend modules</a>.</p></div></div><p><strong>Single-spa</strong> framework allows you to compose and serve multi-framework modules into an app by including a compatible JavaScript bundle. When built, a real-world web application will not just generate JS bundles but also produce CSS and other metadata artifacts. Currently, the <strong>Single-spa</strong> framework does not have any specific way of loading non-code, non-JS artifacts. For this reason, the users are requested to add the additional scripts in the steps mentioned above.</p><p>WaveMaker is planning to work on a loader script that will load all the artifacts required for a WaveMaker app to work with <strong>Single-spa</strong> without the need for any additional loading scripts and provide seamless integration support in the coming releases.</p><h3 class="anchor anchorWithStickyNavbar_LWe7" id="screenshots-of-sample-s-spa">Screenshots of Sample S-spa<a href="#screenshots-of-sample-s-spa" class="hash-link" aria-label="Direct link to Screenshots of Sample S-spa" title="Direct link to Screenshots of Sample S-spa">​</a></h3><h4 class="anchor anchorWithStickyNavbar_LWe7" id="home">Home<a href="#home" class="hash-link" aria-label="Direct link to Home" title="Direct link to Home">​</a></h4><p><a target="_blank" href="/learn/assets/files/wm-sspa-ss-home-7a00a10de7204981fcc44373e38ab5a8.png"><img loading="lazy" alt="screenshot" src="/learn/assets/images/wm-sspa-ss-home-7a00a10de7204981fcc44373e38ab5a8.png" width="1280" height="283" class="img_ev3q"></a></p><h4 class="anchor anchorWithStickyNavbar_LWe7" id="angular-app">Angular App<a href="#angular-app" class="hash-link" aria-label="Direct link to Angular App" title="Direct link to Angular App">​</a></h4><p><a target="_blank" href="/learn/assets/files/wm-sspa-ss-ng-20cdc0eebf14433eda8f9beff24831a1.png"><img loading="lazy" alt="screenshot" src="/learn/assets/images/wm-sspa-ss-ng-20cdc0eebf14433eda8f9beff24831a1.png" width="1265" height="418" class="img_ev3q"></a></p><h4 class="anchor anchorWithStickyNavbar_LWe7" id="wavemaker-app">WaveMaker App<a href="#wavemaker-app" class="hash-link" aria-label="Direct link to WaveMaker App" title="Direct link to WaveMaker App">​</a></h4><p><a target="_blank" href="/learn/assets/files/wm-sspa-ss-wm-0c649ce89eb04cc033619ec59a4d0852.png"><img loading="lazy" alt="screenshot" src="/learn/assets/images/wm-sspa-ss-wm-0c649ce89eb04cc033619ec59a4d0852.png" width="1282" height="489" class="img_ev3q"></a></p>]]></content>
        <author>
            <name>Subodh Kumar</name>
        </author>
    </entry>
    <entry>
        <title type="html"><![CDATA[All-new WaveMaker docs with a powerful Search]]></title>
        <id>https://www.wavemaker.com/learn/blog/2019/12/13/new-doc-search-feature</id>
        <link href="https://www.wavemaker.com/learn/blog/2019/12/13/new-doc-search-feature"/>
        <updated>2019-12-13T00:00:00.000Z</updated>
        <summary type="html"><![CDATA[We released the new WaveMaker Docs site on the 14 November 2019. We migrated from WordPress to Docusaurus with easy-to-edit markdown files. This change has also increased the contributions from our team members.]]></summary>
        <content type="html"><![CDATA[<p>We <a href="/learn/improve-your-app-development-experience-with-the-new-wavemaker-docs/">released</a> the new WaveMaker Docs site on the 14 November 2019. We migrated from WordPress to <a href="https://docusaurus.io/" target="_blank" rel="noopener noreferrer">Docusaurus</a> with easy-to-edit markdown files. This change has also increased the contributions from our team members. </p><p>Since the release, we continued to make changes and improvements to the site very frequently, and now we have fully adapted to the new <a href="https://guides.github.com/introduction/flow/" target="_blank" rel="noopener noreferrer">GitHub workflow</a>. </p><p>In the recent additions to the site, we implemented the search, which was one of the most-waited and most-requested features. While WaveMaker documentation is well-indexed by Google; additionally, it has the ability to search within the site, which makes it easy to discover content inside and outside. </p><p><a target="_blank" href="/learn/assets/files/search-here-966c96243e2c1af63199120af9c9d585.png"><img loading="lazy" alt="Screenshot" src="/learn/assets/images/search-here-966c96243e2c1af63199120af9c9d585.png" width="1890" height="588" class="img_ev3q"></a></p><h2 class="anchor anchorWithStickyNavbar_LWe7" id="what-we-used">What we used<a href="#what-we-used" class="hash-link" aria-label="Direct link to What we used" title="Direct link to What we used">​</a></h2><p>Implementing an entirely new documentation site was a different story while integrating the search was another (<a href="https://github.com/wavemaker/docs/pull/95" target="_blank" rel="noopener noreferrer">read more</a>). We went with <a href="https://www.algolia.com/" target="_blank" rel="noopener noreferrer">algolia</a> community project called 'DocSearch' which offers fast, accurate and robust search results.</p><p>Algolia DocSearch is a popular hosted search and many open-source communities use it, including React, Vue, Bootstrap, Netlify, Paypal, and more. It shows real-time results instantly as you type. We are happy with how it offered the flexibility to make our own customizations.</p><h3 class="anchor anchorWithStickyNavbar_LWe7" id="with-docsearch">With DocSearch<a href="#with-docsearch" class="hash-link" aria-label="Direct link to With DocSearch" title="Direct link to With DocSearch">​</a></h3><ul><li>Algolia crawls documentation every 24 hours and creates a search index in its server. </li><li>It automatically tracks internal links to make sure that the content does not miss away.</li><li>It uses the semantics of the HTML structure to construct records.</li></ul><h2 class="anchor anchorWithStickyNavbar_LWe7" id="the-journey-of-the-search-implementation">The journey of the Search Implementation<a href="#the-journey-of-the-search-implementation" class="hash-link" aria-label="Direct link to The journey of the Search Implementation" title="Direct link to The journey of the Search Implementation">​</a></h2><p>We admit that the journey behind this implementation was quite interesting, in a good way of course. The integration with algolia DocSearch as a ready-to-use service was fairly smooth. Though, there were few challenges from Docusaurus for placing the search into the setup it offered. </p><p>Let's first see how it looked before and what we did to make the search look neat and responsive across all devices.</p><h3 class="anchor anchorWithStickyNavbar_LWe7" id="search-before">Search before<a href="#search-before" class="hash-link" aria-label="Direct link to Search before" title="Direct link to Search before">​</a></h3><p>It did the job. But was it enough? Docusaurus does not allow modifying the header. The default search was overlapping the navigation menu in smaller screens. This hampered the user experience of mobile users. See the "before" screens below.</p><ul><li>In the mobile view, two headers were occupying more space and menu items were accessible only by scrolling horizontal ways. </li></ul><p><a target="_blank" href="/learn/assets/files/search-plain-d8ed8ee2193dd4054bc39e1f3bdea5ea.png"><img loading="lazy" alt="screenshot" src="/learn/assets/images/search-plain-d8ed8ee2193dd4054bc39e1f3bdea5ea.png" width="405" height="567" class="img_ev3q"></a></p><p><a target="_blank" href="/learn/assets/files/search-stage-two-85de99026738cecf2054ca3612111ccc.png"><img loading="lazy" alt="screenshot" src="/learn/assets/images/search-stage-two-85de99026738cecf2054ca3612111ccc.png" width="416" height="516" class="img_ev3q"></a></p><ul><li>Default colors applied automatically, but content got over-crowded. </li></ul><p><a target="_blank" href="/learn/assets/files/before-search-daf85a14f097e90b00b2bc76d08c640d.png"><img loading="lazy" alt="screenshot" src="/learn/assets/images/before-search-daf85a14f097e90b00b2bc76d08c640d.png" width="781" height="411" class="img_ev3q"></a></p><h3 class="anchor anchorWithStickyNavbar_LWe7" id="what-we-did">What we did<a href="#what-we-did" class="hash-link" aria-label="Direct link to What we did" title="Direct link to What we did">​</a></h3><p>Docs are the key source to find solutions instantly with hundreds of documents to filter from. Algolia took care of the technicality, and we took care of the rest. We consulted our UX team and developer to customize the search to match our theme and display results to access docs with ease and responsiveness.</p><p>We developed a custom script that injects dynamic HTML into the website. This means, whenever the documentation page loads, it builds a dropdown menu with options while injecting it into the header in the hidden mode. It also adds event listeners to show and hide menu items. This dropdown works in the mobile view only. We hide the horizontal menu, whilst we expand the search area for better visibility as shown in the screen below. </p><h3 class="anchor anchorWithStickyNavbar_LWe7" id="ta-da">ta-da!<a href="#ta-da" class="hash-link" aria-label="Direct link to ta-da!" title="Direct link to ta-da!">​</a></h3><p><a target="_blank" href="/learn/assets/files/mobile-view-search-f4c35ee4f84a18acfa73048ee42b86be.png"><img loading="lazy" src="/learn/assets/images/mobile-view-search-f4c35ee4f84a18acfa73048ee42b86be.png" width="447" height="480" class="img_ev3q"></a></p><p>When you access WaveMaker Docs in the mobile view, simply click the "Docs" option. It opens the menu vertically without interrupting the user experience. The dropdown menu can be closed by clicking anywhere on the page.</p><p><a target="_blank" href="/learn/assets/files/dropdown-mobile-view-9d435cd8f2b5d7786ff3c12fa06fd062.png"><img loading="lazy" src="/learn/assets/images/dropdown-mobile-view-9d435cd8f2b5d7786ff3c12fa06fd062.png" width="450" height="465" class="img_ev3q"></a></p><h3 class="anchor anchorWithStickyNavbar_LWe7" id="what-more">What more?<a href="#what-more" class="hash-link" aria-label="Direct link to What more?" title="Direct link to What more?">​</a></h3><p>We improvised the web view, too! </p><p><a target="_blank" href="/learn/assets/files/new-search-wavemaker-a7a56fa99fd22146b1701558be3ff0f1.png"><img loading="lazy" src="/learn/assets/images/new-search-wavemaker-a7a56fa99fd22146b1701558be3ff0f1.png" width="1078" height="700" class="img_ev3q"></a></p><p>Try it for yourself to see how fast and accurately it works.</p><p>If you are interested to learn more about how we implemented this, see the pull request <a href="https://github.com/wavemaker/docs/pull/95" target="_blank" rel="noopener noreferrer">details</a>.</p><p>We are constantly working on improving the documentation to make it better every day. If you notice something broken, please report to us by logging an <a href="https://github.com/wavemaker/docs/issues" target="_blank" rel="noopener noreferrer">issue here</a>.</p>]]></content>
        <author>
            <name>Swetha Kundaram</name>
        </author>
    </entry>
    <entry>
        <title type="html"><![CDATA[Welcome to the WaveMaker Developers Blog]]></title>
        <id>https://www.wavemaker.com/learn/blog/2019/11/01/developers-team-blog</id>
        <link href="https://www.wavemaker.com/learn/blog/2019/11/01/developers-team-blog"/>
        <updated>2019-11-01T00:00:00.000Z</updated>
        <summary type="html"><![CDATA[WaveMaker is evolving with new changes and updates to the product frequently. We are trilled to introduce the team blog feed for more specific and detailed technical stuff directly from the developers.]]></summary>
        <content type="html"><![CDATA[<p>WaveMaker is evolving with new changes and updates to the product frequently. We are trilled to introduce the team blog feed for more specific and detailed technical stuff directly from the developers. </p><p>Stay up-to-date about the product and know what's happening inside our WaveMaker towers. Our team will keep you posted.</p><p>Stay tuned!</p>]]></content>
        <author>
            <name>Swetha Kundaram</name>
        </author>
    </entry>
</feed>